The Basic Rendering Settings
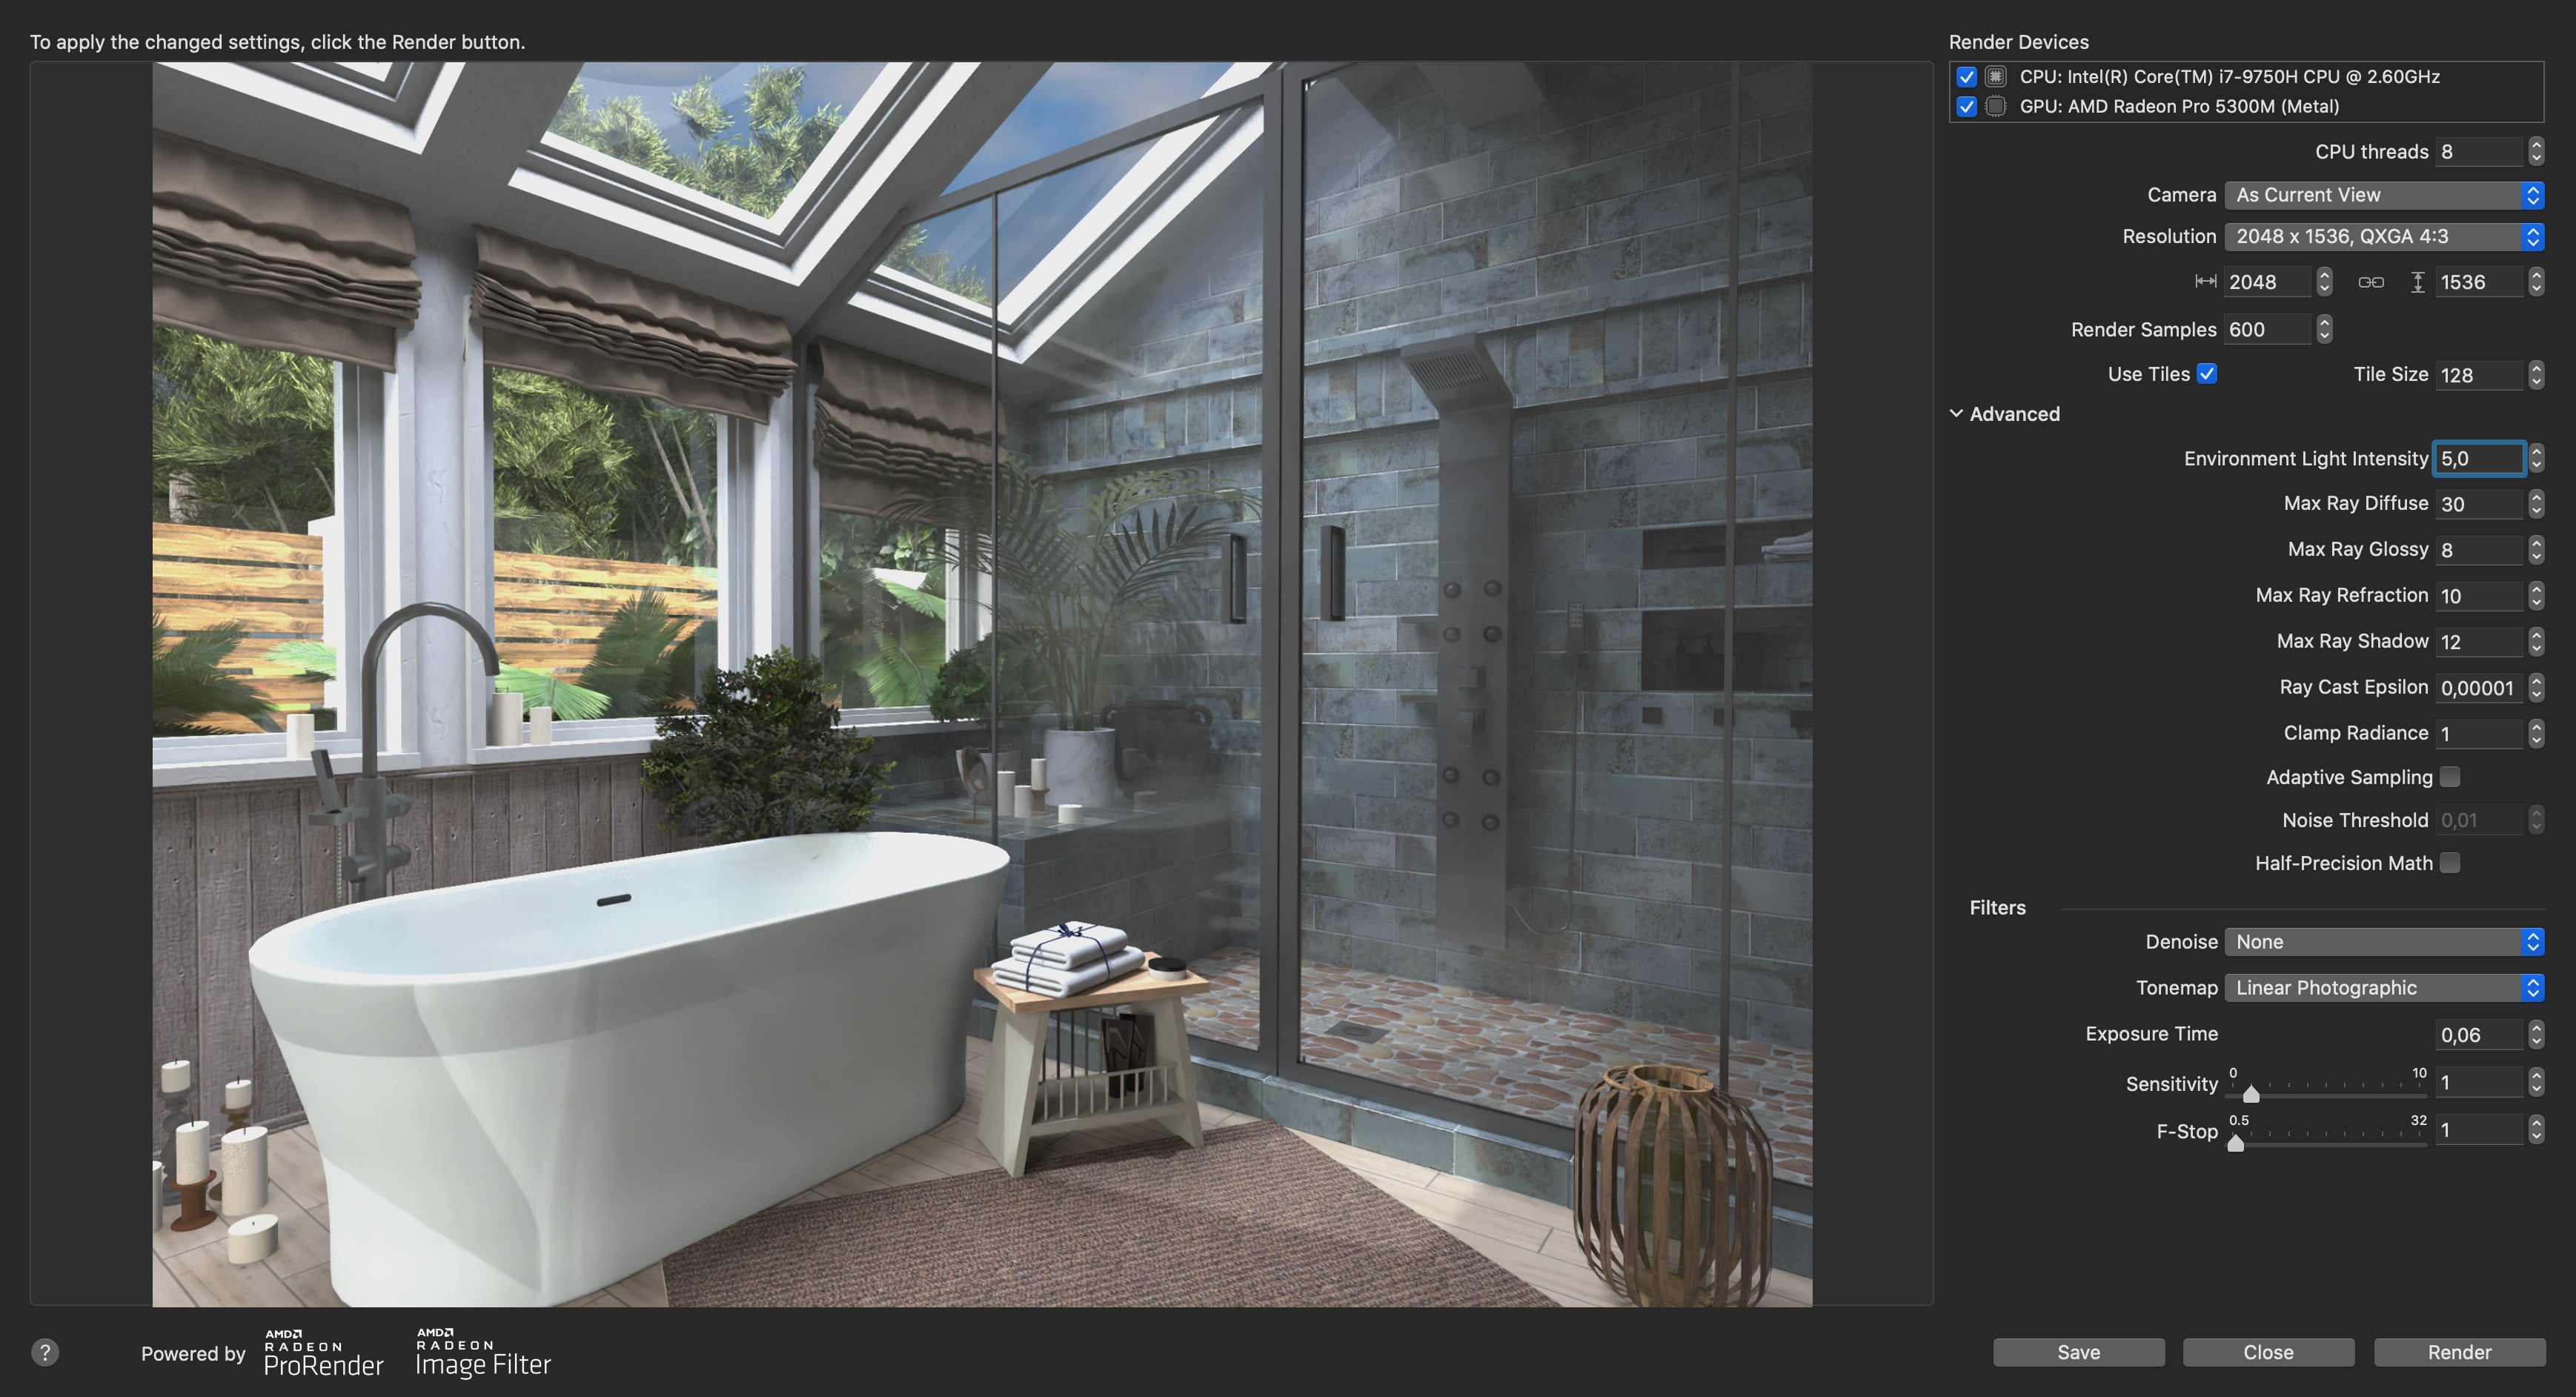
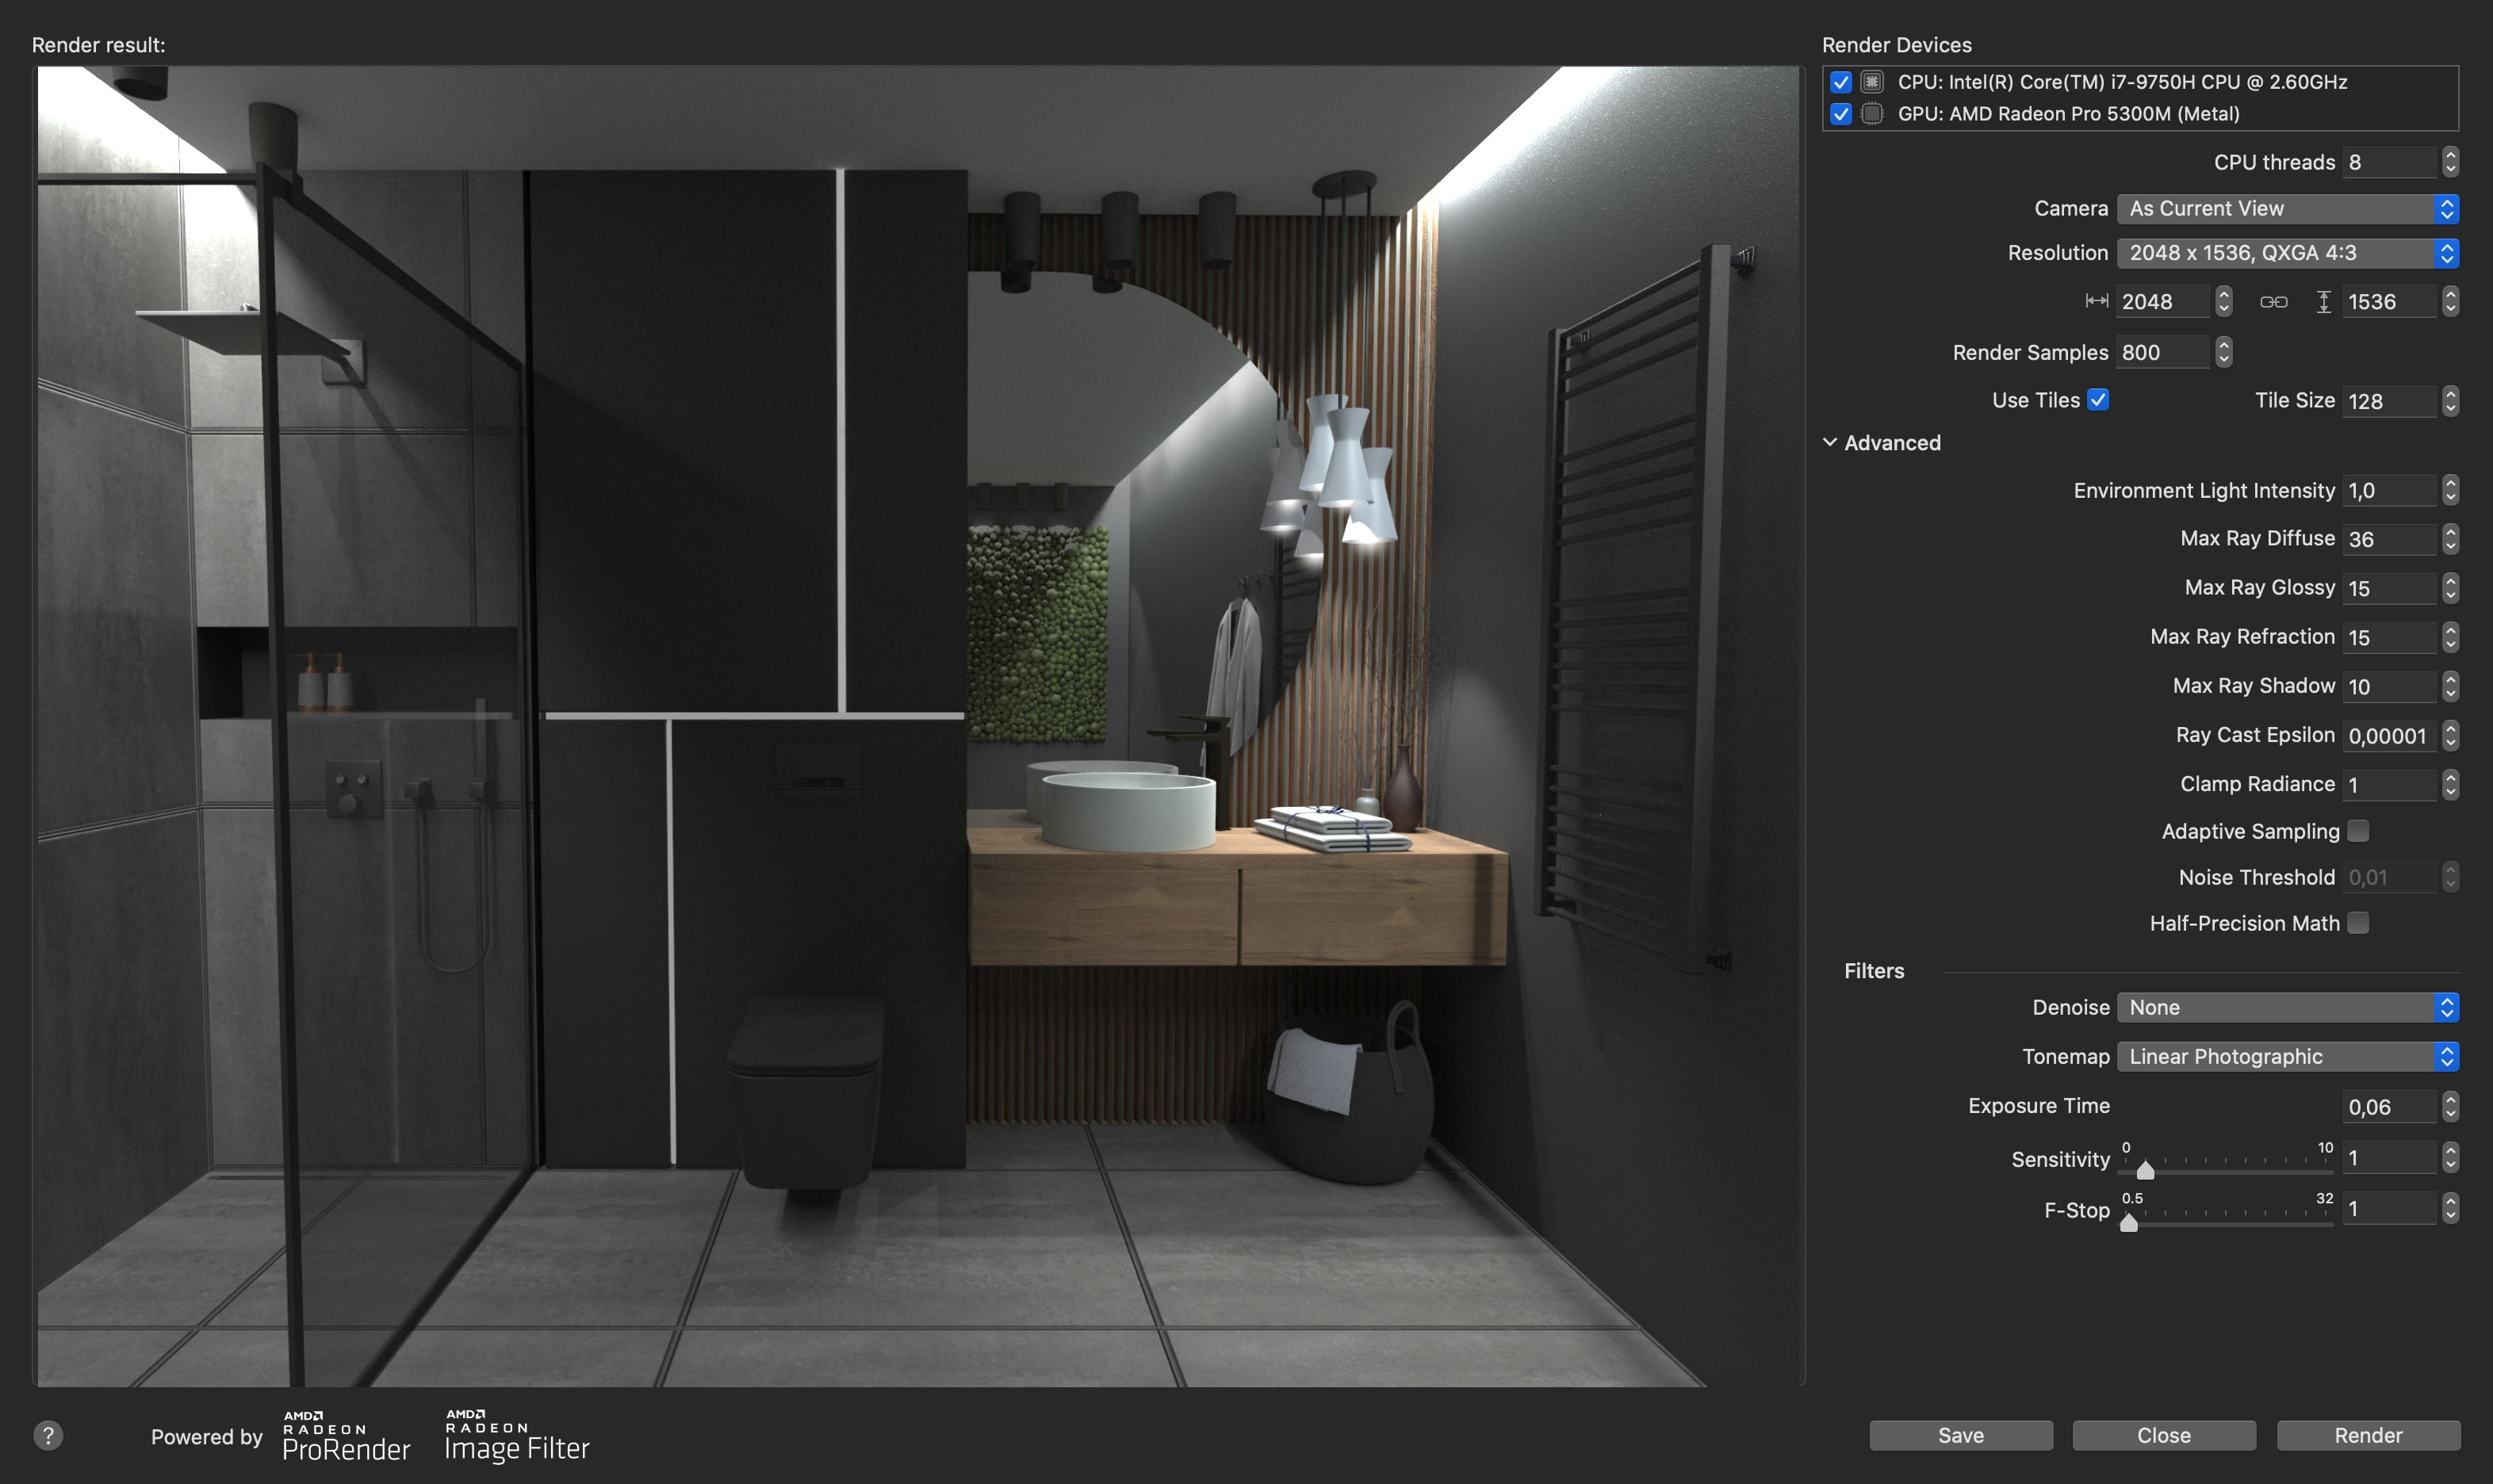
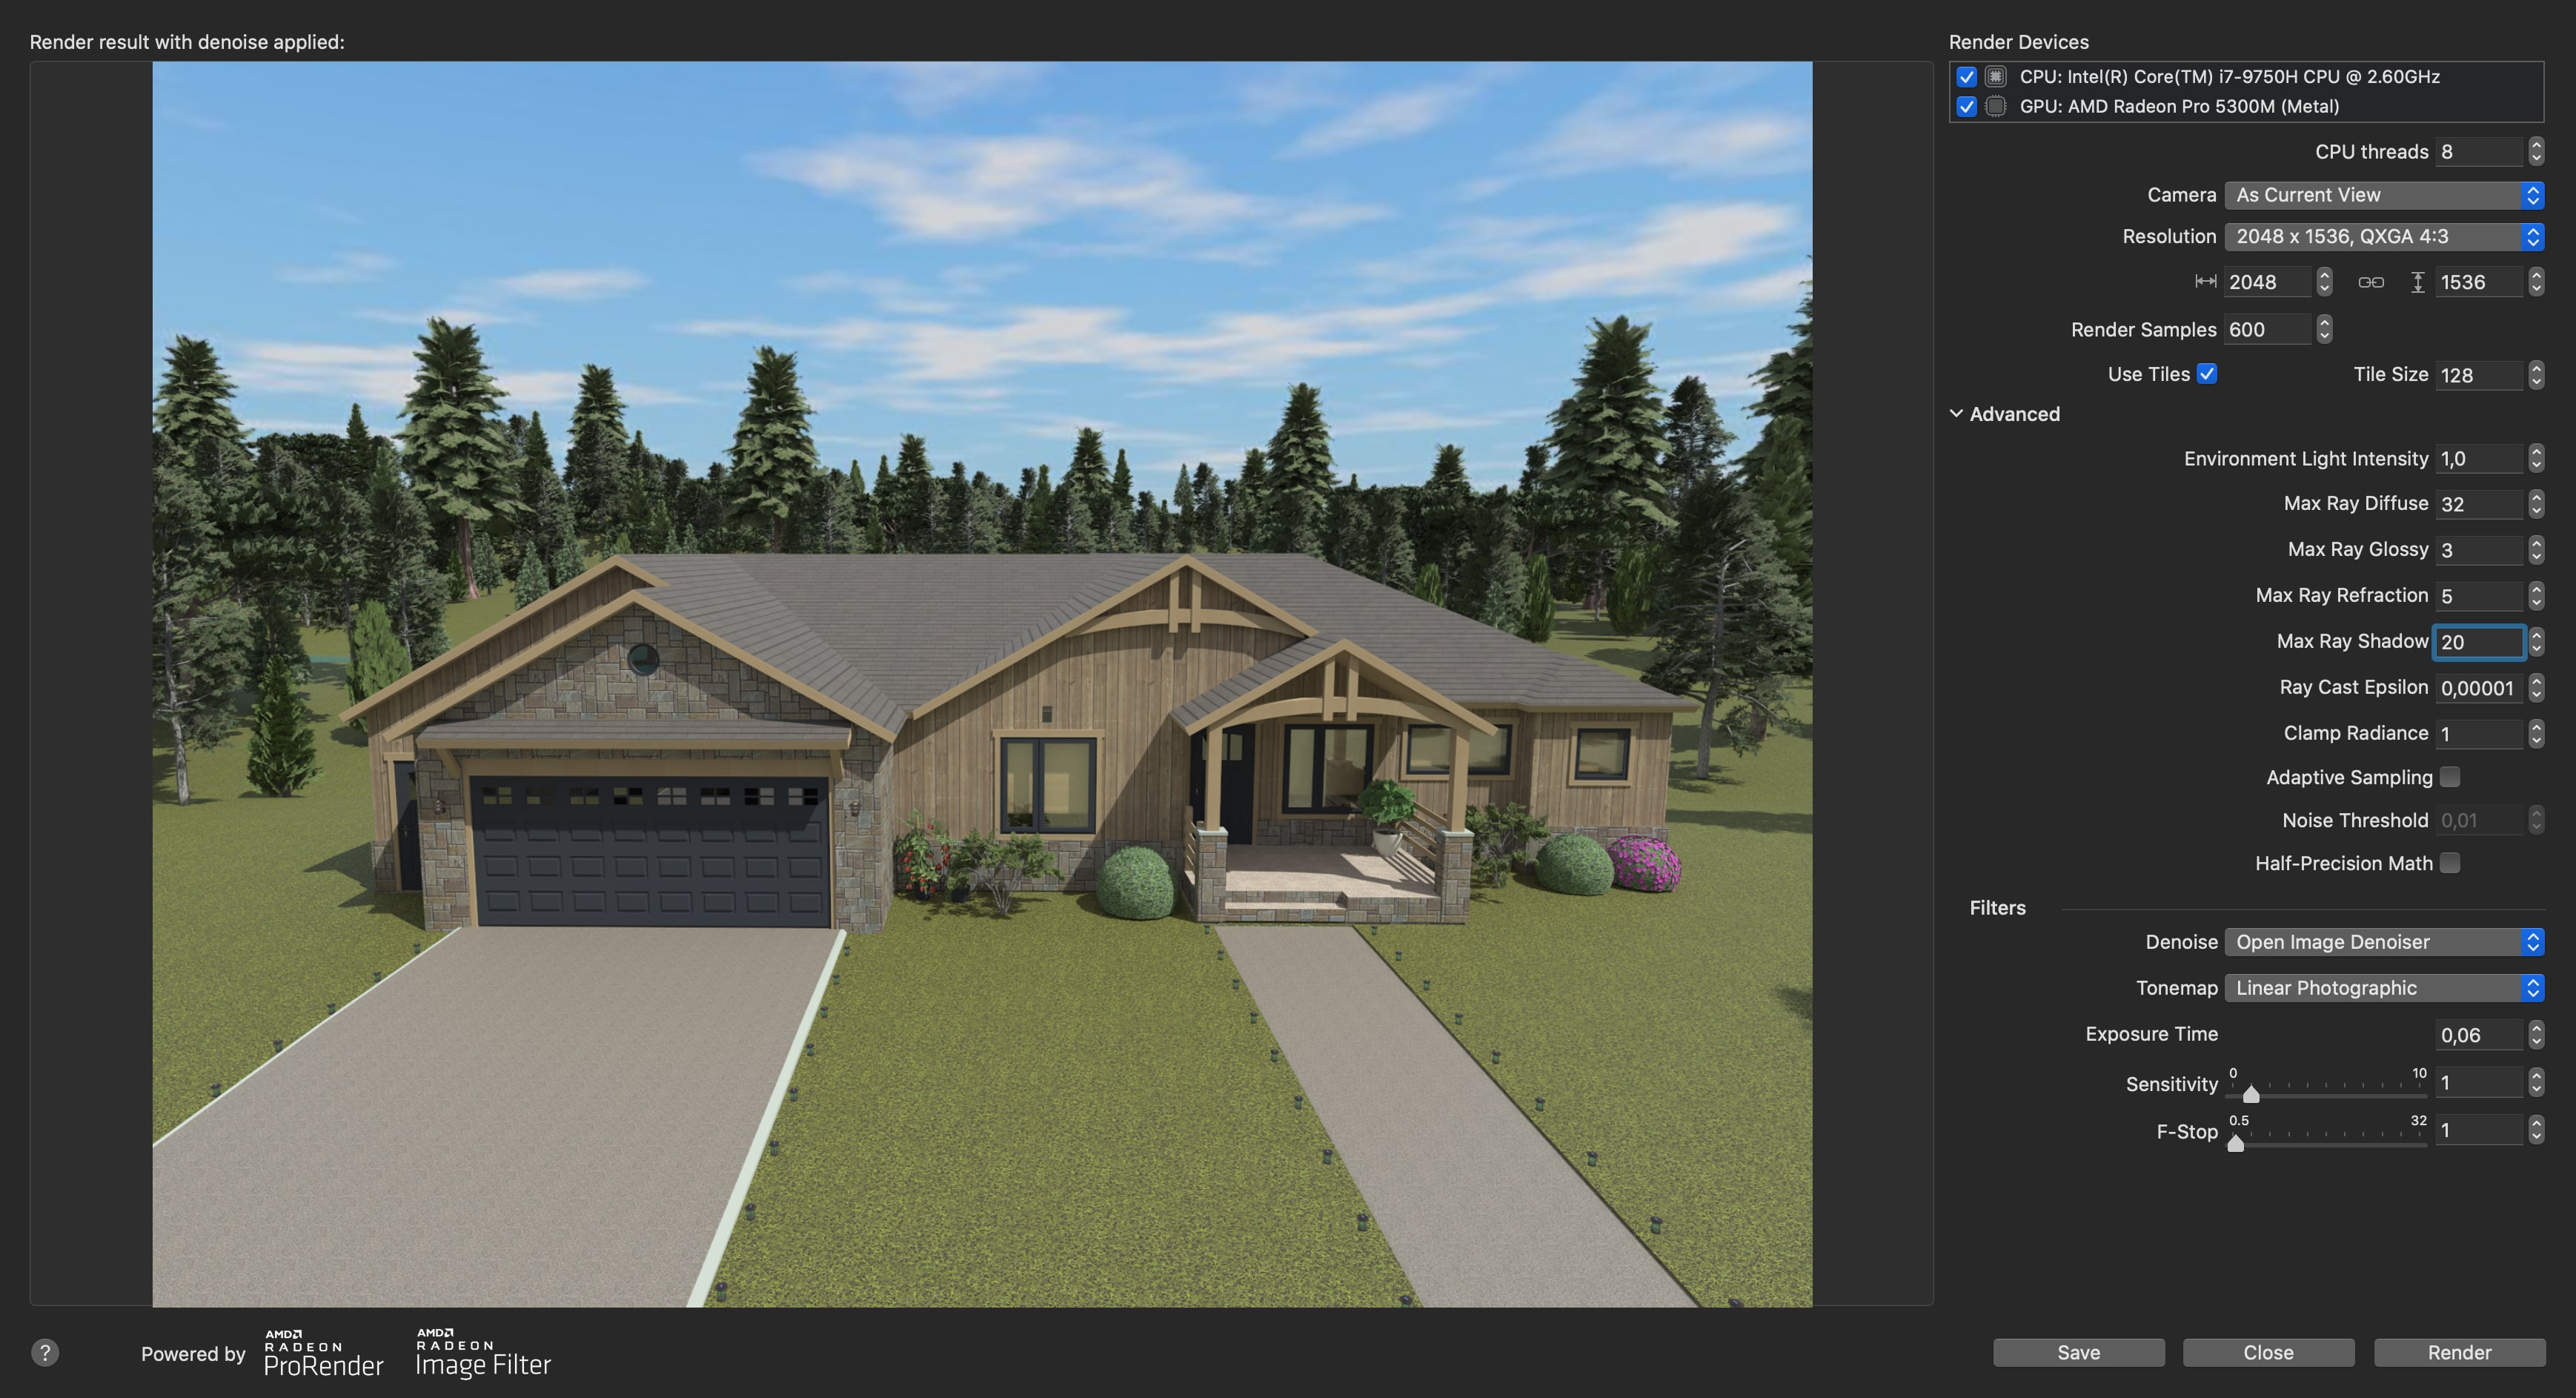
To start using the rendering engine, select File > Export > Render with Radeon™ ProRender in the main menu. Let’s begin breaking down the settings available in the opened window.
Note that most of the default rendering settings do not require changing, unless you need to change them to render a complex scene or because you are trying to achieve a particular result (for example, highly-detailed renderings). Below you will find an explanation of all the settings and their purposes, and at the end of the article we offer several setting options you can use for different cases.
Render Devices and CPU Threads
The first category that you encounter in the opened window is Render Devices, which lists the available devices for rendering, i.e. CPU or GPU. It is worth noting that it is normal to find only one available device for rendering in this list, as it will be the case for most users.
The CPU Threads parameter deals with the number of processing threads on the central processor (CPU) that will be involved in the rendering. It defines the number of the processor cores that are going to be used for handling the tasks of the rendering engine, when GPU is untapped or when CPU is used along with GPU for the sake of speeding up the process.
The maximum number of threads is defined by the model and characteristics of your CPU, the total number of the processor cores and threads, the level of complexity and size of the project that you are rendering. Increasing the number of threads can speed up the process of rendering with the CPU, but it can also affect the performance and stability of the system and the use of resources.
If you own a processor with numerous cores and threads, you can experiment with this parameter to find the best value for your system and your project. Keep in mind that, in most cases, you will only achieve the maximum speedup of the rendering process by using the graphics accelerator (GPU), since it is designed specifically for handling complex graphics calculations.
Camera
The Camera drop-down list contains all cameras available in the current project. Here you can choose the camera with the view that you want to render.
Resolution
Resolution controls allow you to either choose one of the predefined dimensions of the image or to set the image width and height manually. The resolution defines the number of pixels in the image distributed horizontally and vertically. It functions as two numbers, for instance, 1920 × 1080, where 1920 is the width (the horizontal resolution) and 1080 is the height (the vertical resolution). The higher the resolution, the more detailed the rendered image will be. However, rendering an image with higher resolution also requires more time and resources.
This parameter is important while setting up the rendering engine, because it impacts the quality of the rendered image and its usage. You should choose the resolution that best suits your needs, taking into account the limitation of resources. A higher resolution can be useful for printing and for large screens, while a lower resolution is suitable for publishing online and viewing on smaller screens.
Render Samples and Tiles
The Render Samples setting is the major factor defining the quality of the rendered image. To render an image, AMD Radeon™ ProRender creates a certain number of ray samples for each pixel. As new sample values for a pixel are added, the sampling results are averaged in order to calculate the color of the pixel.
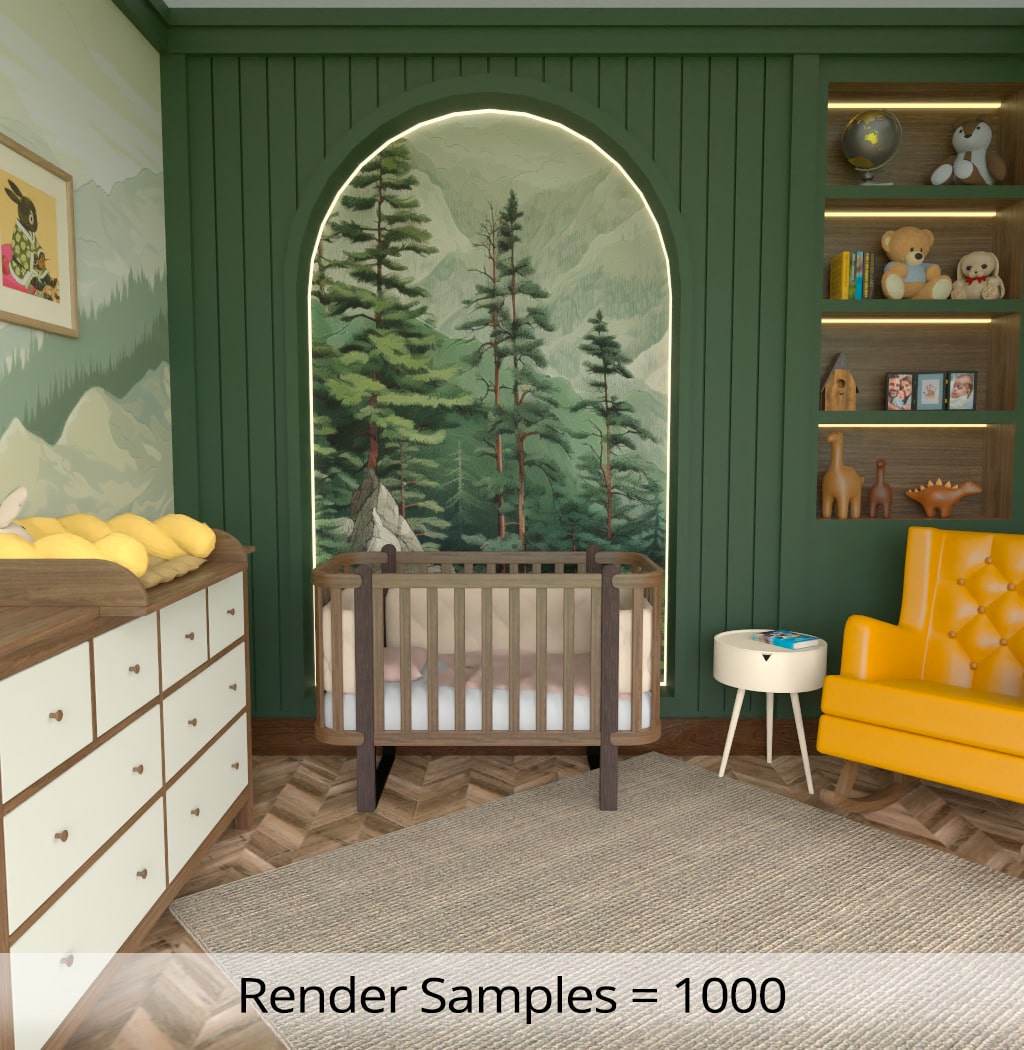
The image is rendered gradually: as new samples are received, the quality of the image gets better, and the amount of noise decreases. The larger number of samples for a pixel is what provides the best results, but it requires more time for calculation of the colors. By default, AMD Radeon™ ProRender processes all pixels in the image for calculating the samples. When displaying the image, it looks grainy and noisy at first, but it gradually improves, as the rendering engine performs the computations and calculates the additional samples. This approach requires more memory and CPU resources, but it allows you to pre-watch the whole image as soon as possible and stop the rendering process in case you need to make adjustments. We also don’t recommend exceeding the value of 1000 for Render Samples.


Instead of rendering the whole image, you can choose to Use Tiles. The tile rendering allows you to create images with higher resolution without using a lot of memory and CPU resources. To activate the tile rendering, tick the Use Tiles option in the window. As the name suggests, with the help of the Tile Size parameter, you can set up the sizes of tiles. Note that you don’t have to resort to tile rendering if you need an image with medium or smaller dimensions.
Another way of decreasing the amount of noise in the image is using Denoiser. If you don’t have time or the technical capabilities to render images with a large number of samples, you can use one of the available denoisers (see the Filters section in the window) to smooth out the noise in the image. Note that using Denoiser with high settings (Samples ≥ 800, Use Tiles) is not recommended, as it can produce an unintended blur effect.
The Advanced Rendering Settings
This section of rendering settings includes such parameters as Environment Light Intensity, Max Ray Diffuse, Max Ray Glossy, Max Ray Refraction, Ray Cast Epsilon, Clamp Radiance, Adaptive Sampling, Noise Threshold and Half-Precision Math.
Environment Light Intensity
The Environment Light Intensity parameter allows you to set the brightness of sunlight and moonlight. Increasing this parameter (to 5, for instance) can help you render the indoor scenes, where daylight is intended to be the main light source. Otherwise, you need to set the brightness of the lamps and other light sources in your project. If the outdoor scene is too bright, restore the default value of this parameter, which is 1.
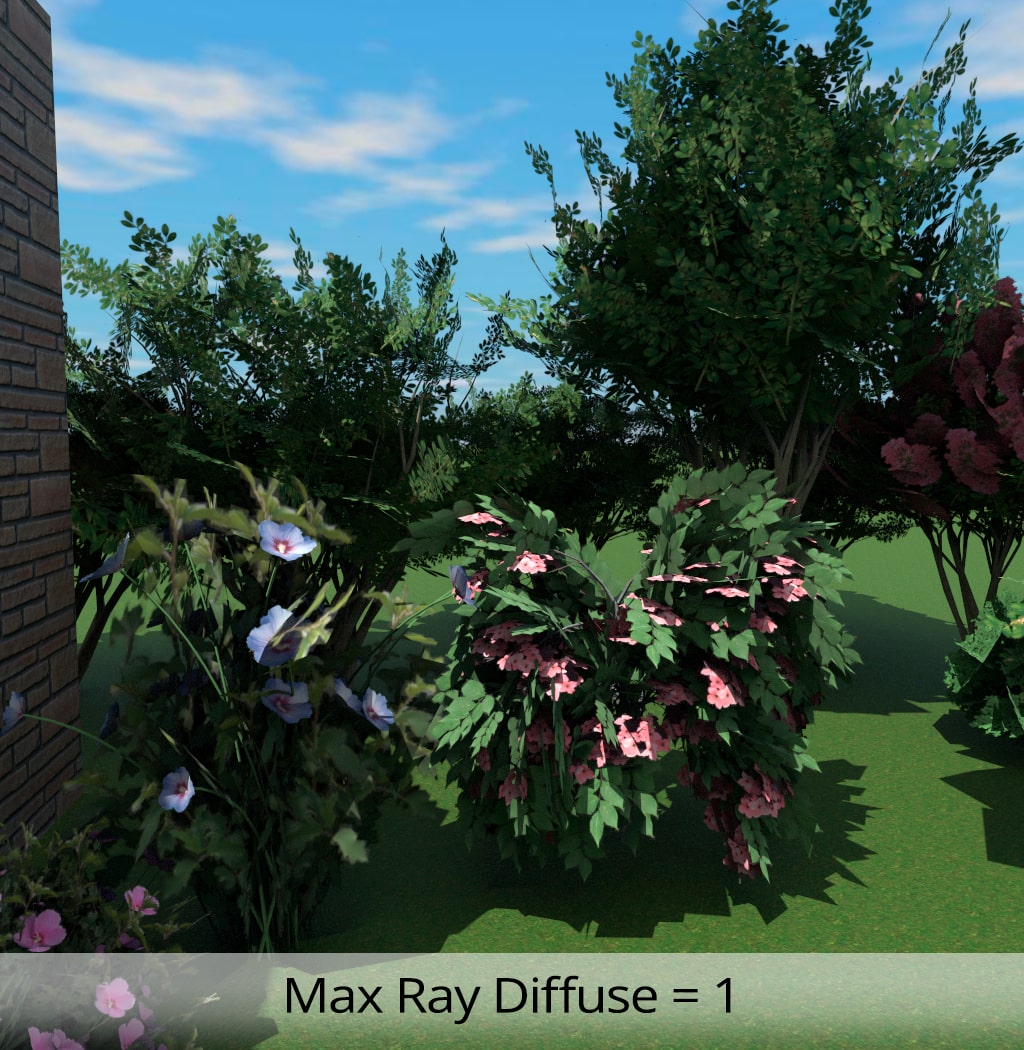
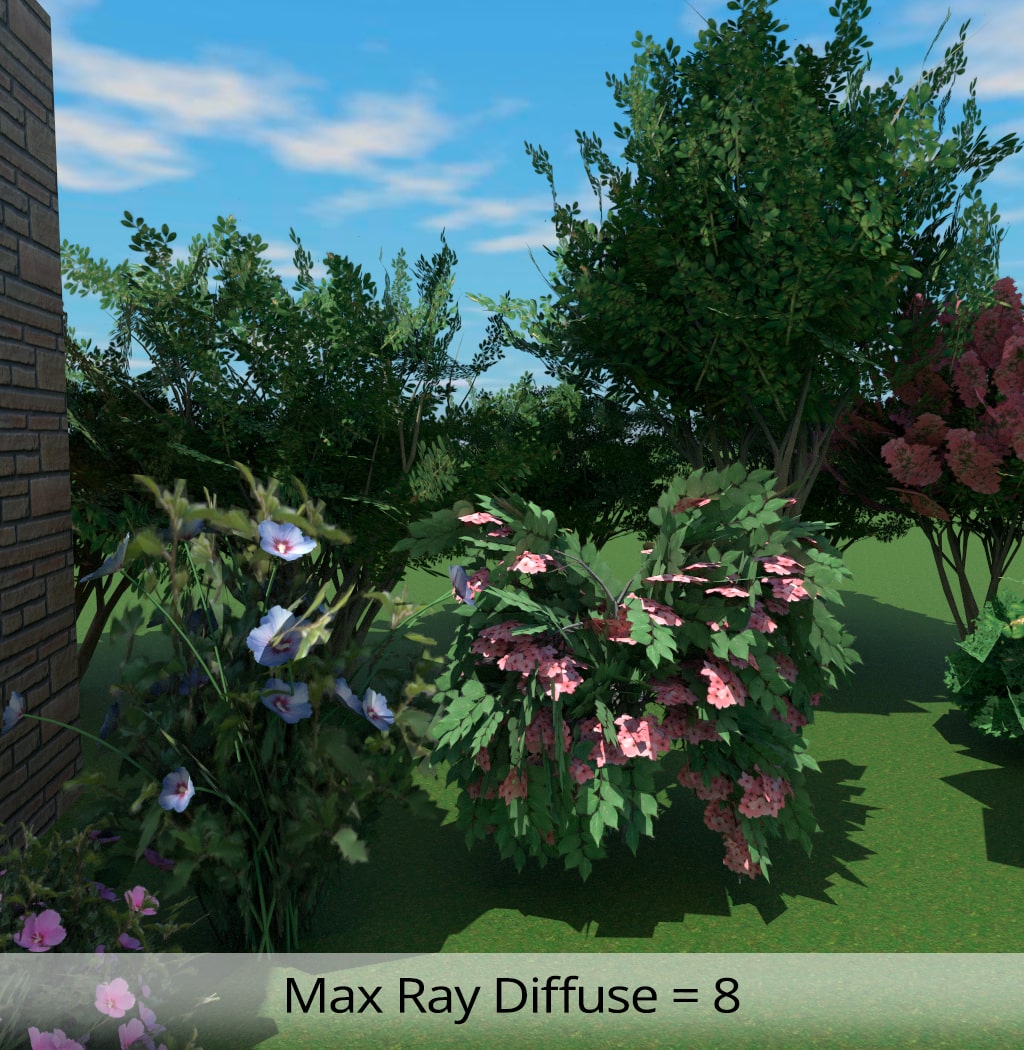
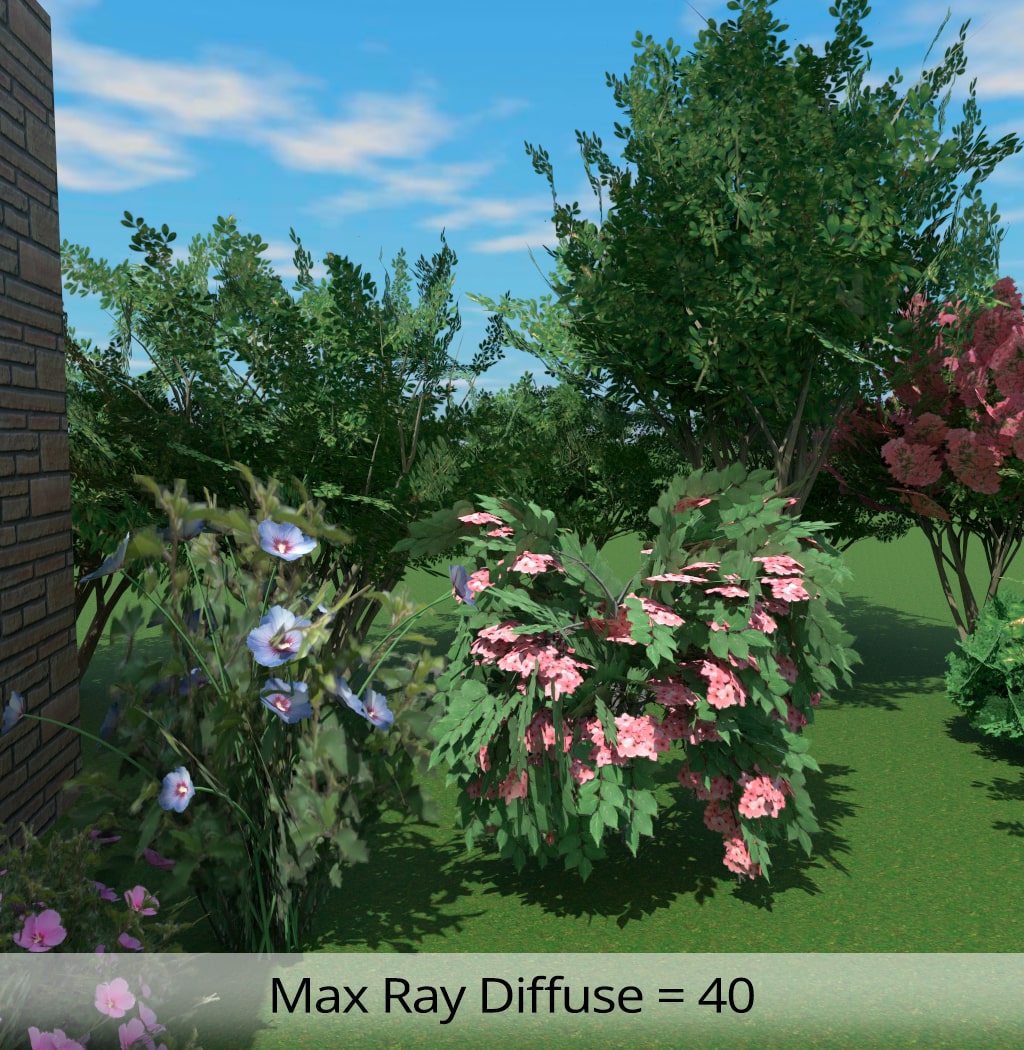
Max Ray Diffuse
Max Ray Diffuse controls the maximum number of reflections (scatterings) of rays when using the ray-tracing rendering method. In this method, the rays of light come out of light sources and “travel” through the scene, reflecting and refracting on different surfaces in order to create a realistic image. Each reflection creates new rays that keep traveling through the scene. The process continues up until the rays reach the maximum number of reflections or until the recursion depth limit, defined by the Max Ray Diffuse parameter, is reached.
Setting the higher value of this parameter will create a greater number of reflections of the rays, allowing you to achieve reflections and lighting that look more realistic. The value that needs to be set for Max Ray Diffuse depends on the rendered scene: if the scene contains lots of plants, for example, we recommend setting the value of this parameter starting from 28 and up. If roughness on surfaces is present in the scene, you can set the value starting from 32.
If you set the higher value of Max Ray Diffuse along with high values of other settings and achieve a grainy, noisy image as a result, we recommend adding more lighting to the scene. Also, the higher value of Max Ray Diffuse can also greatly increase the time of the rendering process, especially when dealing with more complex scenes. Thus, when choosing the right value for the Max Ray Diffuse parameter, it's better to seek compromise between the quality of rendering and the time spent to render a scene.
The value that needs to be set for Max Ray Diffuse depends on the rendered scene and project requirements. In some cases you will need a large number of diffuse reflections to achieve the necessary visual effect. Below we listed some cases when working with this parameter can help you find the optimal value for the rendered scene:
- The rendered scene contains various objects with different materials. Some materials possess the diffuse properties, which means that they scatter light in different directions.
- You want to control the quality of the rendering and the number of diffuse reflections to optimize time of rendering and computing resources.
- You want to determine the depth of diffuse reflections. Setting a certain value for the Max Ray Diffuse parameter (for instance, choosing the value of 2) is going to limit the number of reflections caused by the diffuse reflection. This means that the light hitting the surface can scatter only twice before it gets absorbed or before it leaves the rendered scene.
Max Ray Glossy
The Max Ray Glossy parameter is using the maximum number of reflections of rays with the glossy (shiny) surface in the ray-tracing rendering method. The glossy surfaces are the ones that have shiny properties, i.e. glass, metal or a smooth paint. When a ray of light reaches such a surface, it doesn’t exactly reflect in one direction. Instead, it scatters to some degree, creating a shiny or reflective effect.
This parameter defines how many times the rays can reflect off of the glossy surfaces. For instance, if the value is set at 2, it means that the ray of light can reflect off of the glossy surfaces up to two times, creating double or multiple reflections as in a mirror. Increasing the value of this parameter can make the gloss and reflections appear more detailed, which in turn makes the materials look more realistic. Keep in mind that, just like the previous two ray-tracing settings, increasing the value of Max Ray Glossy can significantly increase the time of the rendering, especially for complex scenes with a great number of glossy surfaces. That is why, once again, you might want to consider finding a compromise between the quality of rendering and the time consumed to render the scene. The default value of this parameter is 5, which is the value we normally recommend.
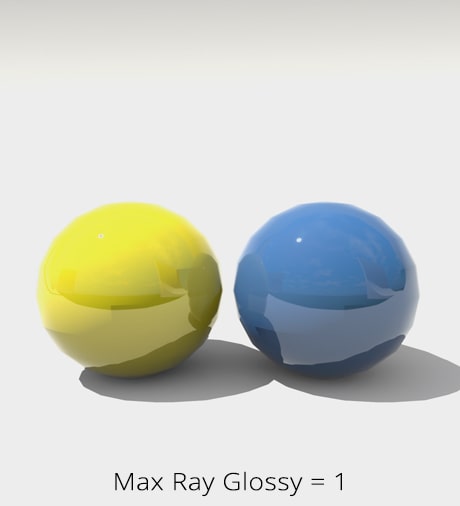
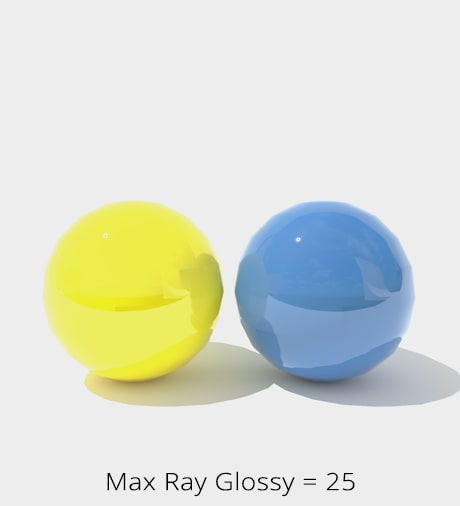
Pay attention to this parameter if the rendered scene contains metal objects, such as metal furniture or household appliances. A specular reflection is a characteristic property of metal. Setting a certain value of the Max Ray Glossy parameter (for example, the value of 3) will limit the number of reflections caused by the specular reflection. It means that the light reflected off the metal surface can reflect three times maximum before the effect stops.
This parameter also affects the level of realism you will achieve in the mirror reflections and reflections in glossy objects that are present in the rendered scene. By limiting the depth of reflections you can control how far the reflections can reach and how they affect the surrounding objects.
Max Ray Refraction
Max Ray Refraction (i.e., the maximum number of refraction rays) controls the maximum number of the refracted rays when using the ray-tracing rendering method. Refraction occurs when a ray of light passes from one environment to another with different refractive indexes (the refractive index determines how much the light is bent while passing from one environment to another). Glass, water, ice and other transparent materials can serve as examples of refraction.
This parameter determines how many times a ray of light can be refracted when it passes through different transparent materials in the scene. For example, if the value of Max Ray Refraction is set to 2, it means that the ray of light can refract up to two times while it passes through the transparent objects, creating an effect of lens or distortion.
Increasing this parameter can make the rendered scene more realistic, especially if the complex transparent objects are present in it. But, similarly to other ray-tracing settings, increasing this parameter inevitably leads to additional calculation resources. In order to choose the optimal value of Max Ray Refraction, you need to consider the project’s requirements and the level of detail that you want to achieve in rendering transparent objects. You can use the default value of Max Ray Refraction, which is 5. Experiment with this parameter and evaluate its influence on the quality of the rendered image and the time spent on rendering to find the perfect balance.
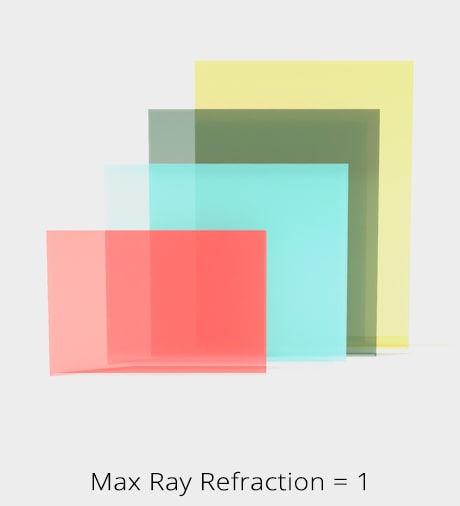
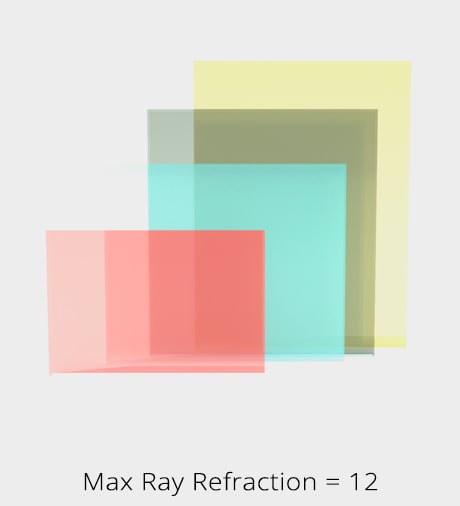
This parameter can control how far the refracted light can reach and affect the surrounding objects. It also creates various lighting effects in the transparent materials.
Max Ray Shadow
The Max Ray Shadow parameter determines the maximum number of rays that are used for the shadows calculation in the ray-tracing rendering method.
The shadows are created by tracing the rays from the light source to the surface of objects. A certain point is in the shadow when a ray of light can’t reach said point on the surface because of an obstacle. For more realistic results, specifically for the softer shadows or the shadows from transparent objects, several rays are required to define the intensity and the shapes of the shadows.
You can increase this parameter if there are many objects in the scene that overlap and cast shadows on top of one another (for example, a glass casting shadows on a tree and both of these objects casting shadows on water). Increasing the value of Max Ray Shadow leads to achieving shadows that look softer and more realistic, particularly in complex scenes with different light sources and obstacles.

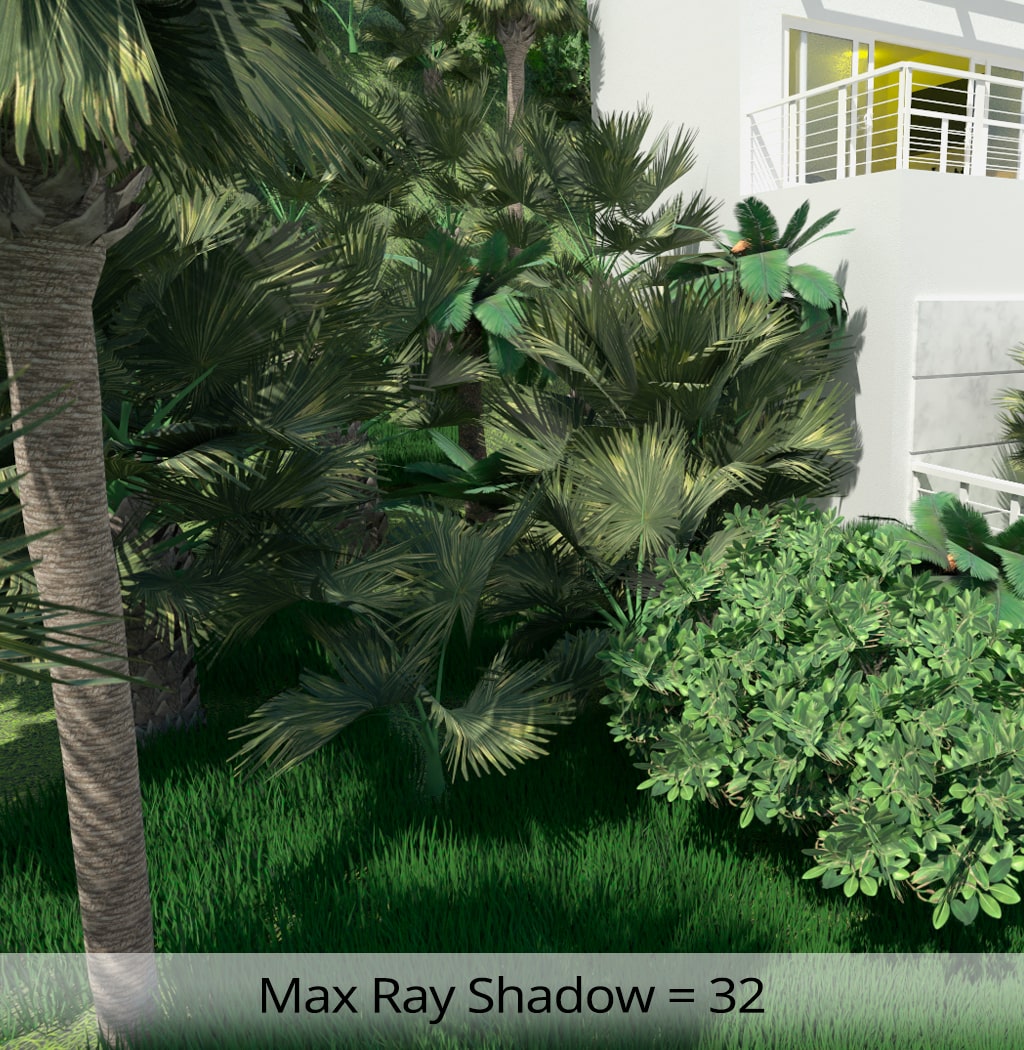
The Max Ray Shadow parameter provides balance between the quality and time of rendering. A larger number of rays can enhance the quality of the shadows, but can increase the time of rendering. In complex rendering scenes that contain a large number of light sources, working with this parameter can be crucial for optimizing the rendering performance and achieving the desired visual results.
Max Ray Shadow mainly affects the rendering of the shadows and not the processing of the alpha channel in the textures. However, in some cases, depending on how the program or the rendering engine processes the textures with the alpha channel and considering how the materials are set, the different interconnected effects can occur (see below).
Potential effects relating to shadows from the transparent objects:
- If you have objects with textures containing the alpha channel (transparency) in your project and these objects create shadows, the Max Ray Shadow parameter can affect the sharpness or softness of these shadows.
- A large number of rays can enhance the quality of the shadows of transparent objects, especially if the alpha channels in the texture possess the smooth gradations of transparency.
Potential effects associated with the soft shadows that have the alpha channel:
- If the objects in your project create soft shadows and they have the alpha channel for masking the texture, the number of rays that are used for calculating the shadows can affect the degree of softness of the shadows from these objects.
Potential impact on productivity:
- Objects with the alpha channel can require additional calculating resources when being rendered. Working with the Max Ray Shadow parameter can help optimize the time of rendering, especially if the rendered scene contains a lot of objects with textures that have the alpha channel.
In general, when working with the alpha channels, you have to consider other parameters, like the materials’ settings, lighting and the transparency settings in your rendering engine to achieve the best results.
Max Ray Shadow can also be viewed as a compromise between the quality and performance. It is important to choose the value of this parameter depending on the characteristics of the rendered scene and the quality of the image you want to achieve.
Ray Cast Epsilon
Ray Cast Epsilon (the max epsilon value for rays) controls the maximum epsilon value for determining the intersection of the rays in the ray-tracing rendering method.
Epsilon is a small numerical value used in calculations with a floating point to compensate for rounding errors and achieving accuracy. In rendering, epsilon is used to define when a ray of light passes the surface of an object.
Ray Cast Epsilon determines the maximum epsilon value for the rays that are used in calculations of ray intersection with the surfaces of objects. Increasing the value of this parameter can be useful to avoid issues with the accuracy of the intersection of rays and surfaces, especially in the scenes with the smaller objects or the objects that are close to one another. On the flip side, increasing Ray Cast Epsilon can also cause more false intersections of rays and objects, which leads to unexpected errors in rendering.
We recommend working with this parameter only if you are experiencing issues with the accuracy of intersection of rays and objects in your scene. Otherwise, it is better to use the default settings (value) of Ray Cast Epsilon.
Let’s consider the following example: imagine you have the scene you want to render that contains a few objects placed really close to each other or located in an area with a very complex geometry. In such cases, you may have to deal with the value overwhelming issues that occur when determining whether the ray crosses the surface of an object or not.
If the objects are located closely to each other, floating point issue can lead to intersection of the rays being detected incorrectly. For example, the ray can pass between the objects instead of determining the collision correctly. Increasing the Ray Cast Epsilon parameter can help compensate for all value overwhelming issues. It sets the minimum value under which it is considered that the ray has crossed the surface. It prevents the rounding errors occurring when the rays are very close to the object’s surface.
Keep in mind that setting the value of Ray Cast Epsilon too high can lead to the situation when the rays are considered as crossing the surface, even if they are above it. This means that choosing the right value requires a balance between preventing the value overwhelming issues and the perceived accuracy of geometry. This parameter is often used in the rendered scenes with the high level of detail or in the scenes where the objects are located close to each other and the accuracy of the interaction between the rays and the surface play a critical role.
Clamp Radiance
Clamp Radiance allows you to limit the brightness or intensity of light when rendering. If the scene contains light sources such as lamps or the sun, the intensity of light can be extremely high, particularly in spots where the light directly strikes the surface. This can cause bright light patches and the effect of overexposure, resulting in an unnatural and distorted rendered image.
This parameter controls the maximum intensity of light, preventing overexposure and unwanted bright patches of light. When you set a certain value of Clamp Radiance, the light that exceeds the maximum value of intensity is limited and reduced in order to meet the maximum value.
Restricting the exposure can be useful in achieving more realistic and eye-pleasing images, but setting the value of this parameter too low can cause a loss of detail in the light-to-dark transitions or create excessively dark areas in the rendered image. The appropriate value of Clamp Radiance depends on the properties of the scene and the specific traits of light sources. We recommend starting with a lower value and gradually increasing it until the desired result is achieved. Experiment with this parameter to find the optimal value for your particular project and scene.

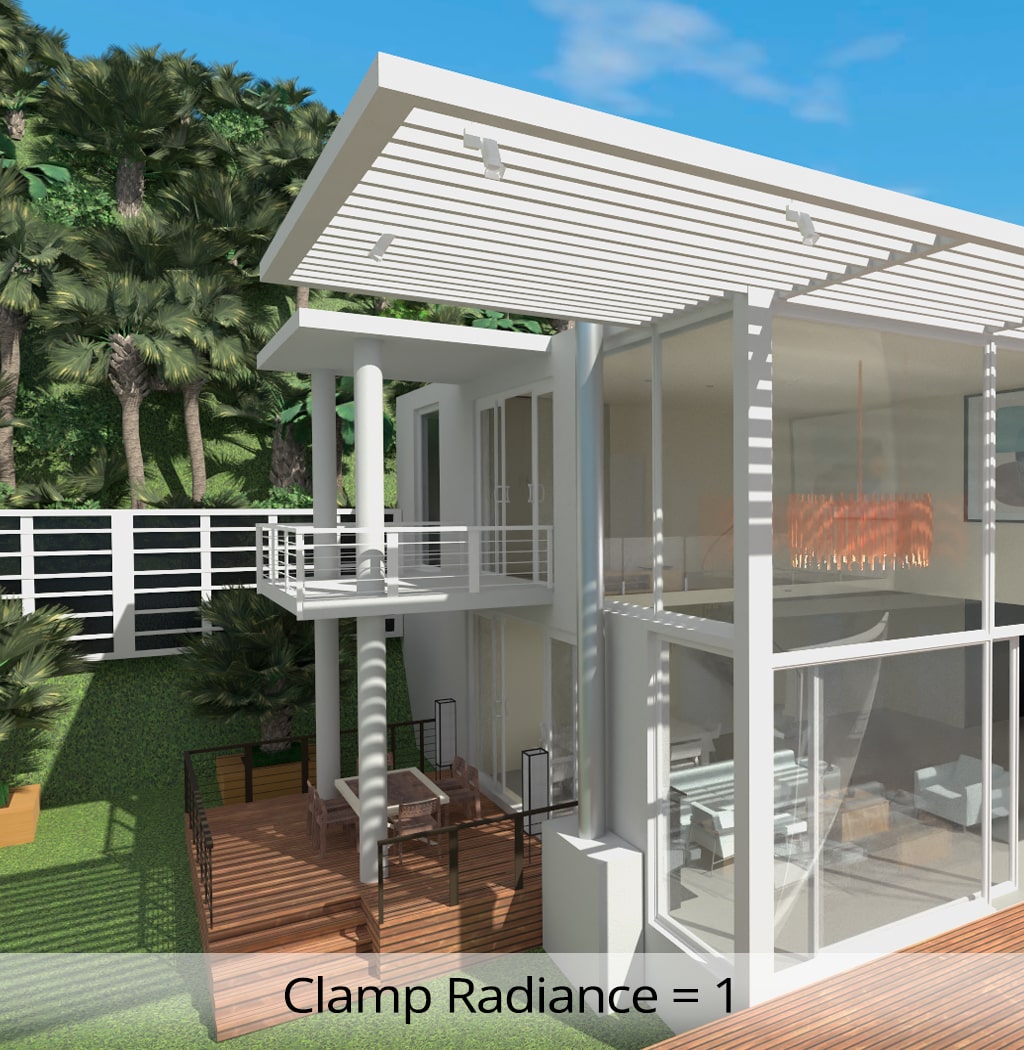
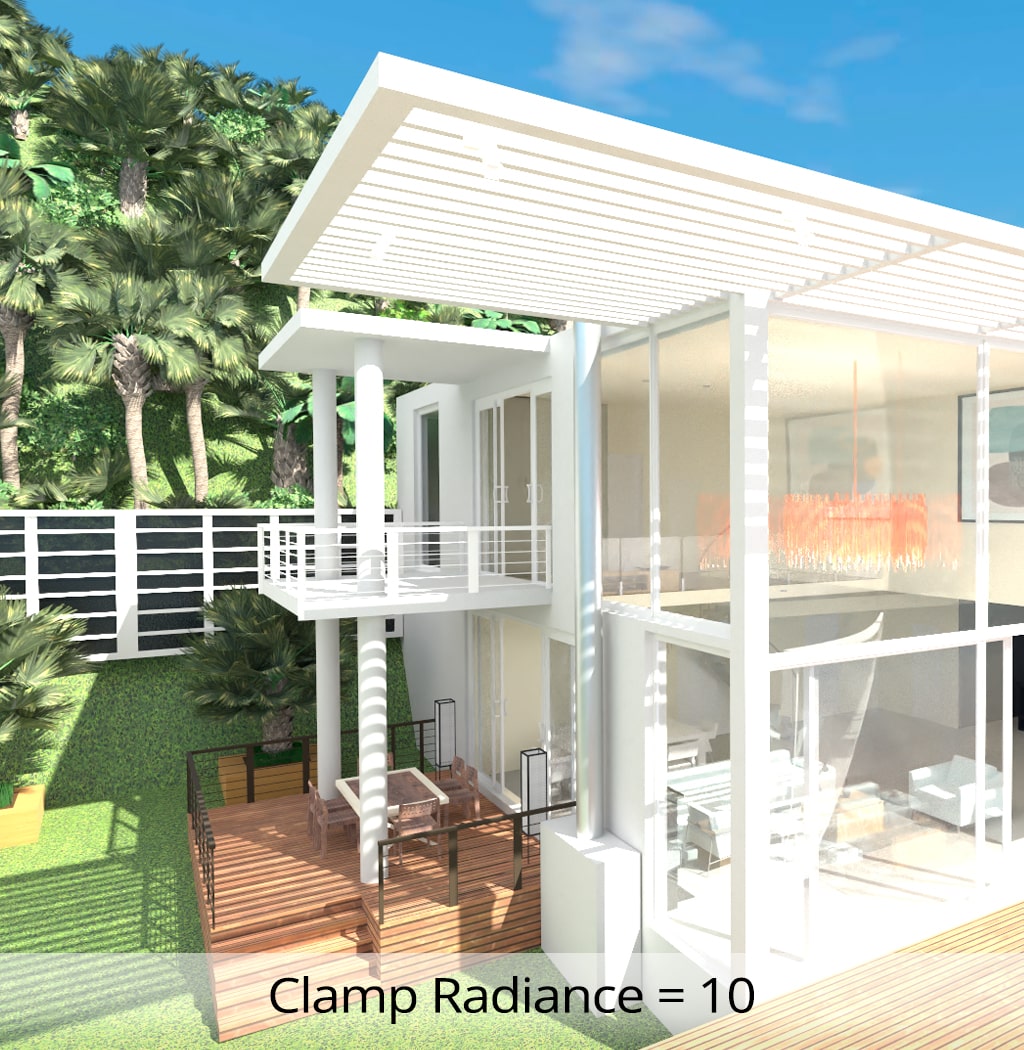
Let’s say you have a scene with a very bright light source, for example, an exterior with bright sunlight or an interior with a powerful light source in the room. If you set the Clamp Radiance parameter at a value that is too high, it can result in the light being extremely bright in the rendered image. The bright areas of the rendered image will be overexposed and you’ll have to spend time fixing such areas when editing the final image.
If you set Clamp Radiance at a certain value (for example, 5.0), the brightness of the light in the scene will be limited by this value. This is useful when you want to avoid overexposure, especially if you are working with high contrast scenes or scenes containing bright light sources.
Limiting the radiance can make the rendered image more pleasant for perception, preventing the loss of details in the bright areas and preserving the textures and details in these areas. Besides, limiting the radiance can also help optimize the time of rendering, as lower brightness means reduced load on the calculating resources.
Adaptive Sampling
As we have already mentioned, sampling is used to reduce noise in the rendered scene. It can be adaptive or fixed. Sometimes, the noise level becomes acceptable even before all samples are taken. In this case, further sampling doesn't make any significant improvement, so the rendering can be stopped.
Adaptive Sampling can be used in a scene with different levels of detail. Let’s say you have a scene that contains objects with different levels of detail, for example, detailed textures on some objects and smooth surfaces on the other. With the help of Adaptive Sampling you can control the detailed parts of the scene, such as textures on the objects, since they usually require the involvement of more rays in rendering for preserving all of the details. Adaptive Sampling is capable of automatically increasing the number of rays in the areas where more precision is required.
At the same time, the smooth surfaces or areas where the details are not as prominent can use less rays. This allows to significantly reduce the number of rays in the areas where their use is not critical. The Adaptive Sampling parameter can automatically divide the calculating resources in a way that provides more resources for the areas that require them. This results in speeding up the process of rendering without any losses in quality. The main purpose of using this parameter is optimizing the time of rendering while preserving the high quality of the rendered image.
Since images tend to have regions with different noise levels, we recommend using the Adaptive Sampling mode in most cases. In this mode, noisier regions are identified and have more sampling iterations. Sampling stops in areas where the level of noise is below the Noise Threshold value.
Noise Threshold
Decreasing the Noise Threshold also helps to fight noise in the rendered image. Setting this parameter to zero is equivalent to using the Fixed Sampling mode, which is the same as switching off the Adaptive Sampling. The Fixed Sampling mode can be used with images that have similar levels of noise in all areas. The number of samples in this mode is defined by the Render Samples parameter.
The Noise Threshold parameter can also be used for optimizing the time of rendering. When the level of noise becomes acceptable, the system can finish rendering in a certain area even if the predefined number of rays wasn’t used.
Setting the value of Noise Threshold too high can lead to image rendering being finished even if it still contains visible noise. This is why it is important to find balance between the level of noise and the time of rendering for achieving the desired result.
Threshold value is normally in the range of 0–1, where 0 means that the rendering process continues while there’s noise in the scene, and 1 means that rendering is finished when the noise is almost eliminated from the scene.
Half-Precision Math and Filters
The Half-Precision Math option saves memory and improves performance at the expense of slightly reduced quality of the rendered image. You can activate this parameter if you need to render a quick sample image as a test, but if you want to achieve a large, detailed and highly-realistic result, we do not recommend using Half-Precision Math.
In most cases, the high precision of color is not essential for human perception. This is especially true for high-resolutions screens or when there are plenty of effects present. The human eye cannot detect the difference in the high precision of colors.
By using math with half-precision, you can significantly save memory and resources of the GPU. This can be rather important for working with a large amount of data, such as high-resolution textures. However, you should remember that using Half-Precision Math can contribute to losing half of the precision in calculations. In some cases it can be unacceptable, especially for effects where the high precision of color or calculation is required.
If you want to learn more about the Denoise, Tonemap and other Filters, check out another article about working with AMD Radeon™ ProRender on our website.
Bonus: Additional Tips and Tricks From Our Users and Designers
Our users eagerly share with us tricks that help them achieve stunning results in rendering, so here’s some advice from Live Home 3D users and designers that you may find helpful:
- Add some light sources that are not visible in the picture. It will bring more light to the scene and produce a more realistic rendering.
- Set the time of day to morning to get longer shadows. The realistic effect of the rendered scene highly depends on favorable light and shadow combinations.
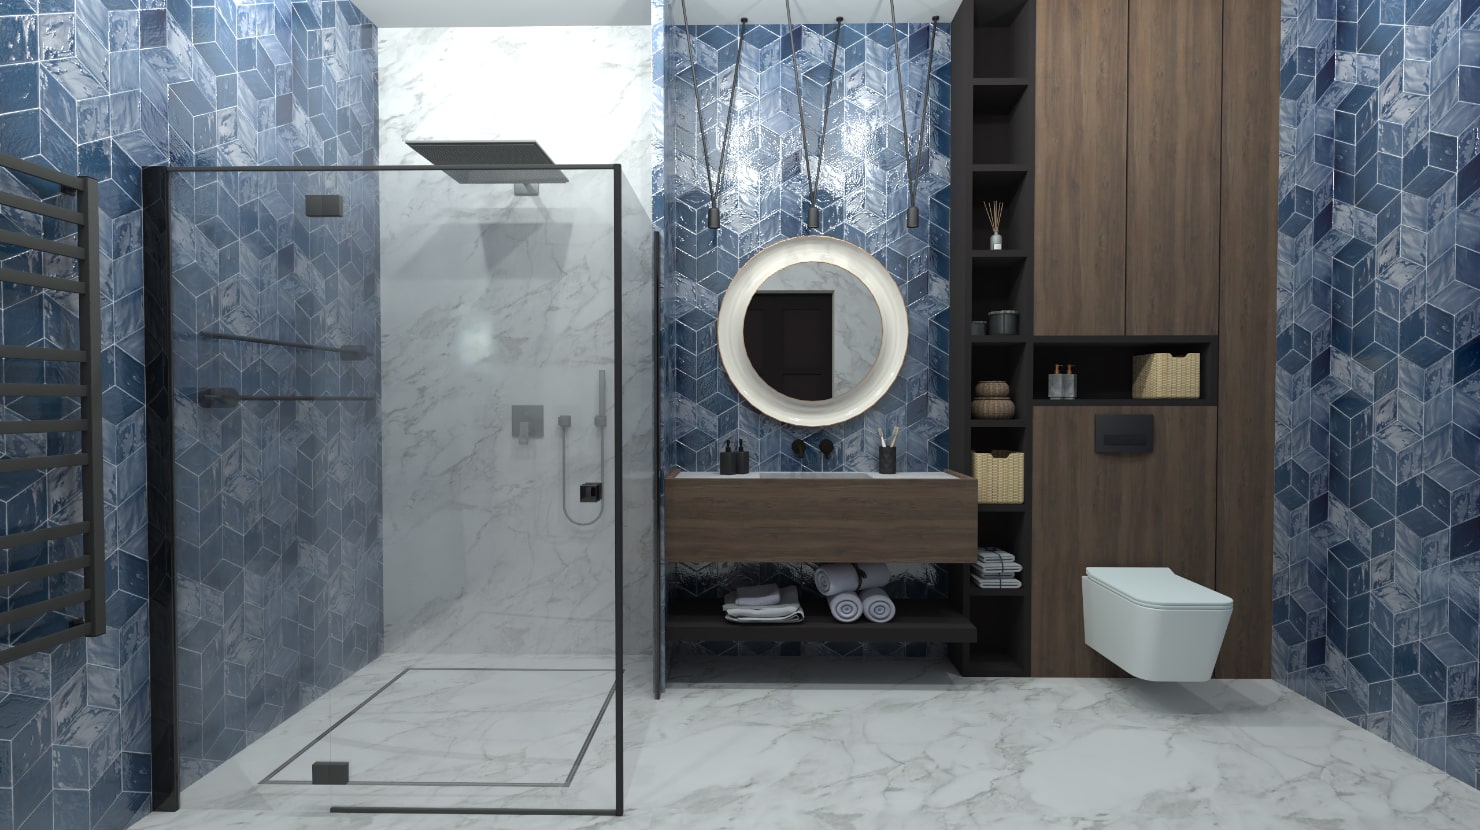
- Give preference to physically based materials (PBRs) in the scene, either ones from the Material library of Live Home 3D or your own materials. Otherwise, the rendered image may hardly be different from the simple screenshot.
- Use emissive materials instead of lamps whenever possible: LED stripes, furniture with a slight illumination, luminous decorations in the kid’s room, etc., to achieve a more realistic look and avoid an overexposed scene.
Finally, below you will find several rendering setting options for various scenes suggested by the Live Home 3D team.
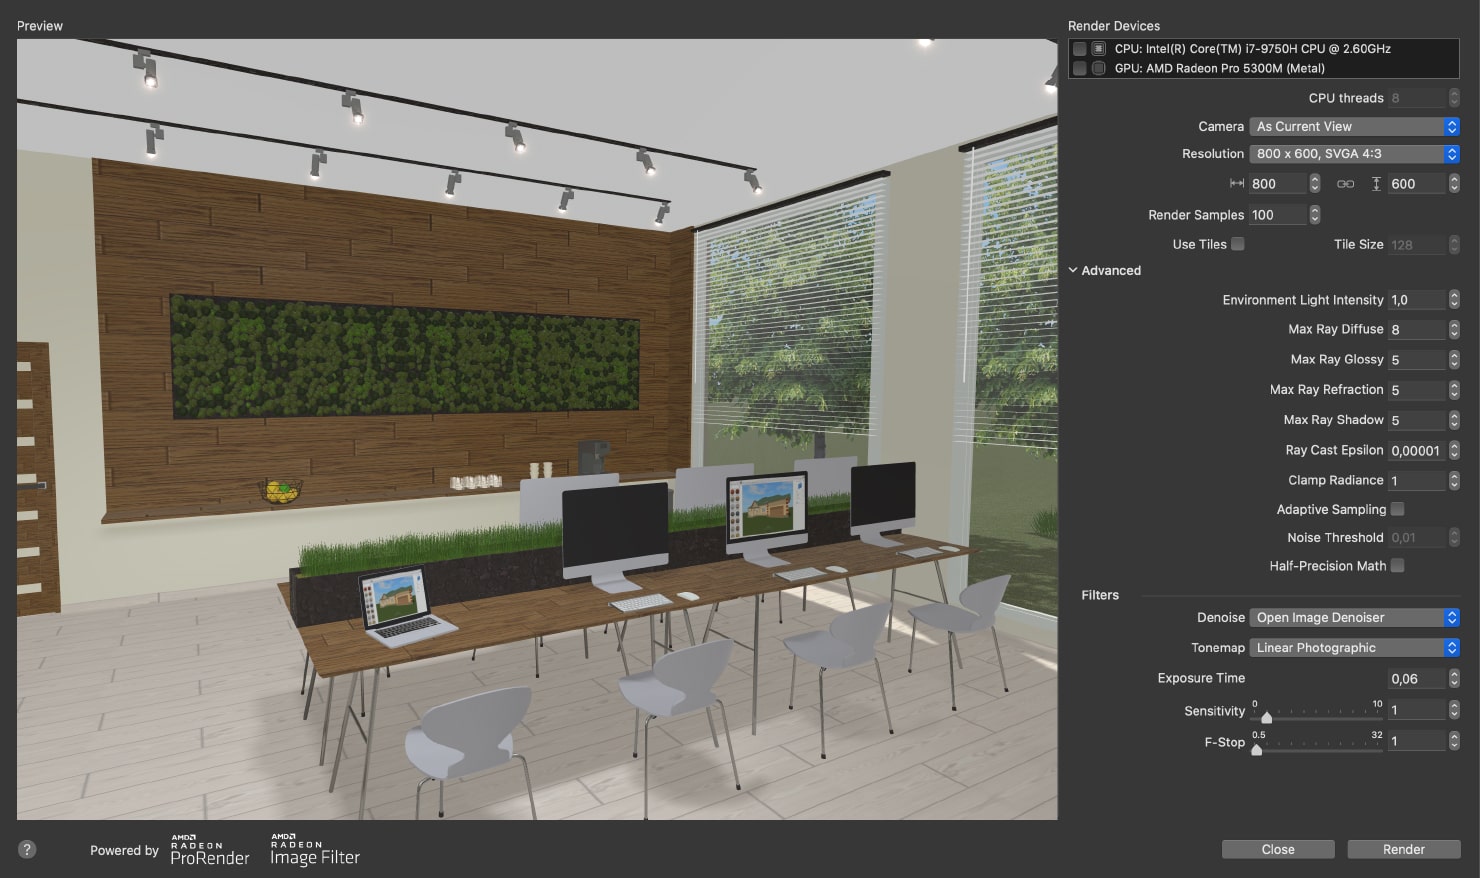
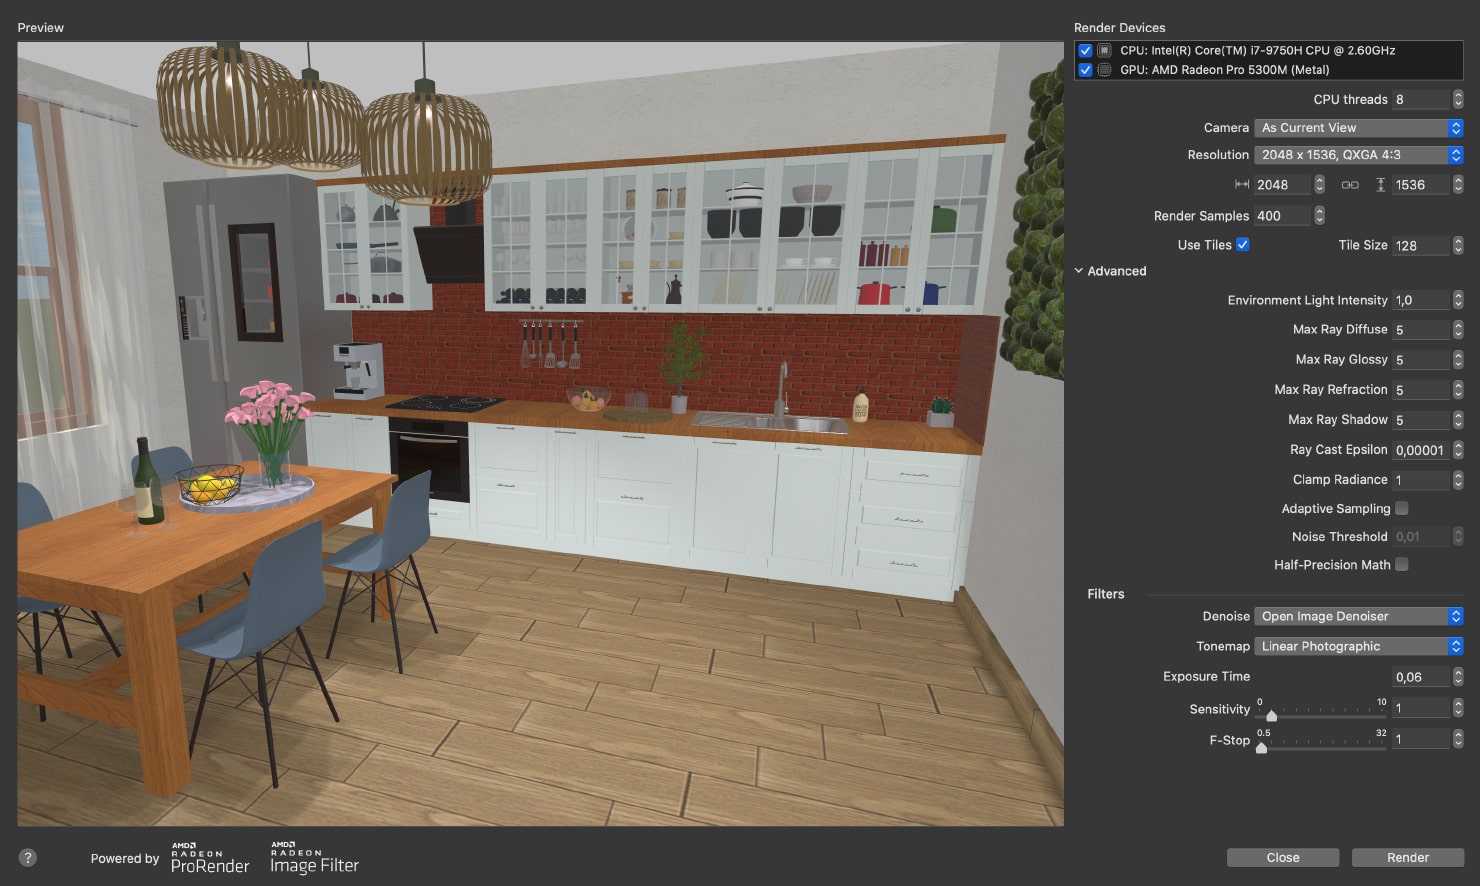
Sample render settings for interior scenes with natural light only.
You can try these render settings for interior scenes with artificial light.
Sample render settings for the outdoor scenes.
Conclusion
We hope this article sheds light on the complex settings of the AMD Radeon™ ProRender available in Live Home 3D for Mac and helps you create realistic and stunning renderings of your designs! Now that you better understand the settings, you can experiment with them to get optimal results. Share your rendering in our community on Reddit or tag us on Instagram, Facebook and Twitter. We would love to see your work!