Creating Screenshots and Videos
Creating and Modifying Movie Tracks in the 2D Plan View
A movie track is a path on the floor plan along which a camera moves while a movie is being created. Any movie track consists of at least two movie cameras. They are used to define the ends of the movie track. More movie cameras can be added in the middle of the track to set points where the track should turn left or right. Therefore, when you are creating a movie track, you are actually adding movie cameras, and the app links them with a line which visualizes the track.
Although the floor plan is flat, the movie track also has an elevation. It can be adjusted for each movie camera individually as described in Changing the Location and Orientation of a Camera in 3D.
Creating a Movie Track
To start creating a movie track, tap on the plus button in the toolbar. Choose the Movie Track tool from the Auxiliary tool set. Tap on the floor plan where the movie track should start. To add intermediate points on the track (if necessary), make several more taps. Once the last point has been added, tap on the Complete button.
Movie cameras have an arrow-shaped icon which shows the direction of the movie track. A selected movie camera displays its controls and frustum.
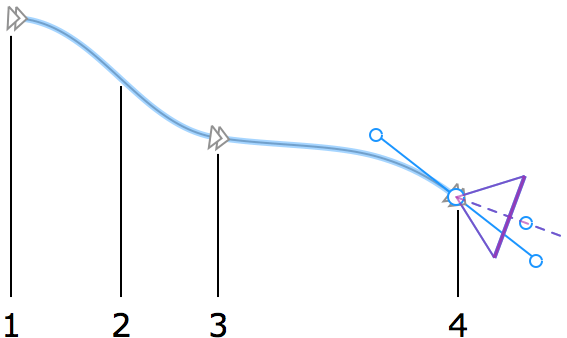
1 – The first movie camera at the beginning of the movie track.
2 – A movie track segment is a part of the movie track between two cameras.
3 – An intermediate movie camera. There can be many of them or none.
4 – The last movie camera at the end of the movie track. The camera is selected so that you can operate on its controls.
The locations of movie cameras, the shape of track segments and the directions of cameras can be changed after creating the track. You can draw a movie track roughly, then adjust the curvature of the track, and the location and orientation of cameras. It is also possible to add or delete movie cameras.
Adding Movie Cameras to a Movie Track
To add a new movie camera before or after a camera on a movie track, long-press on this camera to bring up the context menu and choose either Add Camera After or Add Camera Before.
Removing a Movie Camera
To remove a movie camera, select it on the floor plan and press the Delete button in the toolbar.
You can also select a camera in the Inspector by its name and use the Delete button below the list.
Removing a Movie Track
To remove a movie track, select it on the floor plan (tap on a segment, not on a camera) and press the Delete button.
Also, you can select a movie track in the Inspector and use the Delete button below the list.
Changing the Location of a Movie Camera
To change the location of a movie camera, drag it to a new place as you do with other objects. By moving a camera, you will also change the shape of the movie track segments before and after the camera.
Movie Camera Controls
To display the movie camera controls, tap on this camera on the floor plan or in the Inspector.
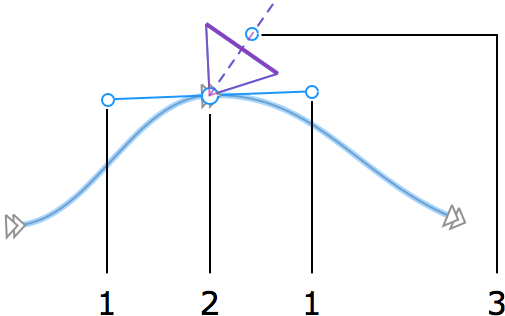
1 – Handles are used to change the movie track direction.
2 – Movie camera handle.
3 – Movie camera direction handle.
Adjusting the Direction of a Movie Camera
To rotate a movie camera, move its direction handle around.
Adjusting the Curvature of Movie Track Segments
To change the curvature of the segments before and after a movie camera, rotate one of the movie track direction handles. The segments will change their shape together.
If you cannot achieve the desired movie track shape, add more cameras.