Working with Objects
Ceiling Openings
Ceiling openings can be present in your project as separate objects as well as a part of Stairs objects. A ceiling opening is in fact a slab opening because it creates a through passage in the slab.
To create a rectangular ceiling opening, draw it on the floor plan using the Ceiling Opening Rect tool. To draw a polygonal opening, use the Ceiling Opening Rect tool (Pro edition only).
Operations common for all object types are discussed in the Basics section. This includes:
The Properties of Objects in 2D section explains how to apply a stroke, fill or pattern to an object using the 2D Properties tab of the Inspector.
The Applying Materials section explains how to apply materials to objects.
Ceiling Opening Properties in the Inspector
Most of the opening properties are located in the Inspector where you can change an object's geometric properties, or set up how the object looks on the floor plan or in the 3D view.
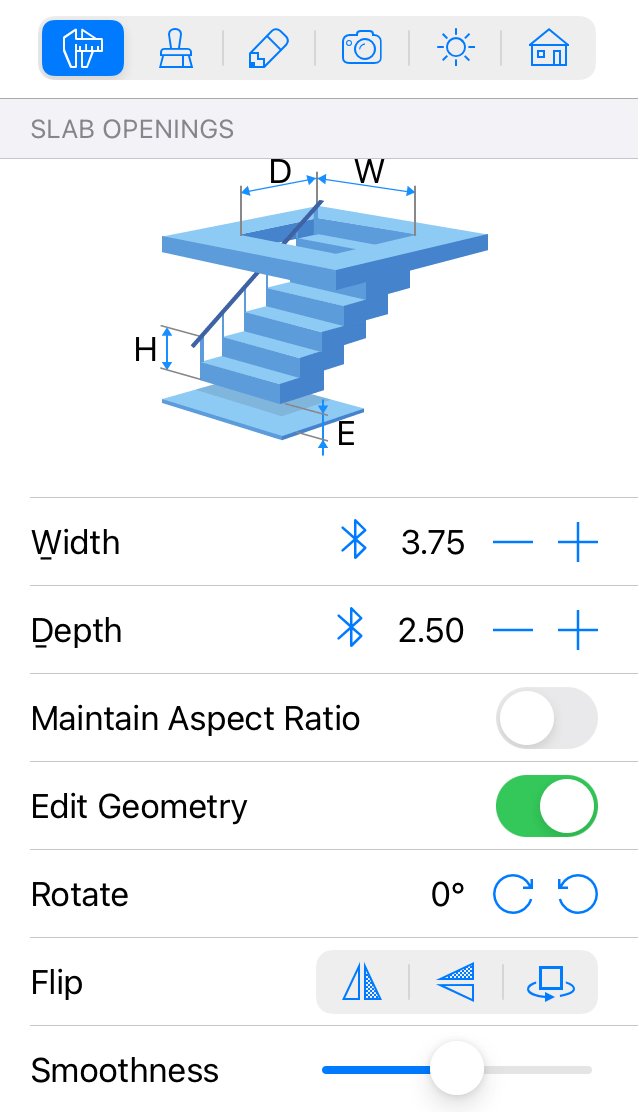
Geometric Properties
The geometric properties of a ceiling opening can be found in the Object Properties tab of the Inspector.
To resize an opening, make sure that its dimensions are unlocked in the Inspector. Then enter new values. To resize the object proportionally, select the Maintain Aspect Ratio option.
To resize an opening on the floor plan directly, drag one of the object's handles. The handles are not displayed when the object dimensions are locked.
To rotate an object, use the Rotate tool in the Inspector or the rotation handle on the floor plan.
The Flip buttons in the Inspector let you flip or rotate a ceiling opening. This set of tools includes three buttons: Flip Horizontally, Flip in Depth, and Rotate 180 degrees. All of them affect the object both in the 2D and 3D views.
The Smoothness slider changes how curved sides of the opening outline look in 3D.
Customizing the Shape of Openings
To modify the shape of an opening, double-tap on the object. The resize handles will disappear, indicating the contour editing mode. The app will display the outline of the opening with diamond-shaped handles at the corners called "points". To change the shape of the outline, you can move the points. Editing is possible only when the Edit Geometry option in the Inspector is on.
To add a new point, long-press on the contour and choose Add Point. To remove a point, long-press on it and select Remove Point.
In the contour editing mode, the app also displays round handles in the middle of each segment of the contour. If you move a round handle in one or another direction, the corresponding segment will bend inside or outside of the contour creating an arc. While you are changing the curvature of a segment, a number near the segment changes from 0 (straight line) to 180 (semicircle). One of possible ways to create a circle when you start from a square shape is to bend each segment up to 90 degrees.

Rounded sides of the object can be displayed in the 3D view as a number of facets or as a smooth surface. To make curvatures more or less smooth, use the Smoothness slider in the Inspector. Higher values may require higher computer performance while the 3D model is rendered.
When the Edit Geometry option in the Inspector is unlocked, you can activate the editing mode by double-tapping on the object.