Working with Objects
Furniture
Various pieces of furniture have similar behavior in the app, so the term "object" will be used for all of them except when we need to describe the difference between them.
Operations common for all object types are discussed in the Basics section. This includes:
The Applying Materials section explains how to apply materials to objects.
Furniture Properties in the Inspector
Most of the furniture parameters are located in the Inspector where you can change an object's geometric properties, or set up how the object looks on the floor plan or in the 3D view.
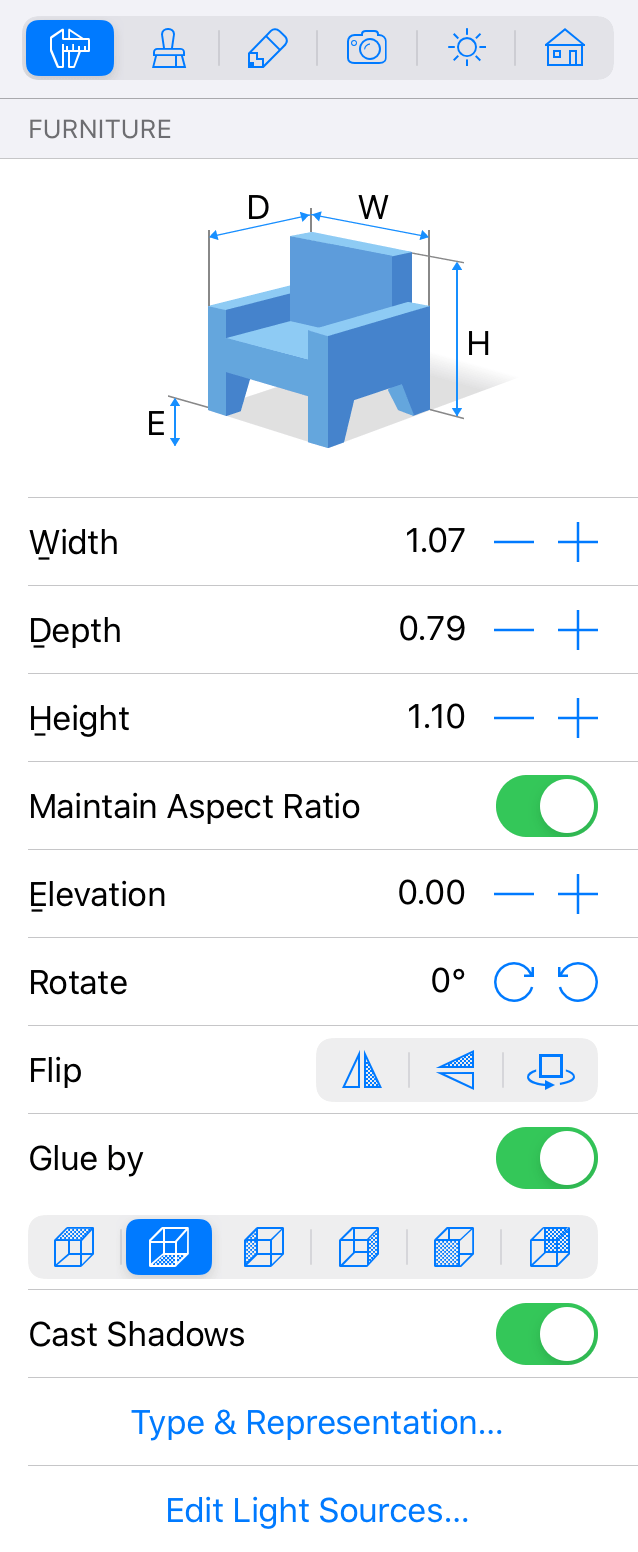
Geometric Properties
The geometric properties of an object can be found in the Object Properties tab of the Inspector.
To resize an object, enter new values into the Width, Depth and Height fields. To resize the object proportionally, select the Maintain Aspect Ratio option.
To resize an object on the floor plan directly, drag one of the handles on the object's selection frame. The handles are not displayed when the object dimensions are locked.
To rotate an object, use the Rotate tool in the Inspector or the rotation handle on the floor plan.
The Elevation parameter defines how high an object is placed in relation to the default floor level. Since the floor can also be elevated, the object's elevation is calculated from the floor with zero elevation. In a multi-story building, the elevation of objects on each story is calculated from the level of the respective floor.
Object Location in Relation to the Walls, Floor and Ceiling
The location of most of the objects in the room is pre-determined by their purpose. For example, tables and chairs can be anywhere in the room but on the floor. Wardrobes and bookcases stay on the floor near a wall. Most lamps hang from the ceiling or are affixed to a wall.
The app takes this object characteristic into account. When you add a lamp from the standard library, it automatically sticks to the ceiling or wall. Wardrobes are pre-programmed to snap the back side to a wall.
The Glue By set of options in the Inspector lets you select up to three object sides that will stick to the floor, ceiling or wall. The left, right, front and back sides can glue to walls. The top side can stick to the ceiling, and the bottom side sticks to the floor.
When the Glue By option is activated, the app may rotate an object, if it is necessary to place it parallel to the wall.
Placing an Object onto the Top of Another
Objects like TV sets, computers, and cookware are usually located atop other objects such as tables and stands.
Imagine that we need to place a TV set onto a stand. If the TV set is higher than the stand, and Glue by Bottom is activated, just move the TV set towards the stand in the 2D or 3D view. The TV set will automatically jump onto the stand. If the Glue By option is deactivated, or the TV set is lower than the stand, adjust the Elevation of the TV set manually. In both cases, the Elevation parameter of the TV set should be unlocked.
Casting Shadows
You can turn the object's shadow on or off using the Cast Shadows option. Switching off the shadow can be useful to increase the app's performance when it renders the 3D scene. Some objects, such as an area rug, can cast shadow, but the latter will not be visible because the rug is on the floor. Deactivating the Cast Shadows option of such an object will make no difference to the 3D scene but can improve the rendering speed.
Light Sources
Objects that can emit light, such as lamps or fireplaces, belong to the Furniture object type. In addition to the regular properties, these objects have one or more light sources. The Light Properties tab of the Inspector lets you turn the light on or off, and adjust the color and brightness. For more details, read the Light Sources section.
To set up a light source, long-press on an object and choose Edit Light Sources… from the context menu. This command will open the Light Source Editor. (Pro edition only)
Object Properties in the Type & Representation Dialog
The Type & Representation dialog lets you change the object's representation for the floor plan. You can also rotate the object in all three dimensions, or flip it.
In the Type & Representation dialog, you can decrease the object's detail level that can potentially increase the rendering speed.
To open the dialog, long-press on the object and choose Type & Representation… from the context menu.