Creating Screenshots and Videos
Introduction
Cameras
You can specify locations and view directions in the 3D space and save them as cameras. Then you can select a camera to jump to a particular location in the 3D model. The same set of cameras defines views for 3D renderings.
By default, five predefined cameras are present in any project. They provide views to your project from four sides and from the top. It is not possible to rename or remove a predefined camera, or turn it to another point. These cameras are not shown on the floor plan.
The user can add custom cameras and adjust them as needed.
Movie Cameras
Another type of camera is a movie camera. Unlike regular cameras, a movie camera is not a separate object but a part of a movie track. A movie track is a path you virtually move along while shooting a movie.
Active Camera
You can access cameras and movie cameras in the Camera Properties tab of the Inspector, in the Auxiliary Objects sections of floors in the Project Tree and on the floor plan. Only the Inspector shows the default cameras.
To make a camera to show its view in the 3D view, select this camera in the Inspector, Project Tree or floor plan. Such a camera is called an "active camera".
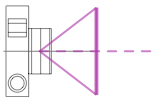
The position of the active camera is indicated on the floor plan by a frustum which usually looks like a triangle.
Active camera:
Active movie camera:
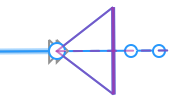
The frustum gives you an idea about the view direction and field of view of the active camera.
To show or hide the frustum, use the Show 3D Viewpoint switch in the 2D View section of the program Settings.
There is always one active camera in the project. It can be a regular or movie camera, or a temporary camera when the picture in the 3D view doesn't correspond to any of your project's cameras. A temporary camera has no icon on the floor plan. The frustum shows its position and direction.
An icon in the top right corner of the 3D view indicates the type of the active camera.
Regular camera is active:
Movie camera is active:
No icon means that a temporary or predefined camera is active.
As soon as you start walking in 3D, the active camera will move along with you. The camera's icon in the 3D view is aimed to warn you that you can change the position of the active camera. If you don't want to, just click on any object, ground or sky to deselect the camera. A temporary camera will then be used, and the icon of the camera will disappear from the 3D view. You can also lock cameras in the Project Tree.