Pros and Cons of Vaulted Ceilings
If you happen to know what a vaulted ceiling is, then you are most likely aware that the controversy of the phenomenon resembles the pineapple pizza debate: you either wholeheartedly love it or absolutely hate it. And, there’s a reasonable ground for either stance. Besides the grand appearance, the pros of a vaulted ceiling are:
- making a small space look bigger;
- letting in more natural light;
- providing good ventilation of the area.
And, of course, there are cons:
- requires more maintenance than the conventional flat ceiling;
- less energy efficient.
Vaulted ceilings are often referred to as “cathedral ceilings” and, even though this may be the most famous type, there are definitely more options included under the “vaulted ceiling” umbrella term.
Cathedral
A cathedral ceiling features two sloping sides similar in length that meet in the center to create an apex.
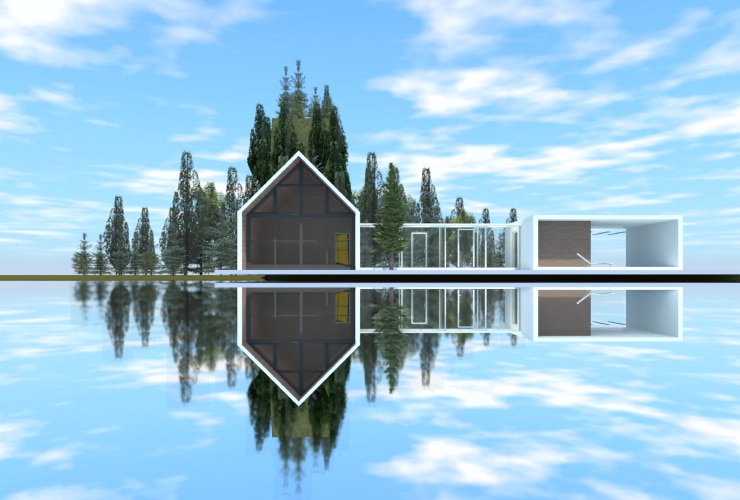
You can create this type of ceiling with the help of the Roof tool. Select the walls of the room in which you plan to create a vaulted ceiling. The wall type should be changed into Loft Wall in the Object Properties of the Inspector. This will allow these walls to have no auto-ceiling, and they will be limited only by the roof. Next step is to build a Gable type roof along the contour of these walls and select the segments of the roof. In the Object Properties tab of the Inspector, set the necessary Elevation height and choose the angle for each segment.
Cove
A cove ceiling has curved edges instead of sharp angles between the ceiling and walls. There are a couple of ways to create this type of ceiling in Live Home 3D.
The first method is using the Mouldings to create curved edges under the ceiling. To start building the ceiling, select the inner parts of the walls. In the Object Properties tab of the Inspector, choose the curved type for the upper mouldings. Then, set the necessary height and width. The only thing left to do is to paint the mouldings the same color as the ceiling by dragging the appropriate material from the Library and dropping it onto each moulding.
Alternatively, a cove ceiling can be built with the help of the Shapes. For that, first find the Shape category in the Object Library and pick a suitable one. Now, drag and drop it onto the 2D Plan View. In the Object Properties tab of the Inspector, check Glue by the top side. You can also turn the shape along any axis: X, Y or Z. To do that, right click on the shape and choose Merge. Then right click on the object and choose Type & Representation.
The next step is to set the necessary dimensions in the 2D Plan View or in the Inspector. Finally, you can paint the shape the same color as the ceiling by dragging the appropriate material from the Library and dropping it onto the shape.
Barrel Vault
A barrel vault ceiling is a semi-cylindrical design formed by the extrusion of a circular curve along a given distance.
This ceiling can be achieved in a similar way to the Cove ceiling with the help of Shapes (see instructions above), but there’s an easier way around it for users of Live Home 3D Pro, and that is using the Wall Panels. Let’s explore it.
Start by selecting the inner part of the wall and then switch to 2D Elevation View. The next step is to build a panel extending the entire length of the room using either the Wall Panel Rect or Wall Panel Poly tool. Then right click on the panel and choose Edit Contour. To provide an arc with a particular slope angle, you need to drag the control dot in the middle of the panel contour. In the Object Properties tab of the Inspector, set Thickness parameters that are equal to the length of the room. You can also use Rounded Openings on the walls to highlight the shape of the ceiling.
Tray
This type of ceiling has a frame and is built upwards in a cutout, visually resembling a tray. Its center is usually rectangular and inverted (or popped out), adding depth to the appearance.

A tray ceiling is easily built in Live Home 3D with the help of the Ceiling tool. Switch to the 2D plan and choose the Ceiling Rect or the Ceiling Poly. Then, in the Object Properties tab of the Inspector, set the Elevation parameters for the ceiling below the level of the main ceiling.
Coffered
A coffered ceiling has multiple, sunken three-dimensional panels covering the ceiling of a room in a grid pattern.
So, how do you create this type of ceiling in Live Home 3D? Well, the beams are built using the Building Blocks or the Shapes in case you need an arbitrary form of the joist. Switch to the 2D plan and choose the Building Block Rect or the Building Block Poly. You can also position the beam at a certain angle using Type & Representation. But, before that, make sure to merge the block (or shape) by right clicking on it and choosing Merge. Now, right click on the block again and choose Type & Representation.
In the Object Properties tab of the Inspector, check Glue by the top side. The final touch is to set the necessary dimensions in the 2D Plan View or in the Inspector.
Shed
A shed ceiling rises at an angle to a higher point on one end.
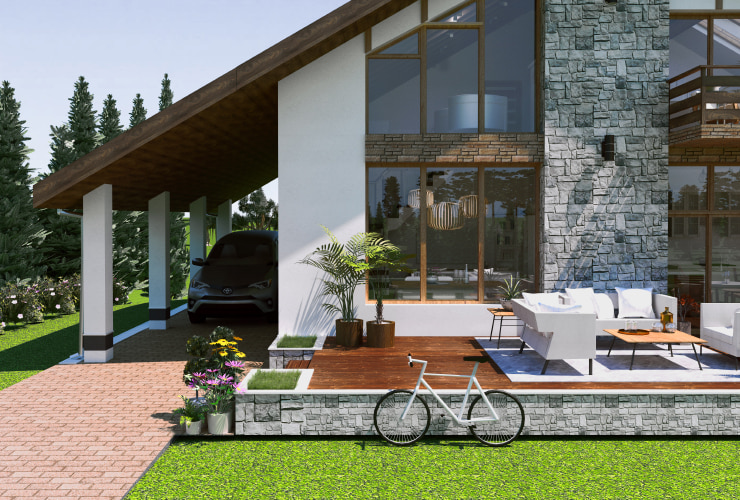
The building process of this type of ceiling is quite similar to the Cathedral one, but there’s a difference in the roof type. As a rule, the segment of the roof that forms a Shed ceiling is a part of a large roof that can be of different types: Shed, Gable, Hip, etc.
To start creating a Shed roof in the program, you need to select the walls first. Then, choose the Loft Wall type in the Object Properties of the Inspector. Now you need to build a Shed / Gable / Hip, etc., type roof along the contour of the walls so that one of its segments ends up above the room. Select this segment of the roof, set the necessary Elevation height and choose the angle for each segment in the Object properties tab of the Inspector. Voila, you have created the shed ceiling!