
Access Trimble 3D Warehouse
To access the model collection on Mac, select Window > Trimble 3D Warehouse™ in the main menu. On iOS, iPadOS, Android and visionOS, bring up the menu and choose Import > From Trimble 3D Warehouse™. The 3D Warehouse window will open. It is a simplified web browser that displays the 3D Warehouse website. Its toolbar has buttons to go to the previous, next or home page (of the 3D Warehouse, of course).
On Windows, the process is a bit different: open the menu and choose Import > From Trimble 3D Warehouse™. Then click the “Open” in the Browser button. The 3D Warehouse opens in your default system web browser. Click the "Download" button on the model’s page. If several formats are provided, choose the Collada format to save the 3D model to your device. Then import the downloaded model as described in the Importing Objects section of the Help documentation.
Adjust the Import Settings
You can use the program settings to set up how you want to have an object be imported. To open the settings on Mac, click the Import Settings button, which is far to the right in the toolbar of the Warehouse browser. On Windows, choose Settings in the menu. Then open the 3D tab and scroll down to the Import section. On iOS / iPadOS / Android / visionOS, choose Settings in the menu and open the Import section.
- Merge submeshes with similar materials simplifies objects, which can potentially increase the program performance. If you activate it, you will limit the ability to apply different materials to parts of an imported object, such as a bunch of flowers. All the flowers can be the same color in the original model. Once this object is imported with Merge submeshes… off, you can still apply different colors to individual flowers. If you activate the option, applying a new color to any flower will affect all the rest. The program may work in a different way depending on how an object was created.
- Make all surfaces double-sided to avoid invisible surfaces fixes the problem when one or several parts of an imported object are invisible. Activating this option will make the 3D model more complicated, so it is reasonable to use it only when you face the described problem.
- Split object instances lets you import a 3D model as a group of its parts. As a result, you can ungroup the parts and work with them as you do with independent objects. When this option is off, you will not be able to split an imported object into parts. Activating this option is reasonable when you import a furniture set and use each item from the set as an individual 3D model. Some objects cannot be separated even when the Split option is on. This possibility is defined by the 3D model itself.
There are several more options that are not so important and will not be discussed in this article.
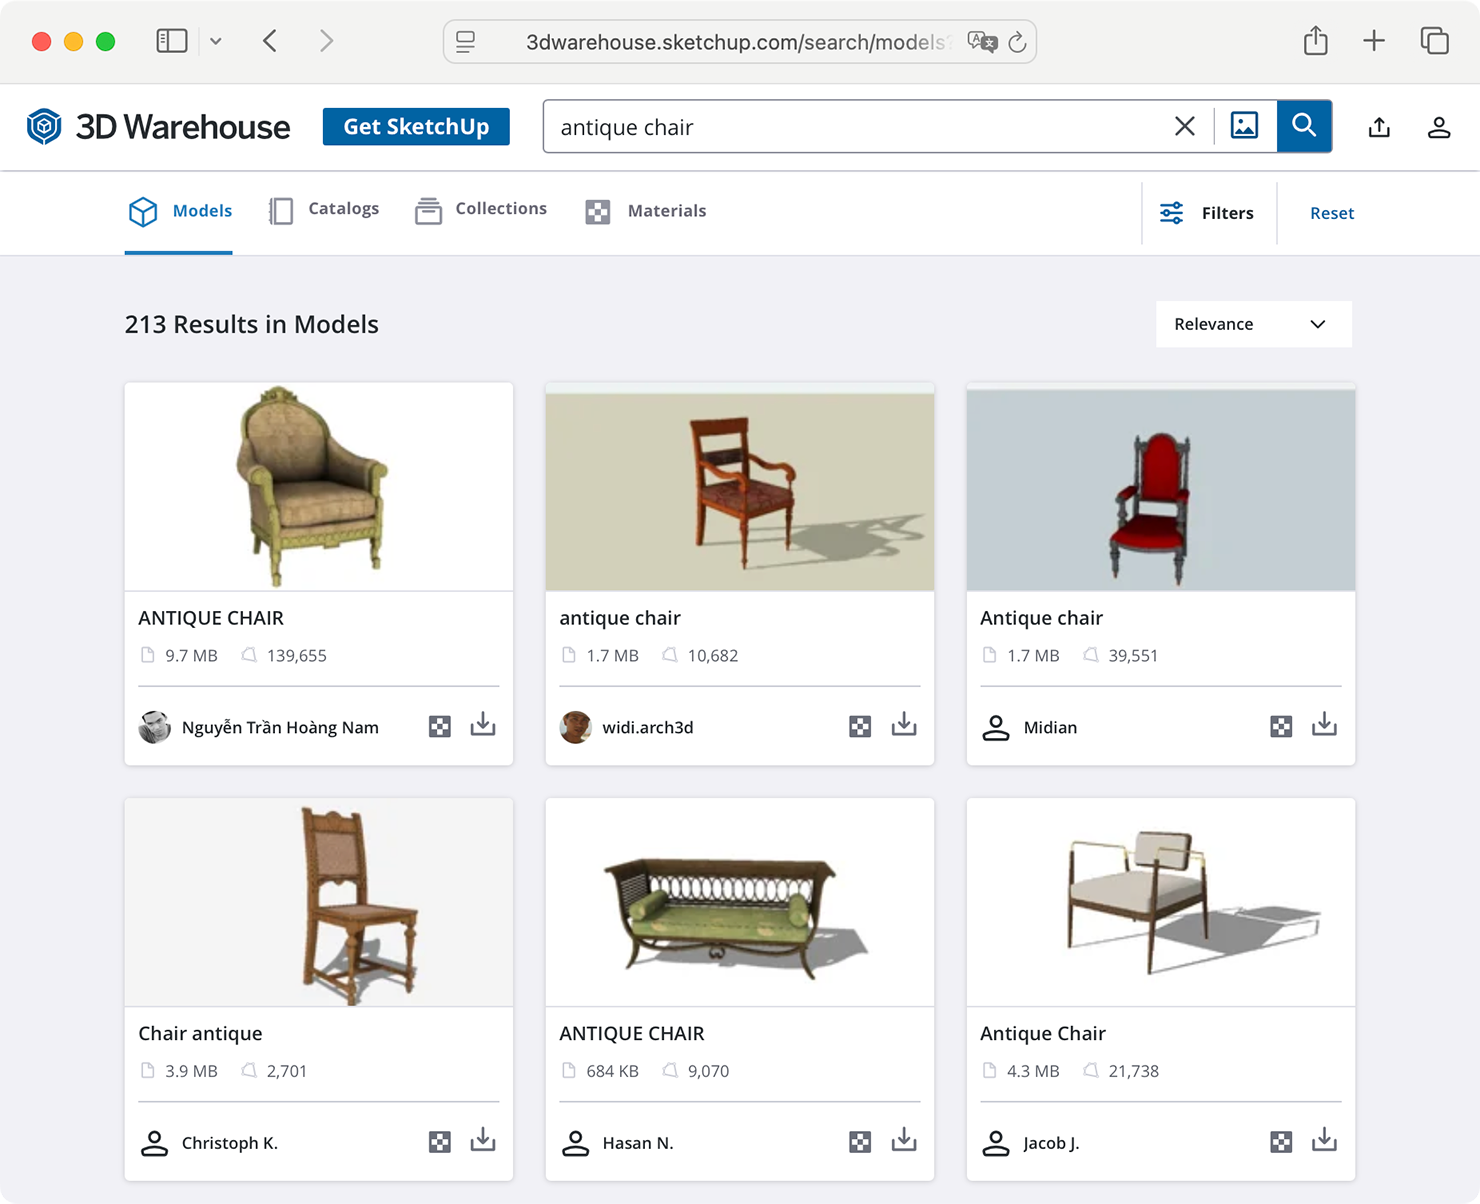
Find the Needed 3D Model
Now let’s get back to the Warehouse browser. The home page of Trimble 3D Warehouse™ shows several featured models and collections. To find something, type a description of the model you need and click Search. Don't pay too much attention to colors and textures. You will be able to change them after importing a model.
Once you have found a model you like, click on its thumbnail to open the model’s page. There you will see a bigger picture of the model and some technical details. To import an object, click the Download button and select one of the format options. Users of Live Home 3D for Mac can import objects in SketchUp or Collada formats. During the download process, the object is shown in Live Home 3D as a dummy object (cube).
In Live Home 3D for Windows, click the “Download” button on the models page. If several formats are provided, choose the Collada format. The model will download to your device.
Import the 3D Model
A 3D model that is imported directly will be saved in the current project. To use the model in other projects, you can save it in the object library. To do this, open an appropriate object category in the library. Then right-click on the object and select Add to Library in the context menu. If you are going to import a lot of 3D objects, it may be useful to create a new category for them. In this way, objects you have selected for your project will not get mixed up with those that come with the program.
In Live Home 3D for Windows, you need to import the downloaded model. Open the menu and choose Import > From File. That is described in more detail in the Importing Objects section of the Help documentation.
Customize the 3D Model
If you are fully satisfied with the imported model, congratulations! A more likely scenario, though, is that the model will need to be customized for your project. So, what can be changed? Color and texture (also known as material), size and more.
The main settings are located in three places: the Type & Representation dialog, Inspector and Material library.
To bring up the Type & Representation dialog, right-click on an object in your project and select Type & Representation… Note that some 3D models can be composed of several objects (e.g., a table with chairs) which have been grouped. In such a case, the Type & Representation… command will not be available until you ungroup the model.
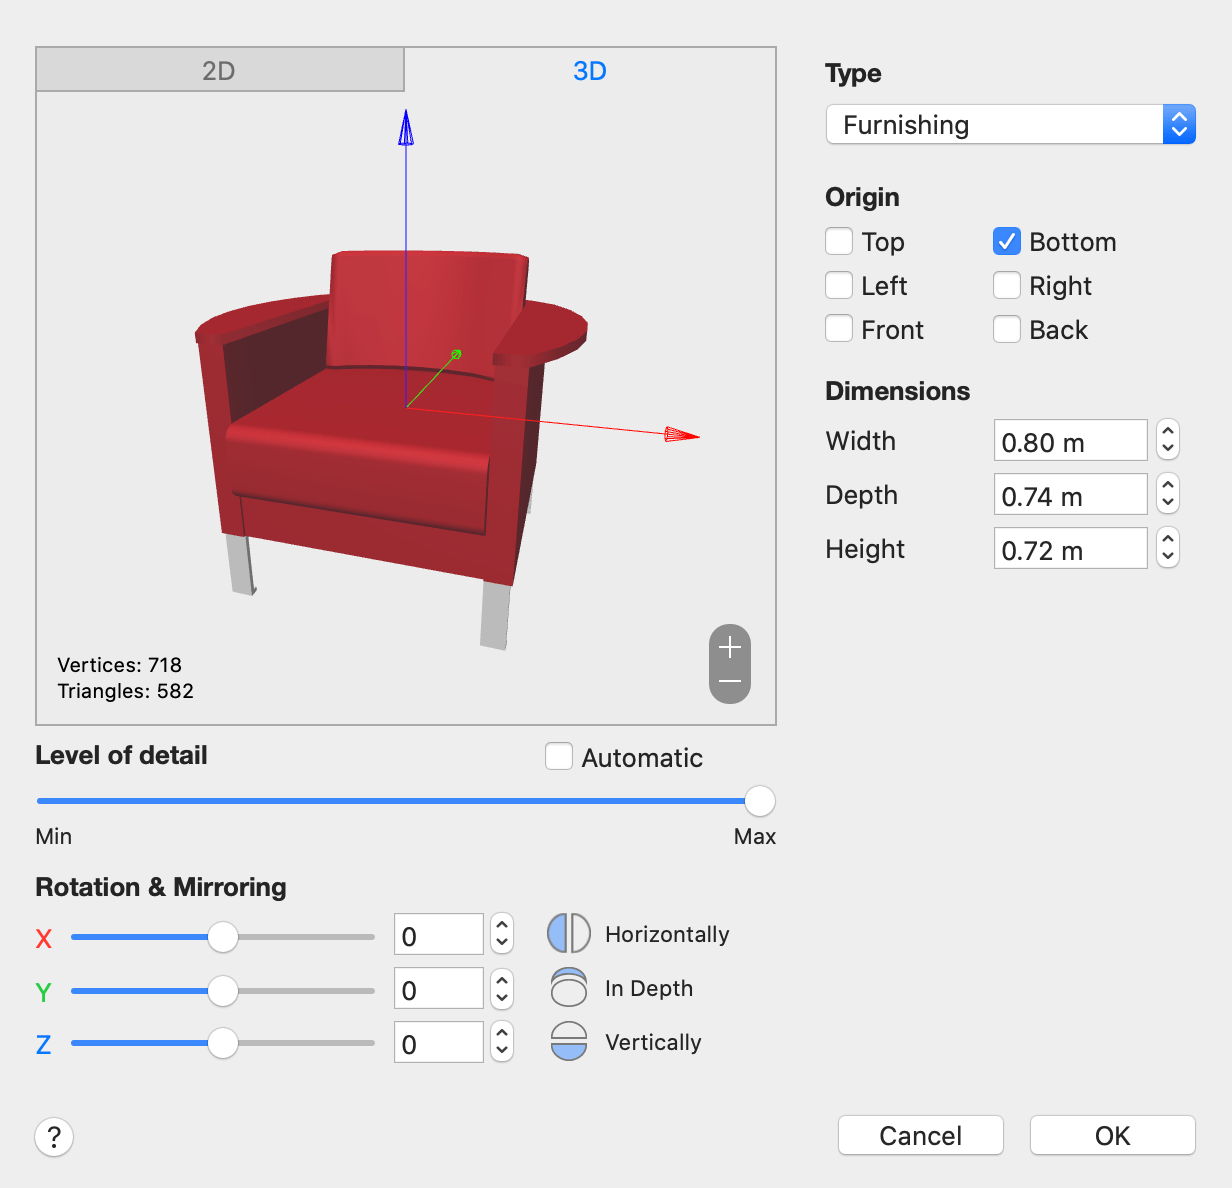
The Type & Representation dialog lets you:
- Change the object type. This very important option specifies that an object is furniture, door, window or stairs. The type of object defines its behavior in the program. For example, windows can cut openings in walls, but furniture cannot. The default type of an imported object is Furniture. If you have imported a door, window or stairs, simply set the corresponding object type.
- Change the object dimensions. This is helpful, if you need to make the model smaller or larger. Note that you cannot change the side proportions here (use the Inspector for this).
- Flip the model in 3D. Mirroring a model in the horizontal plane is useful when you need a door with a handle on the other side (table with drawers on the other side, etc.) and when you need to have a pair of mirrored objects for a symmetrical design.
- Rotate models in 3D. Some objects, such as books or decorations, have no strongly defined top, so you can place them in your design whatever way you’d like.
- Adjust the object’s level of detail. Decreasing the level of detail of very complex objects may increase the program’s performance. Some complex models display a yellow exclamation sign near the preview in the dialog. Move the Level of detail slider toward Min until the sign disappears, or just enable the Automatic option.
To open the Inspector, use the corresponding toolbar button. On Windows and iOS / iPadOS / Android / visionOS, click on the “i” icon. On Mac, click a button in the left corner and choose Show Inspector.
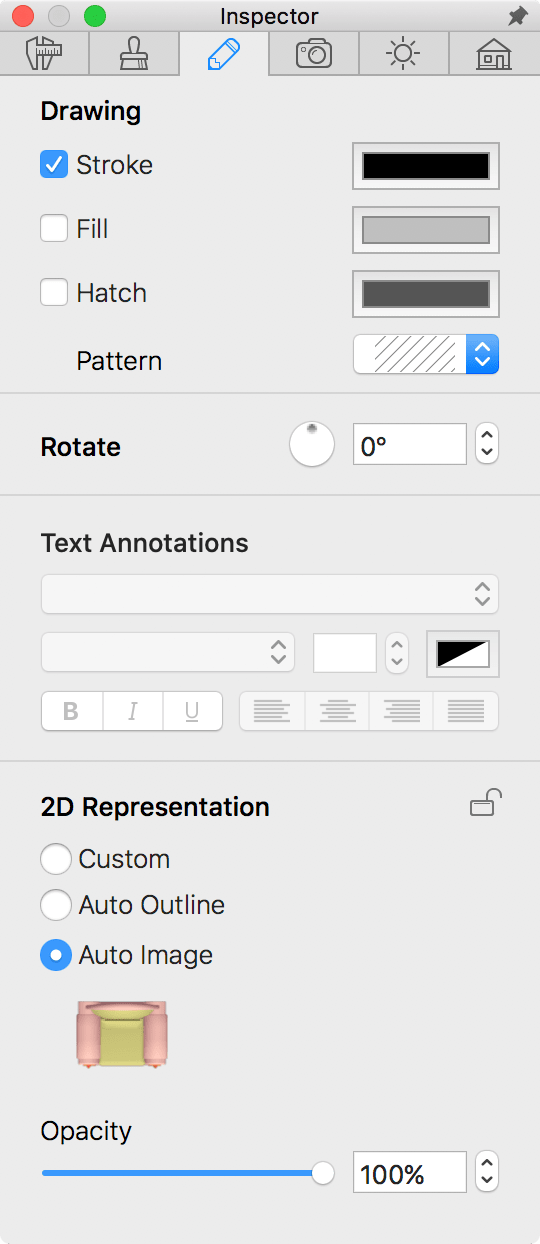
Since the Inspector displays a set of parameters according to the object type, change the type of the imported object, if necessary, before working with its other properties.
What we are interested in is the 2D Representation settings that define how an object is displayed on the floor plan. There are three options you can choose from. Custom is a standard image taken from the built-in library. It may look quite different from the actual object. The other two options are Auto Outline and Auto Image. Both are created upon the object’s top view. Auto Outline is vector graphics. Thanks to this, you can scale it without quality loss. A representation of this type may look confusing if an object has many small parts located one above another. The last representation is a snapshot of the object taken from the top in the 3D view. Usually, this is the most recognizable compared to others because it preserves the shape and colors of the object. It is a raster image.
The Object Properties tab of the Inspector lets you change the dimensions of an object. Unlike the Type & Representation dialog, here you can set the width, height and depth independently.
Change the Object’s Materials
It's time to learn how to change an object’s appearance in 3D. As mentioned earlier, you can replace the original materials of an object with those you like. The “material” term is used when we talk about a color or texture applied to an object. Materials that have no texture cover objects with a solid color. In the standard material library, such materials can be found in the Matte Paint and Glossy Paint categories.
To apply a material to an object, drag it from the library onto an object in the 3D view. Make sure that the cursor is exactly over the object’s part you want to change when you drop the material. The easiest way to apply your own texture to an object on Mac is to drag a graphic file with that texture from Finder and drop it onto the object.
The Material Editor in the Pro edition of Live Home 3D gives you more control on texture and color. Read the documentation if you need more details.
There is a very useful tool in the Object Materials tab of the Inspector called Material Picker. It has an eye dropper icon. The Material Picker lets you copy a material from one object to another. Imagine that you have found several pieces of furniture from different sources and want to use them as a set of furniture in the same room. The material of one of them might suit your design. Then you need to make the others look as if they are made of the same material (e.g., wood, fabric, metal, etc.) in order to have the styles match. Since the materials you like are not present in the library and you don't have the textures as graphic files, all you have to do is take them directly from one of the objects.
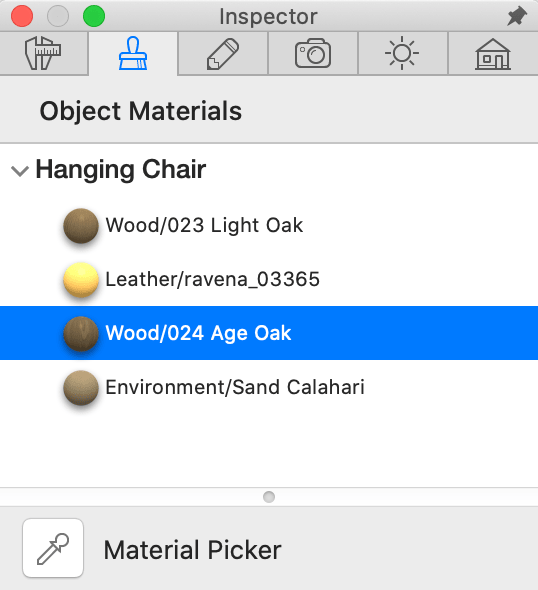
To copy a material from one object to another, make sure that you can see both of them in the 3D view. Ideally, they should be visible on the screen at the same time. Select an object that needs a new material. Open the Object Materials tab of the Inspector. In the list of materials, select the one you want to replace. Click on the Material Picker to activate it. Then click on a material in the 3D view that you want to copy, and it will be applied to the selected object immediately. You can select several materials in the list to update them together. If you can’t find the needed material in the library, you can import your own materials into Live Home 3D.
Revised: February 2026