Story Wall
This is a general type of wall in the program. The Story Wall takes up the full height from the floor to the ceiling.

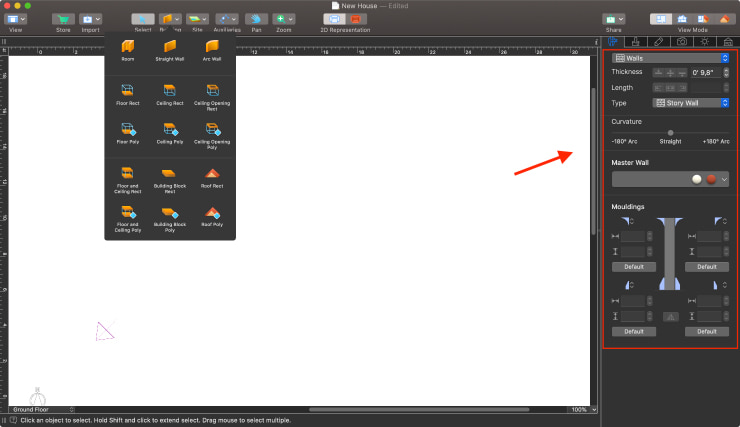
If you want to draw a Story Wall segment, open the Tools drop-down menu in the toolbar and choose either a Straight Wall or an Arc Wall, depending on what you need. You can also draw the whole room right away, either a rectangular or an arbitrary shape.
To draw a Straight Wall, activate the Straight Wall tool and click on the floor plan to start drawing. Double-click at the point where you want to specify the end of the wall.
To draw an Arc Wall, activate the Arc Wall tool and click on the floor plan to start drawing. Click at another point to specify the end of the wall. Move the cursor across the wall to bend it in one direction or another. Click to finish changing the shape of the wall.
To stop drawing an unfinished wall segment, press the Esc key. If you need to remove a wall, select it and press the Backspace key.
Like other wall types, Story Wall has its properties, such as Thickness, Length, Curvature, Mouldings, etc. These properties are shown and can be adjusted under the Object Properties tab of the Inspector.
The Story Wall is a basic wall type that works well for straightforward building solutions. However, the main peculiarity of such a wall is that its height is not directly customizable, as it is equal to the story height, which is set under the Building Properties tab of the Inspector.
So, what should you do if you need to draw a wall with its height not fixed by the current story height? Well, that’s when the other two wall types come in handy.
Loft Wall
As the name suggests, Loft Walls in Live Home 3D are meant to help you create a building’s upper story directly under the roof. The height of a Loft Wall depends on the ceiling or roof’s height. If a roof or ceiling is sloped, the top of the Loft Wall has different heights at different points, following the sloped roof or ceiling.

Another way of using a Loft Wall is for external walls under an elevated roof. Switch to this wall type if the lowest part of a building’s roof is below the ceiling level on the same story, and when the top of the regular Story Wall would be too high.
What is convenient about a Loft Wall is that, when you add walls in the loft, the program can automatically switch the Story type of a wall to the Loft type. It also doesn’t change the shape of a roof, unlike other wall types in the program.
Note that Loft Walls can connect to one another, but they cannot connect to other types of wall, like Story Walls.
Curtain Wall
This type of wall is thin, aluminum-framed and often made of glass, thin stones or metal panels. Lightweight materials bring several advantages to Curtain Walls, for example, improving thermal efficiency and reducing the sway of the building.

The main advantage of such a wall in Live Home 3D is that it can be of any height, completely independent of the current story height. You can customize the height directly in the Object Properties tab in the Inspector.
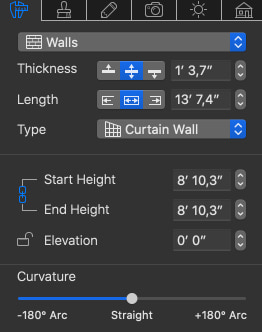
Sometimes, you may need to create retaining or decorative walls, ones that have different start and end heights. For this purpose, Curtain Walls in Live Home 3D also have the Start Height and End Height, for which you can set different values.
Here is what you need to do:
- Draw a wall in 2D, or select the necessary wall in 2D or 3D view.
- Using the Inspector/Object Properties tab, set the wall type to Curtain Wall.
- Set the start and end height for the wall.
Note that the Same Height control should be disabled in order to set different heights for the wall ends.
Apart from setting heights for wall ends, you can locate the wall above the floor level by adjusting its Elevation in the Object Properties tab of the Inspector.
You can also use Curtain Wall to quickly create a fence around your house. To do that, first switch to the Site level of the project using the Inspector/Building Properties tab. Then, on the 2D plan, draw a fence using the Wall tool and switch to the Object Properties tab to set the height for the fence. Finally, switch to the 3D view and apply the materials to the fence.
The Curtain Wall can handle more complex types of fences, like a fence around the external stairs. Such a fence consists of several segments, each of which may have either the same or different start and end height. It all depends on the curvature of the stairs and the height of the steps. The curved parts of the fence can be created with the Arc Wall tool. Arc Walls may have Curtain Wall properties, which offers the ability to create different wall heights. Moreover, any wall on the 2D plan can actually be converted into an Arc Wall with the help of the context menu.
Let’s consider one more use for the Curtain Wall in Live Home 3D. This type of wall is a perfect solution for creating the outer covering of a building in which the outer walls are non-structural.
Simply draw the wall on the floor plan (ground level), open the Inspector/Object Properties tab, set the wall type to Curtain Wall, and then assign it the needed height. This wall can have windows, panels, niches and openings inserted in it, and it is not limited by any story height.
Now that you are familiar with all three types of walls in Live Home 3D and their designated purposes, you can use them to your advantage to create various projects of different complexity levels.