Working with Objects
Basics
Objects can be grouped into several categories. One of the important principles that is used to distinguish objects is whether they can be created using tools (e.g. walls), or those that are pre-designed 3D models (e.g. furniture) created in other software. The objects of the first group can be modified right inside Live Home 3D, and they have specific properties. Pre-designed objects are the majority of the objects in the standard library. All imported objects also belong to this group.
Although objects created with drawing tools can be added to the library, the "library object" term is used exclusively for pre-designed objects.
It is important to note that openings, niches and wall panels are present in the library. At the same time, there is a tool to create these objects. (Pro edition only)
| Objects | ||||||
| Created using tools | Pre-designed | |||||
| Building elements | Auxiliary | Wall parts | Standard library and Imported | Imported | Standard Library | |
| Wall Floor Ceiling Building Block Roof |
Dimension Annotation Camera Movie Track Guide line |
Openings Niches Wall panels |
Furniture Window Door Staircase |
2D Image 3D Image |
Column | |
| Support the Tile Transform tools. Cannot be grouped except for Building Blocks. |
You cannot see these objects in the 3D view. | Can be created with drawing tools or taken from the library. | You can open these objects in the Type & Representation dialog. | You cannot see a 2D Image object in the 3D view. | ||
The object type is the most important property of an object. The Object Properties tab of the Inspector shows the appropriate properties depending on the object type.
Objects, except for auxiliary objects, have two types of representation: one for the 2D layout, and another one for the 3D view.
Some objects consist of several components. For example, windows and doors consist of an opening and 3D model of a window or door respectively. A wall object includes mouldings. Thus, if an object includes sub-objects, you can see this hierarchical structure in the Project Tree.
Adding and Removing Objects
The way you can add a new object depends on the object type. You should use the drawing tools to add parts of a building and auxiliary objects to the floor plan. All other objects can be added from the library or imported.
To remove an object, select it and press the Delete key.
Selecting Objects
To perform most of the operations on an object, you have to select it. To do this, click on it in the 2D or 3D view.
An object remains selected when you switch between the views in the main window.
In the 2D Plan view, selected objects are outlined or indicated with a selection frame. The selection frame displays resize and rotation handles when an object supports the respective actions.
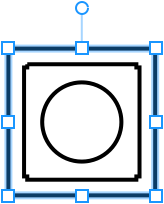
In the 3D view, a selected object has a green boundary frame around it.
Walls, openings, doors and windows let you also select a particular side which will be highlighted with the green color. To select the object's side, you should click on it. Selecting an object side can be useful when you need to apply a material or modify mouldings.
When it is difficult to click on an object, you can select it by clicking on its name in the Project Tree. This method is also helpful if an object is locked or invisible.
To prevent the occasional movement or modification of an object, you can lock it in the Project Tree or in the context menu. A locked object cannot be selected by clicking until you unlock it.
Moving Objects
To move a selected object, drag it with the mouse, or use the arrow keys when the 2D Plan view is activated.
Locked objects cannot be moved. An object can be locked or unlocked in the Project Tree.
Rotating Objects
To rotate an object in the 2D Plan view, select it and drag the round handle near the selection frame. To preview the object's angle with decimals, rotate an object holding down the Cmd key. In order to constrain the angle to 15 degrees steps, rotate an object holding down the Shift key.
You can use gestures to rotate objects in the 3D view.
You can also rotate objects using the Object Properties tab of the Inspector.
To rotate a wall, move the handle at one of its ends on the floor plan.
Modifying Objects
Objects of different types let you modify them in different ways. Most of the object properties are available in the Inspector.
The Type and Representation dialog lets you flip an object, change its orientation and dimensions, and also choose an image to display the object on the floor plan.
Some objects let you actually edit the 3D model. If this is possible, you will find the Edit in Trimble SketchUp command in the object's context menu.
For more information on a particular object type, read the dedicated section. To open it, click on the object's name at the top of this page.
To create a new object from multiple other objects, you can use the Combine operations. Place at least two objects so that they touch one another or one object plunges into the other one. Select objects that you want to combine. Right-click on any of the selected objects and choose one of the operations from the Combine menu. The Combining Objects section explains how these operations work.
Materials
When you add an object to the project, it comes with the default materials. You can apply new materials to an object. The procedure to do this is described in the Applying Materials section.
The program is provided with the material library.
To find out which materials are applied to an object, use the Object Materials tab in the Inspector.
Making Objects Invisible
The Project Tree lets you make an object invisible. This can be helpful if you want an object to disappear from the 2D or 3D view without actually removing it. To find an invisible object in your project, search for it in the Project Tree.
Information Bar
The Information bar is located below the toolbar. It displays details about a selected object which usually includes the dimensions, angle, elevation and the number of triangles. The last parameter indicates how detailed the object is.
More detailed objects take longer to be rendered in the 3D view. This means that while choosing objects for your project, you should consider the level of detail in conjunction with the program performance. The Type & Representation dialog can warn you when an object may be too complicated, and it lets you adjust the object's level of detail.
Some objects display the area in the Information bar. There can be one or two values. The Area is used for flat objects such as a wall, floor or wall panel. This value is what you can calculate by multiplying the Width by Depth on the 2D Plan view (or Width by Height in the 2D Elevation view). Objects with multiple surfaces directed at non-zero angles can have the 2D Area and 3D Area. For example, a terrain pit has five surfaces: the bottom and four sides. In this case, the 2D Area is the area of the bottom. The 3D Area is calculated as the total area of the bottom and all of the sides.