Working with Projects
Exporting the 3D View with Cycles
Cycles is a physically-based rendering engine. It is based on unidirectional path tracing algorithms. This engine can render using CPU and GPU.
The functionality described in this section is available in full scope only in the Pro edition. With the non-Pro edition, you can only render images with lower resolutions.
To start using Cycles, select File > Export > Render with Cycles… in the main menu.
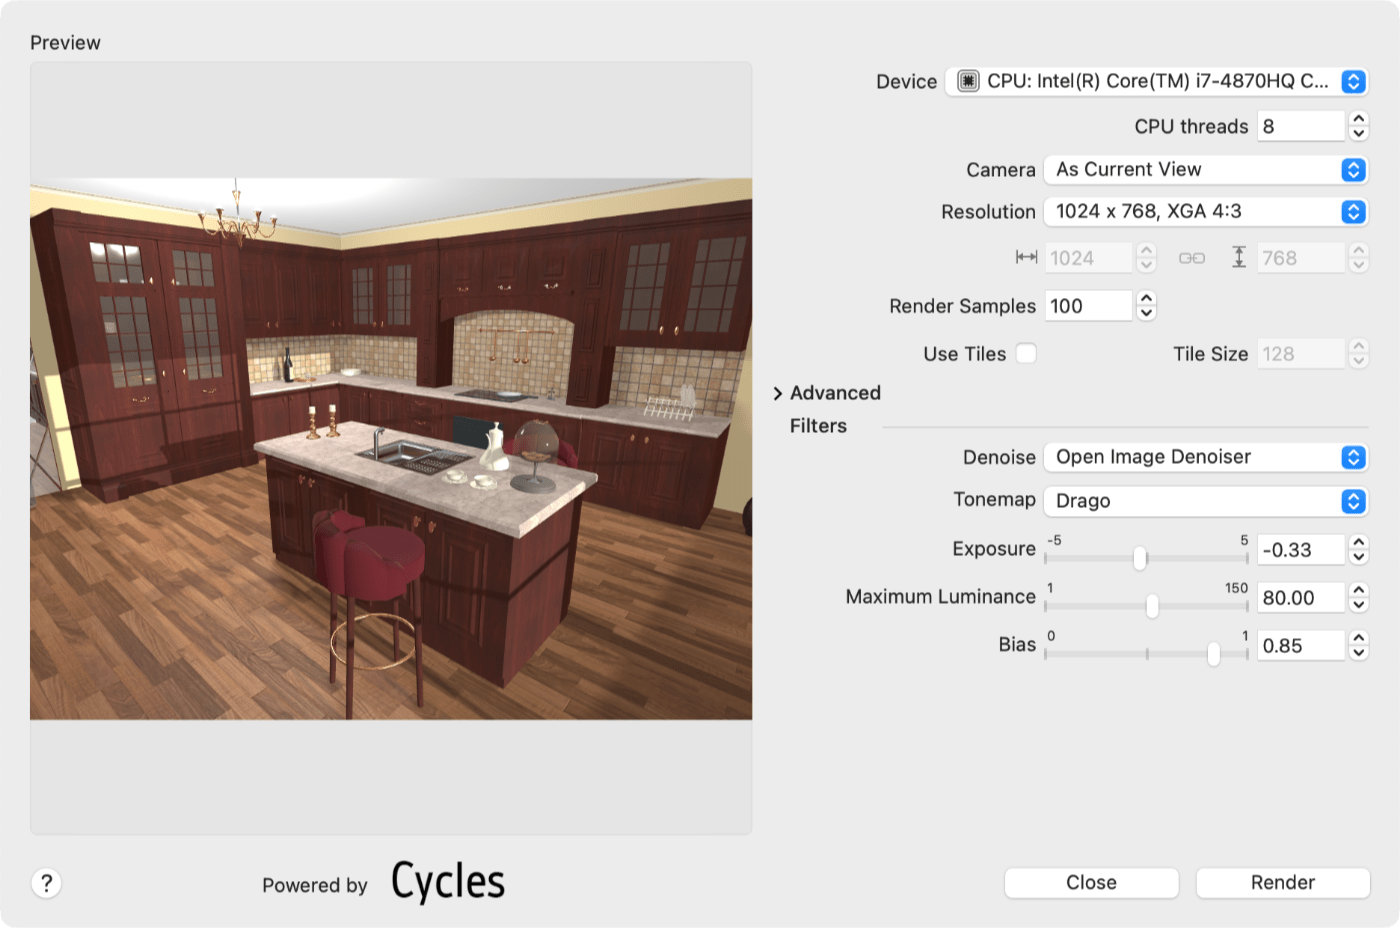
The Render Devices box lists available devices that can be used for rendering, such as CPU or GPU.
The CPU Threads parameter defines the number of CPU threads to be used for CPU renders. The max number of threads is defined by the model of your CPU.
The Camera drop-down list contains all cameras in the current project. Select a camera with a view you would like to be rendered.
The Resolution and Size let you select one of the pre-defined image sizes or input the width and height manually.
Cycles uses the ray tracing technique for light sampling. Rays of light are traced from the camera to the scene with objects, then, after bouncing, to other objects until the light source is reached. Cycles casts a number of ray samples on each pixel of the rendered image. Then the pixel color is calculated as an averaged value. The image is rendered iteratively. A new pixel sample is added with every iteration increasing the image quality and reducing noise. The number of samples can be set using the Render Samples property. A higher value gives you a better image, but this would cost you more time to complete the process.
Rendering images with high resolution may require more memory than what you have available on your computer. In this case, an image can be split into parts (or tiles) to render them separately. Then tiles will be stitched together. To enable tiling, activate the Use Tiles option. With the Tile Size, you can adjust the size of tiles. Tiling images with medium and small sizes is unnecessary.
The Advanced section has extra settings for the rendering engine. To show or hide these settings, tap on the v-shaped icon.
The Filters group of settings is described in the Using Filters section.
The Render button starts the rendering process. Until the process is finished, the button changes its function to Stop Render, allowing you to cancel the task.
The Save button lets you save a rendered image.
Basic Approach to Rendering
The renderer may take quite a bit of time to create an image with average dimensions from the Resolution list and the number of Render Samples near 100. So, to spend your time effectively, it is recommended that you render iteratively. Start from a lower quality image to get quicker results, and make sure that the lighting and everything else in your 3D scene is in order. Then render with high quality settings. Notice that you may need to create multiple intermediate results before you run the final rendering session with the desired quality.
To evaluate your scene quickly, render it with the resolution 1024x768, and with the number of samples 100-150. Rendering will finish in about a minute, and the image will be noisy. But it will give you an idea if anything should be fixed in the 3D scene.
Depending on how quickly you got the first result, you can run the following tests with the same or higher values of the image size and number of samples.
Tweak the Filter settings. It is recommended that you have a denoiser activated. Choose one of the Tonemap filters that gives you the best result (e.g., it allows you to correct parts of the image that may be too dark or too bright).
Once you are satisfied with the result, render an image with the dimensions you need and a high number of samples (600 should be enough in most cases).
Adjust the settings of the selected filter. Then save your image.
Using Filters
The Filters section contains settings that might be familiar to users who have ever taken pictures with a photo camera with manual settings. Basically, they let you change the brightness and contrast of the rendered image using different techniques. Settings in this section let you also decrease the level of noise.
In order to reduce noise, you can activate the denoiser instead of increasing the number of samples even more. As a consequence, you may render an image faster keeping an acceptable noise level. To enable the denoiser, set the Denoise property to any option other than None. Selecting None turns the denoiser off.
Tone mapping enhances images by making visible as many details as possible. In image processing, this technique is used to create High Dynamic Range (HDR) images. You can control tone mapping using the Tonemap drop-down menu. It lets you select one of the tone mapping filters, or you can deactivate this feature by choosing None. Most of the mapping filters have additional settings.
Tone mappers can display the Reset button, which lets you restore the default settings.
Notice that filters are applied to the image after the rendering is finished. You can choose different filters and adjust their properties without re-rendering the image.
Reinhard Devlin
Exposure increases the brightness of the image.
Intensity increases the brightness of the image.
Chromatic Adaptation decreases the image saturation.
Light Adaptation makes bright areas even brighter.
Drago
Exposure increases the brightness of the image.
Maximum Luminance increases the brightness of the image.
Bias increases the image brightness up to some point, then the most bright areas become a bit darker.
Hable (Updated) Filmic
Exposure increases the brightness of the image.
Toe Strength makes dark areas even darker.
Toe Length defines the range of dark colors affected by the Toe Strength parameter.
Shoulder Strength makes bright areas even darker.
Shoulder Length defines the range of bright colors affected by the Shoulder Strength parameter.
Shoulder Angle makes areas with middle brightness darker.
Day Filmic
Exposure increases the brightness of the image.
White Point adjusts the white point (brightest areas in the image).
Black point adjusts the black point (darkest areas in the image).
Toe Strength makes dark areas even darker.
Shoulder Strength makes bright areas even brighter.
Cross-Over Point makes areas with middle brightness darker.
Lottes Filmic
Exposure increases the brightness of the image.
Contrast makes the image more contrast.
Shoulder makes bright areas even darker.
Maximum HDR sets the maximum HDR value.
Input Mid-Level decreases mid-level brightness.
Output Mid-Level increases mid-level brightness.
Uchimura Filmic
Exposure increases the brightness of the image.
Maximum Brightness changes the brightness of the most bright spots.
Contrast makes the image more contrast.
Linear Section Start decreases mid-level brightness.
Linear Section Length defines the range of mid-level colors affected by the Linear Section Start parameter.
Black Tightness Shape makes dark areas even darker.
Black Tightness Offset makes dark areas brighter and desaturated.
Hill ACES
Exposure increases the brightness of the image.
Narkowicz ACES
Exposure increases the brightness of the image.
Advanced Rendering Settings
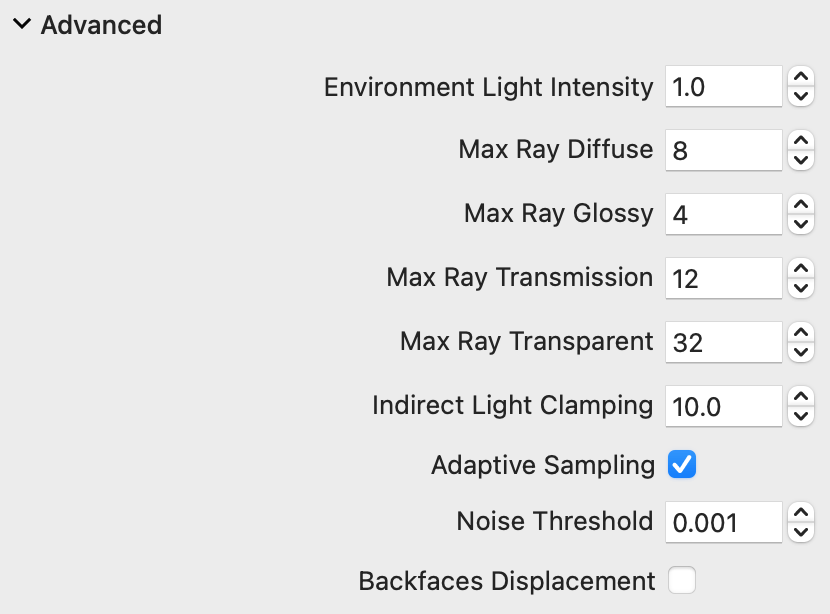
The Environment Light Intensity adjusts the amount of the ambient light (sunlight or moonlight).
The Max Ray Diffuse parameter sets the maximum number of times that a light ray can be bounced off diffuse surfaces.
The Max Ray Glossy parameter sets the maximum number of times that a ray bounces from specular surfaces.
The Max Ray Transmission parameter sets the maximum number of times that a light ray can be refracted. It is designated for clear transparent materials such as glass.
The Max Ray Transparent parameter sets the maximum number of light bounces while passing transparent areas.
The Indirect Light Clamping parameter limits the maximum contribution of a sample from rays which have bounced. It reduces noise at the cost of accuracy. The 0 value disables clamping. Greater values produce brighter images.
Sampling can be either adaptive or fixed. As we have learned earlier, sampling is aimed to reduce noise. Sometimes, the noise level becomes acceptable even before all samples are taken. In this case, further sampling doesn't make any significant improvement, so the rendering can be stopped. In real life, images have regions with different noise levels. In the Adaptive Sampling mode, noisier regions are identified and have more sampling iterations. Sampling stops in areas where the level of noise is below the Noise Threshold value. The Adaptive Sampling mode is recommended in most cases.
For less noise, you need to decrease the Noise Threshold. Setting this parameter to zero is equivalent to using the Fixed Sampling mode which is the same as switching off the Adaptive Sampling.
In the Fixed Sampling mode, the whole image is sampled uniformly. This method can be used with images that have similar levels of noise in all areas. The number of samples in this mode is defined by the Render Samples parameter.
The Backfaces Displacement option lets you avoid depth fighting when the front and back faces appear in the same plane.