Creating Screenshots and Videos
Adding and Adjusting Cameras
Adding and Deleting Cameras
To add a camera to the floor plan, activate the User Camera tool in the Auxiliaries tool set. Then tap on the floor plan.
To add and rotate a camera immediately, touch the floor plan with the User Camera tool activated. Then drag around until the camera is directed the way that you want it. Finally, lift your finger and tap the Done button in the toolbar.
To add a camera when the 3D view is activated, use the Add Camera from 3D Viewpoint button in the Inspector.
To delete a camera, select it on the floor plan or in the Inspector and press the Delete button.
Moving and Rotating Cameras in the 2D Plan View
To move a camera on the floor plan, drag it to a new place.
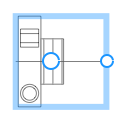
To rotate a camera, drag a handle located on the camera selection frame.
Moving and Rotating Cameras in the 3D View
To move or direct a camera to a certain point, select this camera and then rotate or walk using the Walk Control or gestures. When you are satisfied with the view from the camera, deselect it by tapping on some other object, the ground or the sky.
As long as a camera is activated and changes its position in 3D when you move, the 3D view displays a camera icon in the top right corner.
