Live Home 3D Workspace
The Program Settings
To display the program settings, tap on the Menu button ![]() and select Settings.
and select Settings.
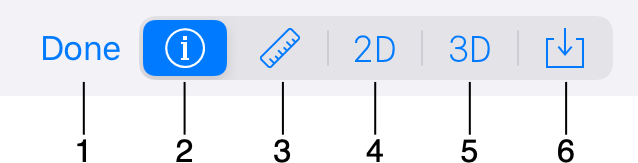
1 - Close the Settings panel and apply the current settings.
2 - The General section displays information about the software. There is also an option to back up and restore the library.
3 - The Project section gathers settings of the current project such as measurement units or story height. This section is explained on a separate page of the documentation.
4 - 2D view settings. That includes options for snapping, guides, and more.
5 - 3D view settings. These settings are responsible for the rendering quality.
6 - Import settings.
General
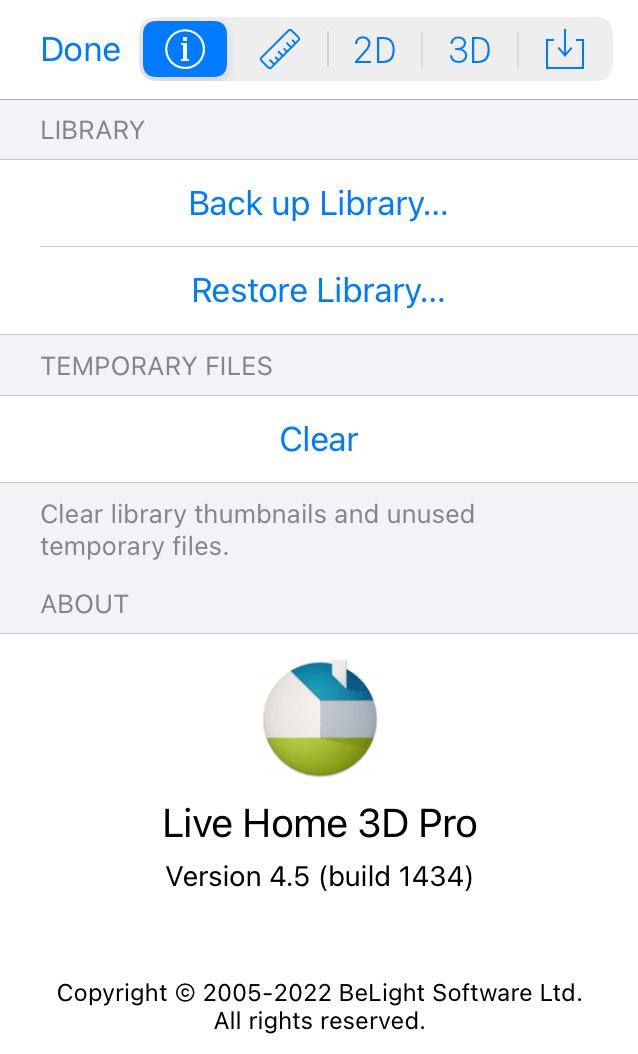
The two options at the top let you back up and restore the material and object libraries.
The Clear button removes unnecessary temporary files and thumbnails of library objects when there is no any open or unsaved document.
The About section indicates the exact name and version of the app. It is useful when you need to contact the developer in case you have difficulties with the software or suggestions on how to improve it.
2D
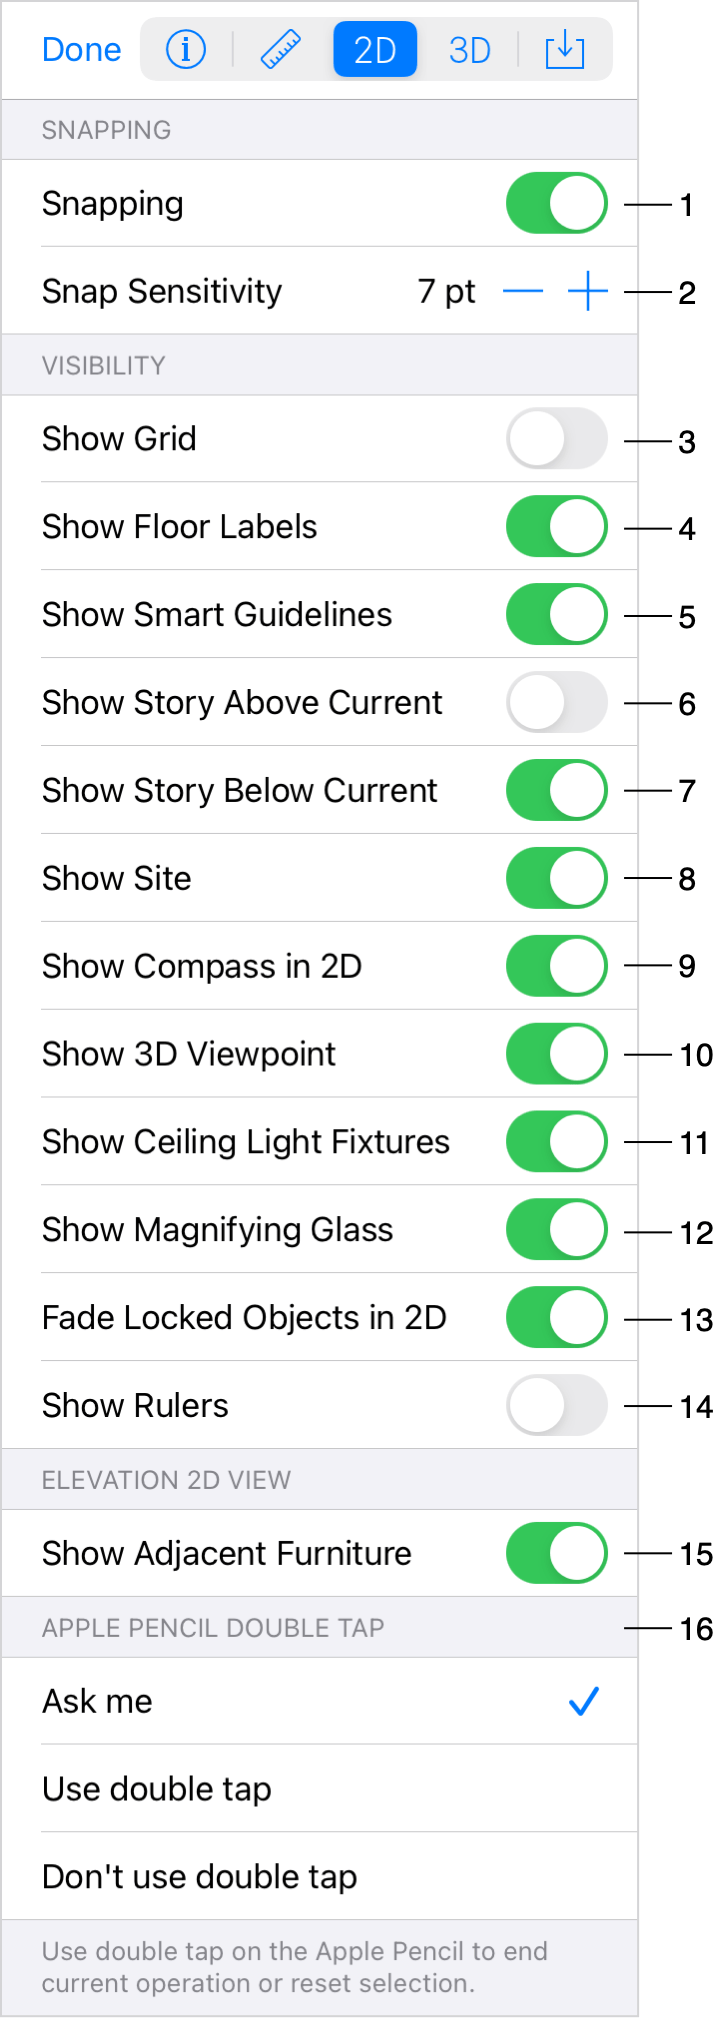
1 – Activate or deactivate snapping. This option concerns the behavior of drawing tools and objects when you move or resize them. When enabled, objects will snap to one another when in close proximity.
2 – Snap Sensitivity defines how close the selected object needs to be to another before the objects snap together.
3 – Show or hide the grid. The program sets up the grid spacings automatically depending on the zoom percentage of the 2D view.
4 – Show or hide floor labels that can display the floor area and some other information.
5 – Activate or deactivate smart guidelines and snapping to them. These guidelines show up temporarily when you move a tool or object near another object in order to help you align them correctly.
6 – Show or hide walls of the story above the current one.
7 – Show or hide walls of the story below the current one.
8 – Show or hide the Site while another story is activated.
9 – Show or hide the compass.
10 – Show or hide the viewpoint. When it is on, the viewpoint is usually displayed as a blue triangle on the floor plan.
11 – Show or hide the ceiling light fixtures. You may need to hide lamps before exporting a top view.
12 – Show or hide the magnifying glass. When you are using a drawing tool (e.g. Straight Wall) with a touch screen, you may not be able to see the exact location of the tool under your finger. The magnifying glass can display this spot at some distance from the finger.
13 – Make locked objects semi-transparent on the floor plan.
14 - Show or hide rulers on the floor plan and in the Elevation view.
15 – Show or hide furniture in the elevation view (Pro edition only).
16 - Select what the app should do upon double-taps with Apple Pencil.
3D
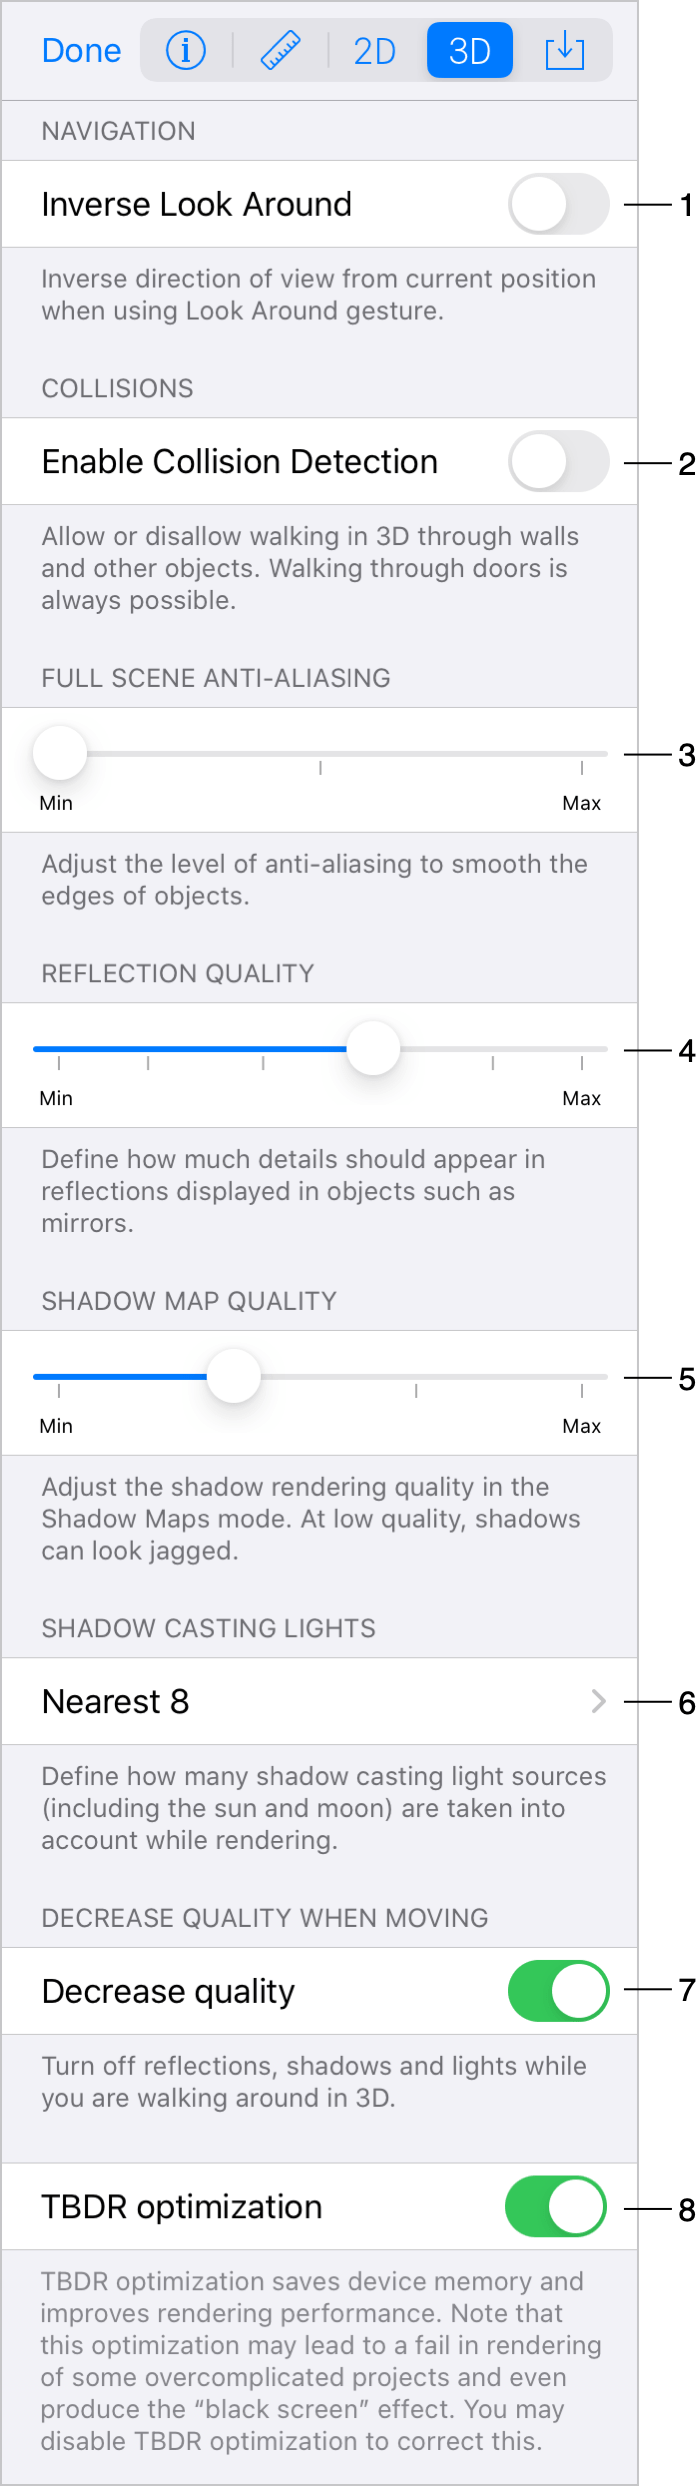
1 – Invert the direction of rotation for the Look Around tool.
2 – Allow or disallow walking through walls and some other objects. When you are editing the project, keep the option off. It is useful to be able to change your position in the 3D view with no obstacles. Turn the option on before recording a video. In this case, you will be able to use staircases to walk up- or downstairs.
3 – Full Scene Anti-Aliasing makes the picture look softer by smoothing the edges of objects. When this option is off, diagonal lines may look jagged.


4 – The Reflection Quality defines the quality of reflections displayed in objects such as mirrors. This parameter affects the resolution of the reflections and also the strength of anti-aliasing. At lower quality, the picture may look more pixelated, but rendering will be faster.
5 – The Shadow Map Quality lets you adjust the rendering quality. At low quality, shadows can look blurred.
6 – Shadow Casting Lights defines how many light sources (including the sun and moon) are taken into account when the program is rendering shadows. At smaller numbers, rendering is faster.
Note that if the quantity of considered light sources is too small, you can get an unrealistic picture because you cannot see shadows that normally exist.
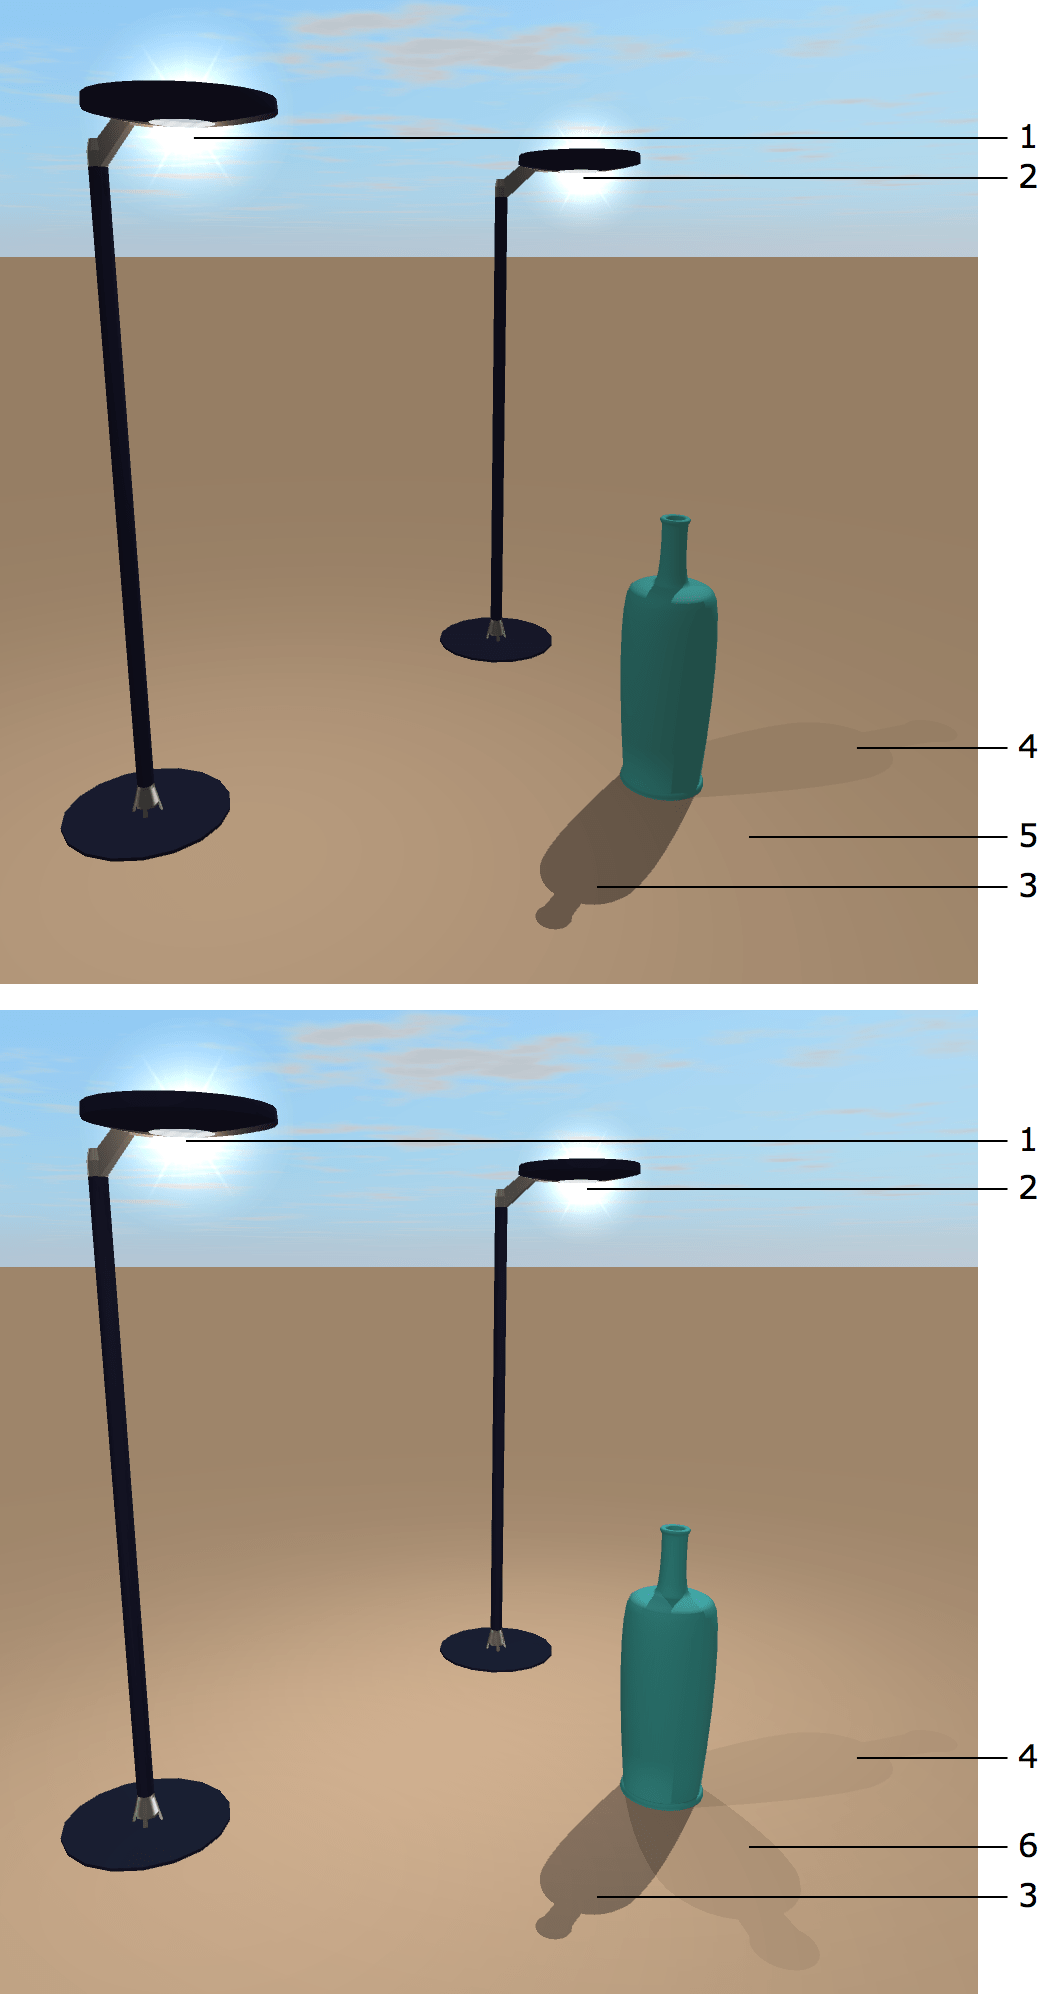
1 – Light source 1
2 – Light source 2
3 – Shadow from the sun
4 – Shadow from the light source 1
5 – No shadow from the light source 2 with Shadow Casting Lights set to Nearest 2
6 – Shadow from the light source 2 with Shadow Casting Lights set to Nearest 4
You can increase the rendering speed by choosing lower values. Limiting the number of objects that can cast shadow can also increase the program performance.
Note that higher values of Full Scene Anti-Aliasing and Reflection Quality settings provide better rendering quality but require higher device performance.
7 – The Decrease Quality option temporarily turns the lighting, shadows and reflections off when you start walking in 3D. As soon as you stop, the app restores the initial quality. This can significantly improve the performance. Activating this option is useful when you are editing your project and want to move quickly from one point to another.
8 - Activate or deactivate the TBDR optimization. With TBDR enabled, most of the work is performed on the GPU. It splits the image into tiles which are rendered separately. For that, the app uses the GPU memory which is very fast. The other advantages of the TBDR are the lower energy consumption and better utilization of the device memory. It is recommended that you have the TBDR option on, especially on mobile devices. On rare occasions, the app's screen may turn black when very complicated geometry of a particular project cannot fit the tile memory. In such a case, turn the TBDR optimization off.
Import
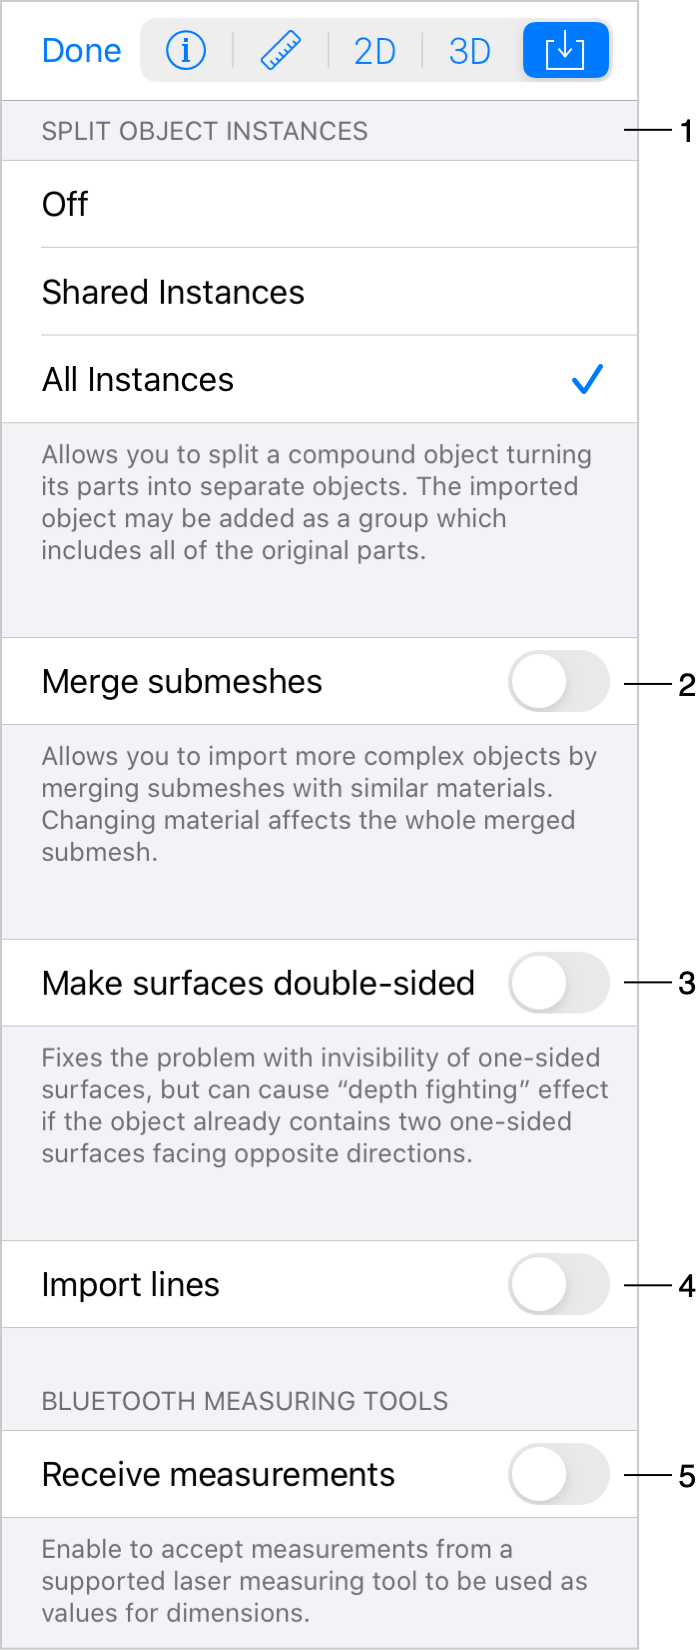
1 – The Split Object Instances option separates parts of an object you import. As a result you get an object that can be ungrouped in the 2D view. Not all objects can be split in this way. More details can be found in the Import Options section.
2 – Merging submeshes, if activated, takes place when you import an object. By merging submeshes, the program can remove excessive details from the object model. More details can be found in the Import Options section.
3 – This option fixes objects with surfaces created inside out. Without repair, such defective objects appear as having holes or missing parts in the 3D view. Only those objects are affected that were imported when this option is on. Not all objects can be fixed this way. More details can be found in the Import Options section.
4 – When the Import lines option is deactivated, the program ignores lines. Such lines can be created using the Line tool in the SketchUp or other software.
5 - The Receive measurements option enables the possibility to import measurements from an external device via Bluetooth.