The Library of Objects
The Object Library Panel
To open the Library panel when it is hidden, use the View button or the Window > Object Library menu command. Using the View button, you can also detach the panel from the main window.
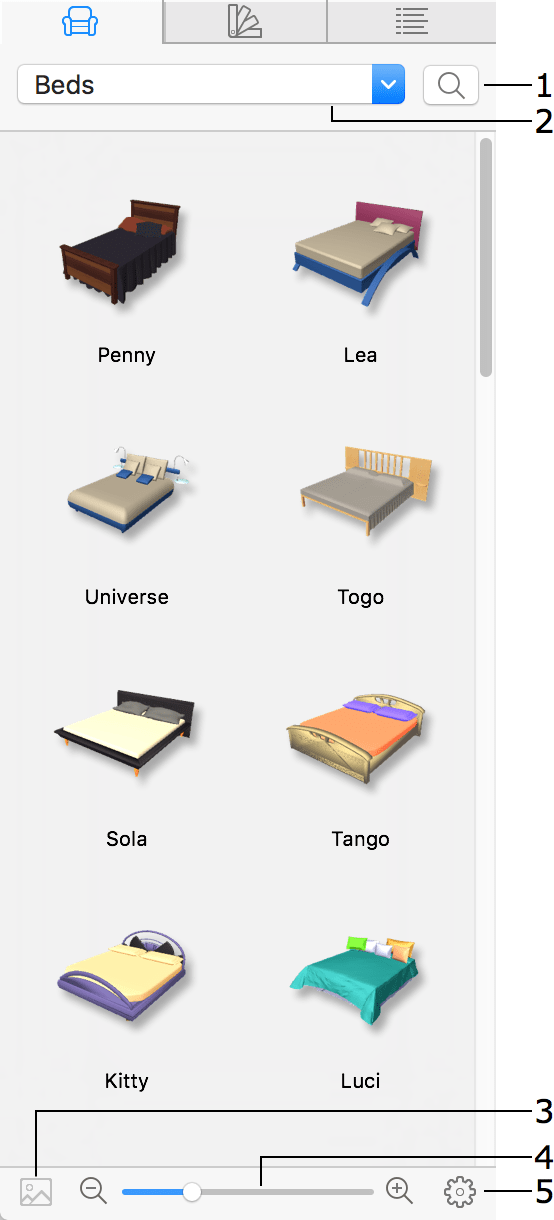
1 – The Search tool. Click on this button to activate the tool. To find an object, type in its name and press the Return key. To deactivate the tool, click on the button again. After closing the search result, you can show it again by choosing the Search Results item at the bottom of the list of object categories.
2 – A drop-down menu with the list of object categories and commands to manage the library.
3 – Click on this button to preview a selected object with the possibility to magnify and rotate it in 3D. To restore the default magnification, double-click on the preview.
4 – You can change the size of object previews in the library.
5 – This button opens the context menu.
Objects in the library are grouped in categories by types. To select a category, use the drop-down menu at the top of the panel. The Favorites category can be used to gather objects you are currently working with. It is empty by default.
The Trimble 3D Warehouse™ item in the list of categories is not a part of the library, but a shortcut to open an online object library in order to find and download 3D objects.
Object's Context Menu
To open the context menu, right-click on an object in the library. A second way is to select an object and click on a gear icon at the bottom of the panel.
The context menu includes these commands:
- Substitute with Selection in Project – replaces an object selected in the library with an object selected in the project.
- Substitute Selection in Project – replaces an object selected in the project with an object selected in the library.
- Item Info – displays details of an object selected in the library. This dialog is described in the Object Information in the Library section.
- Show 3D Preview – opens object's preview.
- Add to Favorites – adds an object's copy to the Favorites category.
- Export Library Archive – exports selected object(s).
- Import Library Archive – imports objects from a package created by the Export command.
- Cut – removes a selected object and places its copy to the Clipboard.
- Copy – copies a selected object to the Clipboard.
- Paste – pastes an object from the Clipboard into the open category.
- Delete – deletes a selected object.
- Select All – selects all objects in the current category.
- Undo and Redo – cancels or redos the last operation you performed in the object library.
Customizing the Object Library
You can use the New Category…, New Subcategory… and Delete Current Category commands from the drop-down menu to add and remove object categories. The standard categories cannot be removed.
The commands from the object's context menu let you work with individual objects. Using the Cut, Copy and Paste commands, you can duplicate objects or move them from one category to another. The Delete command can remove the user's objects. Any standard object cannot be deleted or moved to another category.
To change the order of objects within a particular category, drag objects from one position to another. You can reorder objects only in custom categories.
Adding New Objects to the Library
Objects imported into your project can be stored in the library. To add an object from your project to the library:
- Open a category in the library where you would like the object to be stored. It is recommended that you add new objects to a custom category.
- Right-click on the object and choose Copy in the context menu.
- Right-click on the library and choose Paste.
- The Item Info dialog will appear. Type the object name into the Title box.
The Description and Keywords fields can be left blank. If you plan to add a great number of objects to the library, enter some information into these boxes. This will simplify finding the required object later. Keywords should be separated by spaces.
If necessary, change the 2D thumbnail. - Click OK.
An alternative way to add an object to the Library is to use the Add to Library command from the object's context menu. By default, the object will be added to the opened category. If the Library displays something other than the object library (e.g., Project Tree), the object will be added to the Favorites category.
You can open the Item Info dialog at any time by double-clicking on the object in the library.
Updating an Object in the Library
After editing an object in your project, or after applying new materials to it, you may want to replace the old object in the library with its new version. In fact, you can replace an object with an absolutely different one. The standard objects cannot be updated in this way.
To replace an object in the library with an object in the project, select the object in your project. Then right-click on the object in the library and choose Substitute with Selection in Project from the context menu.
Exporting and Importing User's Objects
One or multiple objects, that you added to the library, can be exported as a *.lhzl file. This file can be imported on the same or another computer in order to add items, that are inside it, to the library.
To export, select one or multiple objects in the library. Then bring up the context menu and choose Export Library Archive.
You cannot export objects of the standard or any additional library.
To import, open the context menu and choose Import Library Archive. After that, select a *.lhzl file.
Imported objects will be added to a category with the same name as one in which those objects were originally located. The respective category will be created automatically if it is not present in your library.