Working with Objects
Walls
Walls are the basis of your project. You usually begin creating a floor plan by drawing external and then internal walls.
The app can create three wall types: Story Wall, Curtain Wall and Loft Wall. The Story Wall is a general type. This section of the documentation is dedicated to Story Walls. Most of this information is also applicable to Loft Walls. To verify or change the wall type, use the Object Properties tab of the Inspector. Walls of different types cannot join.
Operations common for all object types are discussed in the Basics section. This includes:
The Properties of Objects in 2D section explains how to apply a stroke, fill or pattern to an object using the 2D Properties tab of the Inspector.
The Applying Materials section explains how to apply materials to objects.
Wall Segments
A wall segment is a straight piece of a wall that is limited by two end points. A selected wall displays two handles at its ends. You can drag one to change the wall length or direction. One side of the selected wall can be highlighted by the green color: this is the side you tapped on. Tap the other side to move the highlighting there. This lets you distinguish the wall sides while you are using tools in the Inspector.

1 – Individual wall segment.
2–5 – Wall segments joined together.
3 and 4 – These were parts of a single segment that had been divided into two parts by joining the wall segment 5.
6 – Handles of the wall segment 5.
7 – The highlighted side of the wall segment 5.
If you add a wall segment that crosses another one (“X” intersection), both segments will split into two smaller segments. A segment will also split into two smaller ones if you join a new segment to the middle of the first one (“T” intersection). Joined wall segments can create corners.
The app can merge two segments of a straight wall into one when you remove the wall that crosses and splits it.
The word “wall” is used in this documentation both for a single wall segment and for a wall consisting of multiple wall segments when the number of segments does not matter.
When you are creating a room, wall segments should join in order to form a closed shape. The joint may break when you resize, move or add new wall segments. Places where segments are joined incorrectly are marked by red circles on the floor plan. You should move a segment aside and then return it back to restore the connection. If this doesn’t help, delete the affected segments and add them again. For more details, see Troubleshooting.

Adding and Removing Walls
To activate a tool for adding walls, tap the plus button in the toolbar and open the Building tool set in the tools panel.
To add a single wall segment:
- Activate the Straight Wall tool.

- Touch the floor plan and drag to start drawing.
- Lift your finger to specify the end of the wall.
To add an arc wall segment:
- Activate the Arc Wall tool.

- Touch the floor plan and drag to start drawing.
- Lift your finger to specify the end of the wall.
- Move the arrow in the middle of the wall to bend it in one direction or another.
Note that an arc wall will consist of multiple straight segments. Curved walls are not supported.
To add a rectangular room:
- Activate the Room tool.

- Touch the floor plan and drag to the side to specify the position of a corner of the room.
- Lift your finger at the point where the opposite corner should be located.
When you draw an adjoining room using the Room tool, make one of its walls overlap with a wall of another room exactly. The app will automatically create a single partitioning wall at the overlapping area.

To draw a room with any shape:
- Activate the Straight Wall tool. Then select this tool again. After the second tap, the tool will remain activated permanently, and you will be able to draw multiple wall segments.
- Touch the floor plan and drag to start drawing.
- Lift your finger to specify the end of the wall.
- Add another wall segment starting it at the end of the previous one. Add as many segments as needed to complete the room.
- Tap the Complete button in the toolbar to deactivate the Straight Wall tool.
When you draw, the app can snap the tool in order to help you align the wall with other objects, or to draw in a certain direction (e.g. horizontal or vertical).
To stop drawing an unfinished wall segment, tap the Complete and then the Undo button.
To remove a wall, select it and tap the Delete button in the toolbar.
Selecting Walls
To select the whole room on the floor plan, tap on any wall of this room.
To select a specific wall segment of a room, you may need to tap on that wall three times. The first tap will select the whole room. The second tap will bring up the context menu of the room. The third tap on the same wall will select this wall.
Tapping on a separate wall segment selects it immediately. If any wall segment is already selected, tapping on another wall will select that wall.
Long-press on a wall that is a part of a room selects that wall and immediately shows its context menu.
All walls in your project are listed in the Project Tree. You can use this list to select walls individually, or all of them together.
Moving Walls
You can move a wall by dragging the middle of the wall or one of its ends on the floor plan. We are going to see what happens when you move a stand-alone wall segment, and a wall joined with other walls.
If you grab and move the middle of a stand-alone wall, you can relocate it as you do with other individual objects. The angle and length of the wall will not change.
By moving a wall end that is not joined with other walls, you can rotate the wall around its opposite end, which will retain its position. The length of the wall can also be changed in this way.
When you move a wall, which is a part of a room, the adjoined walls can change their length. The walls will remain connected.
If you select a single wall with both ends connected to other walls, and move one of the ends aside, you will break the link between walls.
If you select and drag the whole room, all of its walls will move together without changing the size or angle. Note that you should not grab a wall but the floor.
Parameters of Walls
Most of the parameters of walls are located in the Inspector where you can change the geometric properties, or set up how the object looks on the floor plan or in the 3D view.
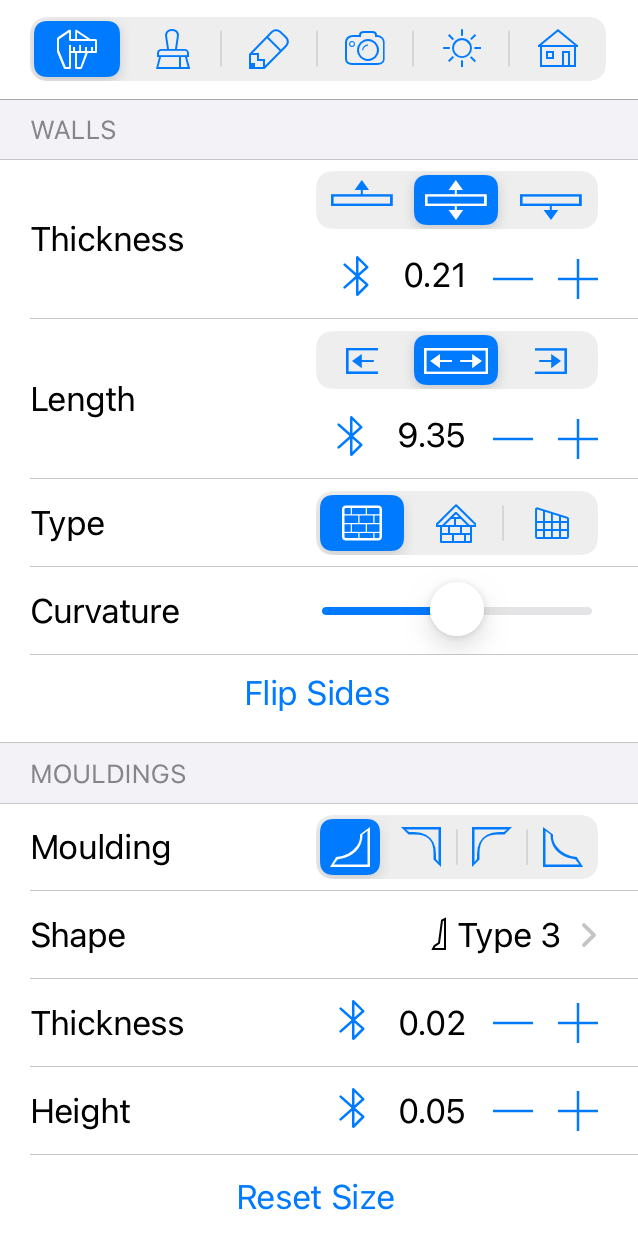
The geometric properties of walls can be found in the Object Properties tab of the Inspector. You can also choose the shape and size of the wall bases and wall crowns in the Mouldings section.
To set up the thickness of a wall, use the Thickness tool. The three buttons let you choose whether the internal, external, or both wall sides should move when you change the thickness.
The length of a stand-alone wall is the distance between its ends. When a wall is a part of a room, the app measures its length from inside of the room. To adjust the wall length, you can drag one of its ends on the floor plan. You can also input the exact length in the Inspector. The three buttons near the Length field determine whether one or both ends of the wall can move when you change the length.
The Type parameter lets you choose the wall type. Use the Story Wall type for standard walls. Use the Loft Wall type for walls in a loft. The Curtain Wall type is used when you need to customize the height of a wall.
The Curvature parameter lets you change the curvature of an arc wall. It also can turn a straight wall into an arc wall. The Segmentation parameter adjusts the number of segments used to create an arc wall.
The Mouldings section of the Inspector allows you to set up the base and the crown on both sides of the wall. The four Moulding buttons at the top of the section select which moulding you are going to edit: a base or a crown, on one wall side or the other. All tools below apply to the selected moulding.
If one of the wall sides is highlighted in green on the floor plan, the buttons that belong to this side are marked with green as well. This is how you can see which button corresponds to which side of the wall.
Base and crown have identical settings. The Shape parameter lets you choose one of the templates. If no base or crown is needed, choose None. You can set up the thickness and height below. The Reset Size button restores the default settings.
The Flip Sides button swaps moulding settings and materials on the wall sides.
Each wall has two bases and two crowns as sub-items in the Project Tree.
You can apply different materials to each of the crowns, bases and wall sides.
Managing the Wall Height
Story Walls
The height of a Story Wall is equal to the story height which is set in the Building Properties tab of the Inspector. In other words, a Story Wall takes the full height from the floor to the ceiling.
Loft Walls
The height of a Loft Wall is limited by the roof located on the same story above the wall. When a roof is sloped, the top of the wall has different heights at different points just to reach the sloped ceiling. If there is no roof, the height of a Loft Wall is equal to the story height.
Curtain Walls
The Curtain Wall is the only wall type that allows you to customize its height directly. You can do this using the Object Properties tab in the Inspector.
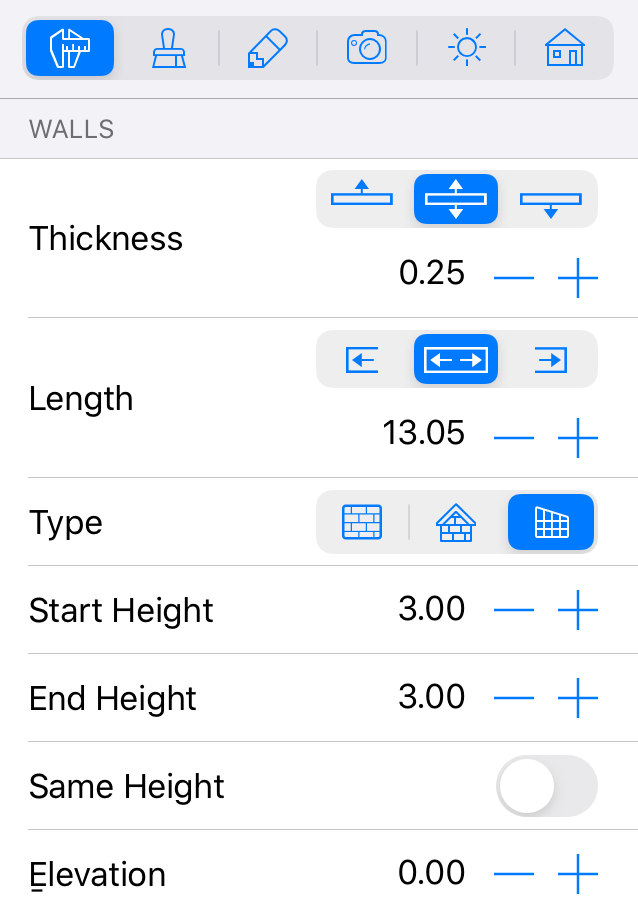
In addition to properties available for the other wall types, Curtain Walls have the Start Height, End Height and Elevation.
By using the Start Height and End Height, you can set the wall height at its ends. These parameters can be set to different values. The Same Height option forces the Start Height and End Height to be equal.
The Elevation property defines how high the bottom of a wall is located above the floor level.
Unlike other wall types, you can add Curtain Walls on the Site level. This can be used to create fences or other wall-like outdoor structures.
Elevation View
The 2D Elevation view allows you to add and edit the shape of openings, wall panels and niches. To display a particular wall in the Elevation view, select this wall in the 3D view or on the floor plan, and then open the 2D Elevation view. This feature is only available in the Pro edition.