Working with Projects
Cloud AI Rendering
Cloud AI rendering lets you submit your 3D scene to a specialized server, which processes it using AI and returns a high-quality image rendered in a specific visual style. Unlike local renderers such as Cycles, cloud AI rendering does not require a powerful GPU on your machine.
To open the AI rendering dialog, choose File > Export > Render with AI… in the main menu.
Rendering requires an active Live Home 3D account. Render credits are tied to your account and shared across all platforms — credits purchased on Mac are available on iOS, Windows and Android, and vice versa. Credits are consumed per render job and can be purchased from within the app.
The AI Rendering Dialog
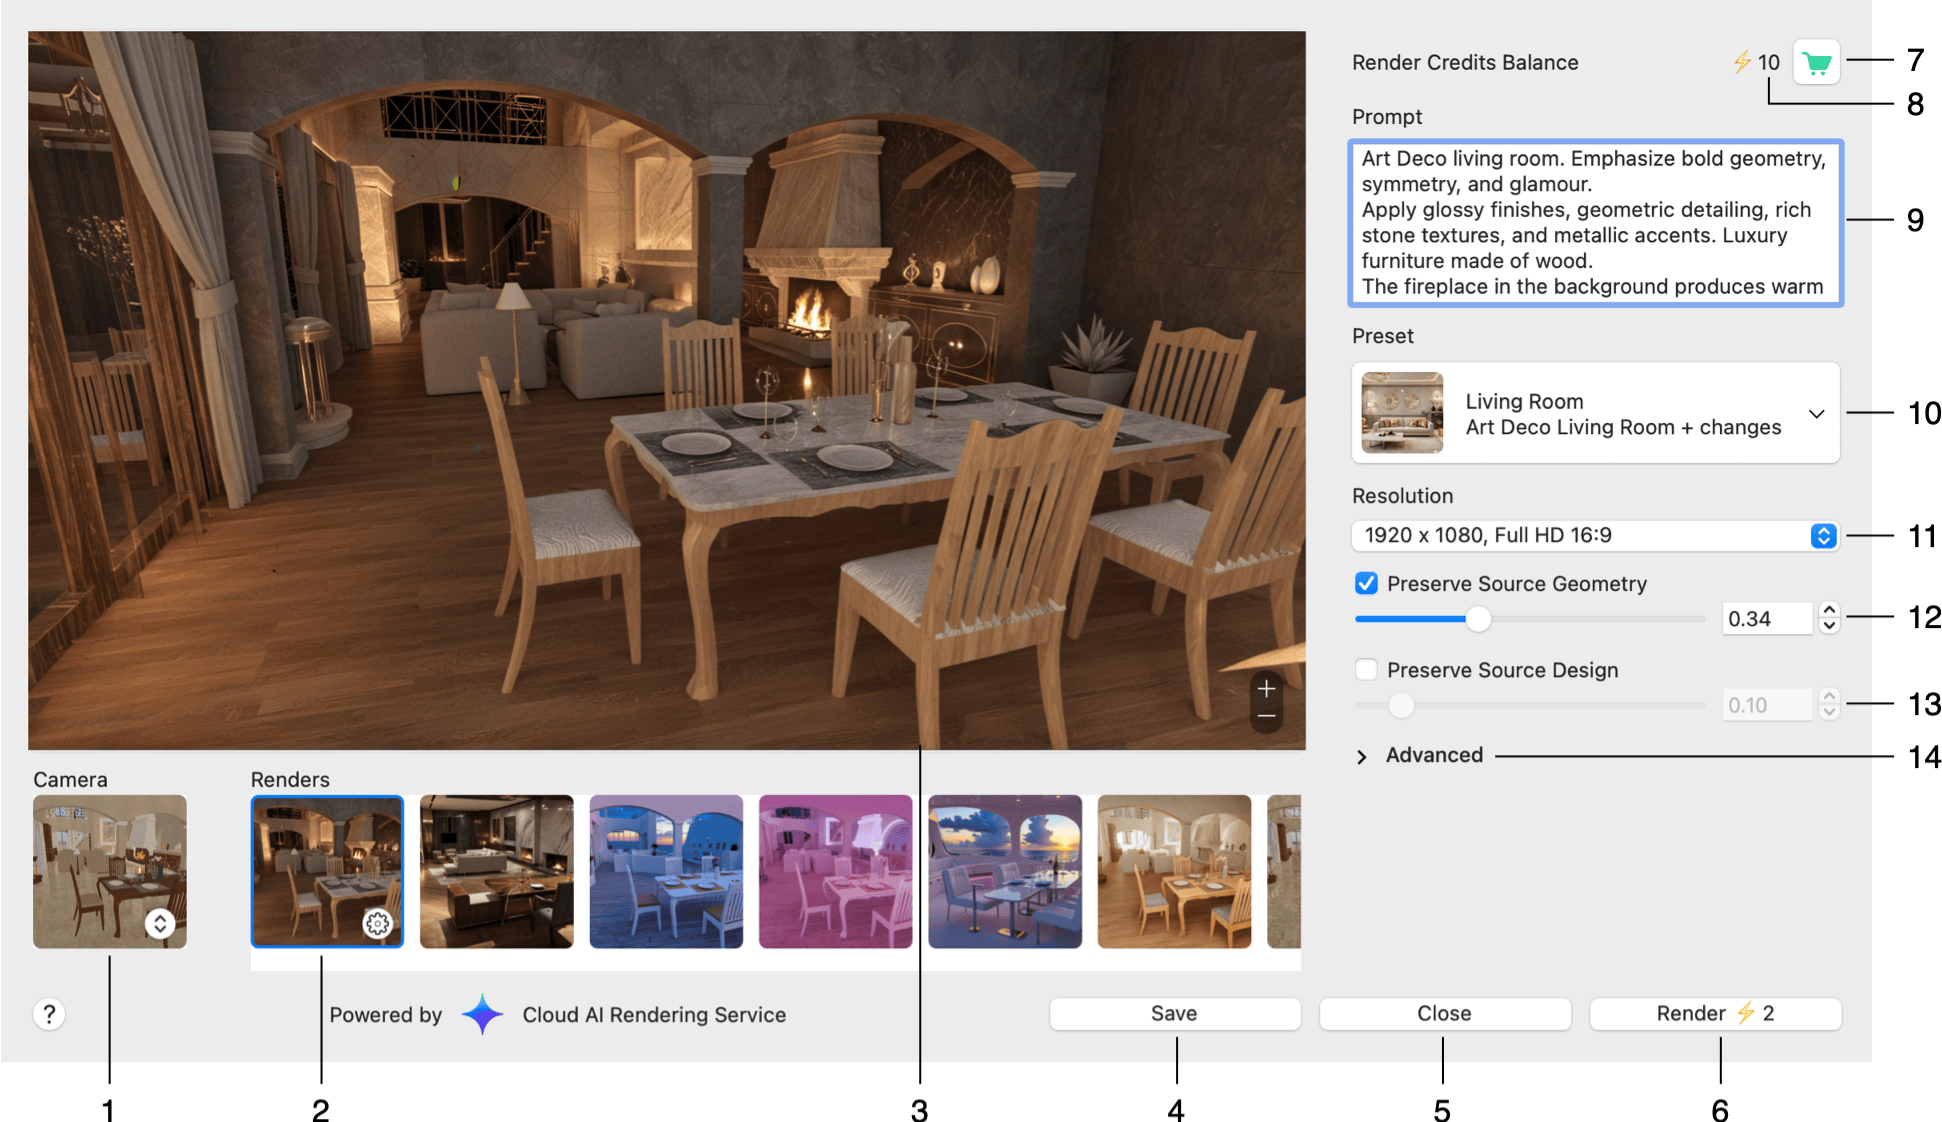
1 – A view from the selected camera. To preview the camera view, click its thumbnail. The renderer uses the view from the selected camera as the input image. The button with arrows opens a list of all of the cameras in the project.
2 – A thumbnail of one of the rendered images. The results of rendering appear as thumbnails in the Renders list. By clicking on a thumbnail, you can preview the respective image and access the rendering result’s menu.
3 – The preview of a rendering result or camera view.
4 – The Save button exports the current result to a file. It is displayed only when a render result is selected.
5 – The Close button closes the dialog.
6 – The Render button submits the scene to the server. The cost of the job, in render credits, is displayed on the button.
7 – Open the Store to purchase more render credits.
8 – The number of render credits remaining in your account.
9 – The Prompt field is used to type a detailed description of what you expect to see in the generated image.
10 – The Preset button displays the currently selected preset, its category and its name. Click the button to open the preset library and select another preset. A preset defines the overall look of the output image. You can choose one of the predefined presets or one of your own.
11 – The Resolution drop-down menu lets you choose the output image size. Depending on the resolution, rendering one image costs a particular amount of render credits which is displayed on the Render button.
12 – Select Preserve Source Geometry to preserve the original shapes and layout of objects in the scene. The slider adjusts how closely the generated image follows the original scene. With higher values, the generated image looks more similar to the input image.
13 – Select Preserve Source Design to preserve the visual style of the original scene, including colors and the overall design. The slider adjusts how closely the generated image follows the original scene. With higher values, the generated image looks more similar to the input image.
14 – Open the Advanced settings.
Advanced Settings
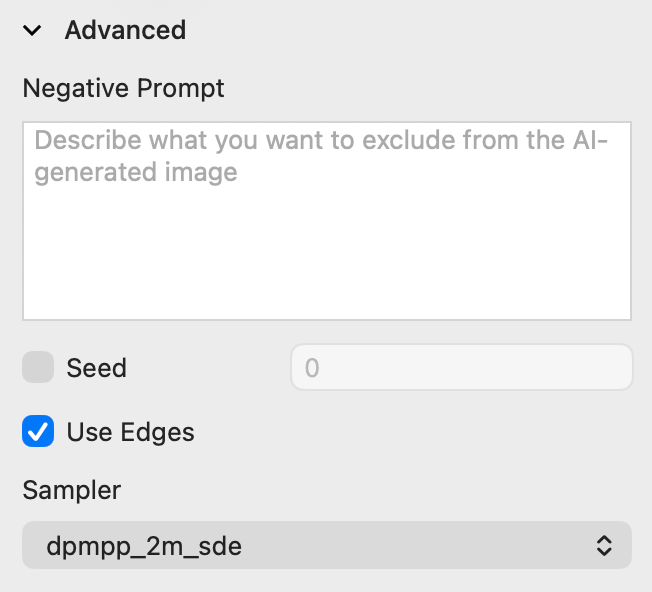
Negative Prompt – describe what you want to exclude from the generated image.
Seed – use a random or a fixed seed number to control image reproducibility. Select the check box and enter a number in the field next to it. With identical settings, the same seed always produces the same image.
Use Edges – use the edges of objects to improve accuracy and preserve scene details.
Sampler – select the sampler method.
Viewing and Saving the Result
When rendering is complete, the result appears in the preview area, and its thumbnail is added to the Renders list below. Click a thumbnail to display that result in the preview area. Use the zoom buttons in the lower right corner of the preview area to inspect the details of the image.
To render the same scene again with different settings or a different preset, adjust the options and click Render again. Previous results are not replaced. Each new image is added to the Renders list.
A selected thumbnail has a gear icon. Clicking on it opens a menu with these commands:
- Create Preset… – saves the settings of the selected result as your own preset, so that you can reuse them later.
- Delete – removes the selected result from the list.
- Delete All – removes all the results from the list.
- Copy Image – copies the rendered image to the clipboard.
- Save… – exports the rendered image to a file.
- Copy Settings – uses the settings of the selected result as the settings for the next render job.
Render Credits
Render credits are purchased in the in-app store and consumed per render job. Unused credits do not expire. Because credits are stored in your account, they are available on all platforms automatically — there is no need to transfer or re-purchase them.